
Astronomy Projects for Beginners
So, you've got your telescope and have an idea of what you want to look at, but, once you've seen that object, very soon you'll be wondering what else you can do
that will provide worthwhile and fulfilling telescopic activity. Astronomy is a brilliant obsession to get into that surprises and delights for years
and years. The projects you can undertake with the telescopes I recommend in these pages are many, varied and interesting. One project can take many years
and another be done in a single observation. There is always something going on in the night sky, and something else to look forward to in the future.
Below is a list of interesting and absorbing astronomical projects, listed by subject, that beginners of any age will find easy to observe and will have a good
chance of success following the project. In the night sky there are many objects which inexperienced observers, or even experienced observers, find difficult to locate and I don't want you
starting off searching for a very difficult object and being disappointed. So, I have created this list of objects which will have a good chance of making a successful and enjoyable
observation. If, at first, you don't manage to find the object, don't give up!
USEFUL LINK:
I recommend the FREE Download "Stellarium" planetarium program for these activities - It is invaluable in locating objects.
The Project Headings:
The Moon, Planets and Asteroids
Deep Sky Objects
Double Stars
Conjunctions and Occultations
Man-made Satellites
Variable Stars
Astro-Photography
Each project list starts at the top with the easiest project and ranks them as you go down. The more difficult objects and projects are at the bottom. Although all the objects on these lists are relatively 'easy' objects, some projects can be tricky for a beginner. Give each section's projects a go, in order if possible.
Look down the list to pick an object you'd like to have a go at.
The description of each point suggests projects to be undertaken. These lists apply to all beginners, though older observers will also have their own ideas about
what they want to see! I would respectfully suggest that working through this list would get you off to a better start than trying to see, M97, M1 or Pluto. You have the rest of your life
for that!
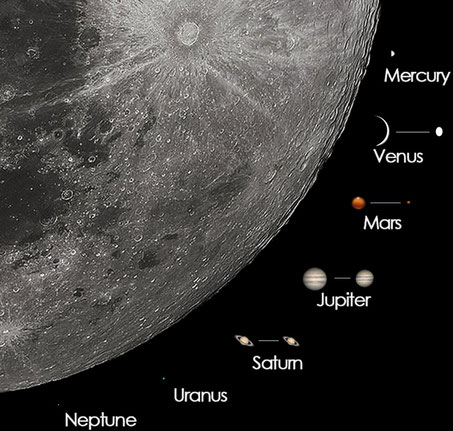
Pic: This illustration shows the comparitive size of planets at their closest and furthest compared to the Moon.
These objects are available for viewing for a period during each year. They are not always available as the Sun apears to move round the celestial ecliptic and objects pass into evening twilight, then behind the Sun and finally emerge from pre-dawn twilight again. Please, use something like 'Stellarium' to see what's available for your current viewing pleasure.
Before You Start on the Projects:
It is wise to learn several of the constellations before you begin trying to find anything else in the night sky. There are several of these that can be used to signpost others. Ursa Major (The Great Bear), Orion (The Hunter), Cygnus (The Swan) and Pegasus (The Winged Horse). Once you know these few, you will be able to find other constellations from their relationship to these 'signpost' constellations and that will be a great help when you look up the location of your target object in the star atlas.
Eg: If you know how to find Orion, you'll find Gemini is above and left, Taurus is above and right and Sirius and the Great Dog is below and left. Other constellations are easily learned using this method as time goes by. There is no rush to learn these and they will come with time.
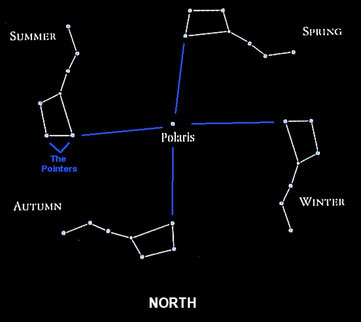
It is also very useful to be able to find polaris, the pole star easily. It is essential when setting up your EQ mounting, for instance. In the Northern hemisphere you will usually be able to see Ursa Major, and one of the others at any time through the year above 40 degrees North. Don't forget: Some constellations are not visible in the night sky for part of the year as they are too close to the Sun to be seen in a dark sky. Stars that are closer to the pole than your northern horizon are visible all year round!
PIC: See illustration to see how to use the Pointers to locate polaris, the Pole Star.
NOTE: If you have a GoTo telescope you will still need to know which star to line it up on - So a knowledge of the night sky is essential, and it's what you're trying to learn, right?
Please, don't skip this step!
The Planet projects below are in order of easiness. Planets that are unobservable because they are too close to the Sun may appear in the list as easy! They are easy, as long as they are in the night sky and this is not always the case!
Allow me to give a quick mention of the 'Star-Hopping' process. Use this method to help you to locate the objects I describe. Especially the ones that are impossible to see without optical aid.
Star Hopping:
The technique used to find faint objects in the night sky.
This is basically a method of finding successively fainter objects until you have the target in view. You start by finding something you can find easily, then gradually work toward the target object using a planned trail of other objects.
Star hopping is useful for unaided eye location of objects as well as when tracking down an object in binoculars or the eyepiece of your telescope. Smooth control of telescopes is essential
when star hopping as it is very easy to lose where you are! Slow motion controls on a good mounting is your best solution to successful star-hopping.
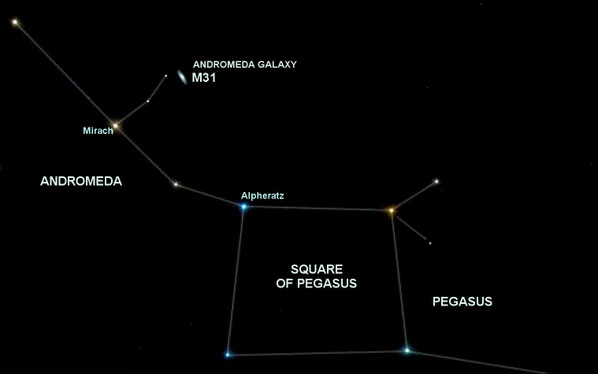
Example: To find the Andromeda Galaxy, M31 (Unaided eye)
1: Find the square of Pegasus (An asterism in the constellation of Pegasus).
2: Locate the top left hand star of the square, the star Alpheratz.
3: Count two fainter stars to the left, to the star Mirach.
4: Count two fainter stars above that one.
5: M31 is close to that star, and can be seen without optical aid!
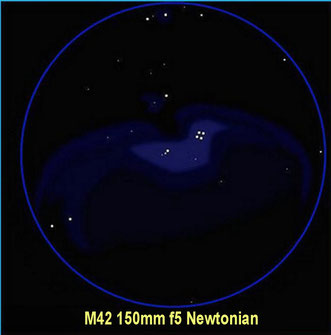
Note: M31 is found in the same low power field of view as that star, even in binoculars or f5 telescope. (See pic).
To find faint objects, such as, the outer planets, asteroids, and variable or double-stars, for example, you do the same thing, but using the view in your telescope to hop from star to star. Telescopic star hopping is usually in a much smaller area than the example above as you have objects in a much smaller field of view to work with. Using this technique, I tracked down the asteroid Pallas the first time I saw it, as described in the Asteroids section of 'My Solar System'.
Note: An 'asterism' is a small group of stars contained within a larger constellation. Some well-known examples are named, and include: Orion's belt (Orion), The Plough / Big Dipper (Ursa Major, the Great Bear), The Hyades and the Pleiades (Taurus), The Teapot (Saggitarius), The Kids (Auriga) and the Square of Pegasus (Pegasus) as mentioned.

Binocular Star Hopping, an Example:
On March 13th 2025, on the 244th anniversary of the discovery of Uranus. I used my 10x50 binoculars to locate and observe the planet.
Pic: This shows the star hopping plan to locate this dim world among the stars.
Uranus Observation Plan:
1: Locate the Pleiades M45, an easy to find asterism in Taurus (A).
2: From there, sweep downwards a few degrees (B1 to B2)
3: Locate the asterism of five fainter stars (C)
4: From the top triangle stars of the small asterism (D), move left to find a pair of starlike objects (E).
5: The lower one was the planet Uranus.
The Astronomical Projects List:
THE SUN, the MOON, the major PLANETS and ASTEROIDS:

THE SUN: Simple Solar Observation Projects
1: The Sun can be tracked as the Earth orbits through the year. The Sun appears to change its position in the sky at noon each day due to the tilt of the Earth's axis at 23.5 degrees from the vertical. You can observe the highest and lowest points in the sky, plus or minus 23.5 degrees above or below the celestial equator. This is most easliy done using a stick in the ground of a certain height and measuring the length of the shadow at midday throughout the year.
2: Observe the rising and setting position of the Sun as it moves along your horizon throughout the year, from one extreme in late December, to the other, in late June. This is done using objects on the horizon to guage the position of the setting Sun.
3: On the 21st of March and 21st September, you can find your exact East (Morning) and West (Evening) directions, by observing the position of the rising and setting Sun.
4: An interesting thing to do is make a pinhole camera to project the Sun. There is no danger at all, and it is quite fun if there is an eclipse!
Pic: You can see the pinhole camera set up - A box, some foil with a pinhole in it, and a projection screen in the box (You can see the Sun on the screen through the viewing aperture).
I don't recommend using a telescope for Solar observation in this website. Read the 'Woe is me' section of My Solar System 'Sun' section for more information and recommendations about Solar observation with a telescope.
THE MOON: You can't miss it! Your telescope will show views ranging from full disc to close-ups of the large craters!
The Moon goes through its complete phase cycle each month and is available for viewing for about three weeks of each cycle. (About 21 days out of the 29 day orbit). Also the Moon can get approximately 5 degrees higher or lower than the Sun in the sky as the orbit is not exactly along the ecliptic. It can be as far as 29.5 degrees North, or South, of the celestial equator, whereas, the Sun can only be a maximum of 23.5 degrees north or South (The tilt of the Earth).
1: Observe craters close to the shadow line (terminator). Watch the sunlight and shadows change over just a few minutes!
2: Try to spot small craters to test the telescope and your vision. (You will need an online Moon map! A good site HERE)
3: Try to learn as many of the Lunar features as you can.
4: Observe the Moon passing in front of a bright star or planet! (This is called a Lunar Occultation, it's quite rare! See section below.)
5: Use your telescope and phone or camera to photograph it! (See my guide "Moon Photography")
6: Observe a lunar eclipse when the Moon moves into the Earth's shadow as it moves through its orbit.
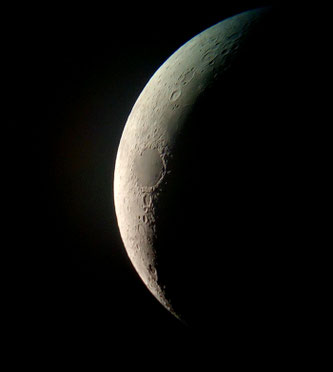
PIC: A simple, though effective, mobile phone shot through the eyepiece of my SkyWatcher 150 Classic Dob.
JUPITER: Easy to find: Plenty of detail and the entertaining moons. A nice bright 'star' in the sky. You'll
find that the planets don't twinkle.
This planet is observable for about nine months of the year, and moves about 33 degrees around the ecliptic each year. The four Galilean moons can be seen in ANY instrument!
1: Observe the four 'Galilean moons', Io, Europa, Ganymede, and Callisto. Watch them night after night, and see if you can work out which is which and their orbit periods.
2: See how much detail you can see on the planet.
3: Observe the moons passing behind Jupiter (This is quite often, Jupiter only has a 3 degree tilt, so, the moons all string out in a line.)
4: Try to observe the Great Red Spot (Good luck!) This feature was very dark brown when discovered in the 17thC. Today,
it is much paler.
5: Jupiter moves about twenty degrees during its observable apparition. Plot this movement on a chart and observe the retrograde loop. Jupiter moves quite quickly at times, nearly three degrees a month, amongst the background stars.
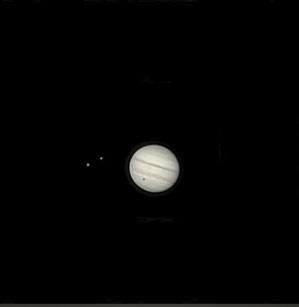
PIC: Gareth Jackson's image of Jupiter with the shadow of Ganymede on the disc of the planet.
VENUS: Amazingly bright, watch the phase and size change over time. Spends a lot of time too close to the Sun to be seen.
This planet is observable for about eight months of the year. There are morning and evening apparitions of Venus.
1: Observe the phase of Venus. (Don't give up - It starts off very small and almost circular, but grows to a large crescent as time goes by!)
2: See how long you can follow it evening after evening. We start off in the twilight and mover farther from the sun day by day, then back
in!
3: Try to observe Venus in the morning sky a month or so after you lose it in the evening. It will start off a big crescent and
grow smaller.
4: Try to pick Venus up in the daylight sky when it is furthest from the Sun.
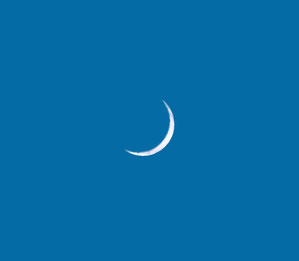
PIC: My mobile phone image of Venus through the eyepiece of my SkyWatcher 200P f5 Newtonian.
BE VERY CAREFUL NOT TO LOOK AT THE SUN WITH YOUR TELESCOPE.
SATURN: Easy to find when it's in a dark sky: Not quite as bright as Jupiter, but very obvious. There are the rings to see and moons to locate too.
This planet is observable for about nine months of the year, and moves about 13 degrees around the ecliptic each year. As much as a degree a month.
1: Observe the superb rings.
2: Estimate the tilt of the rings as currently seen.
3: Can you determine the orbital period for Titan, the brightest Saturnian moon? Titan is obvious and also bigger than the planet Mercury!
4: Locate other moons of Saturn, there are 4 or 5 in our 70 - 90mm telescopes! (Not as easy as Jupiter's moons though, Saturn has a 29 degree tilt! - Use Stellarium)
5: See if you can see any detail on the planet disc. Dusky bands can be seen at times by small instruments.
In 1933 Will Hay (a stage and screen comedian) observed a white spot with an amateur sized instrument.
6: Can you see the Cassini division? This is an area between rings A and B which is swept clear of ring material and is a clear, dark gap.
7: Observe the rings open and close over a 15 year period. They were 'edge on' (closed) in December 2025 so we are moving toward open rings again now we have moved into 2026. NOW is an excellent place to start! The rings will be 'wide open' in 2040 again. In the meantime, enjoy them getting larger each year.
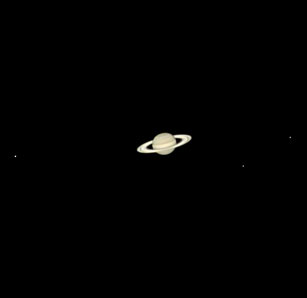
PIC: Gareth Jackson image of Saturn showing all the things described: ie: Bands. Titan, Tethys and Dione, and the Cassini division in the rings
(Click to enlarge).
MARS: Easy to find and is bright at opposition. Has a small disc. Firey red/orange colour. Moves quickly, night to night.
This planet is observable for about nine months, every other year, due to the difference in the orbital period between Earth and Mars.
1: Follow this quick little planet as it moves against the background stars night by night. Carefully plot the track on a printed star map.
Watch out for the retrograde motion against the background stars as Earth catches up and passes the slower moving
Mars.
2: Observe the rapid apparent size change from week to week as Mars approaches and passes opposition.
3: See if you can see any markings on the
disc. Mars is a small world. You'll need 150x and higher to see anything in a 120mm refractor or 150mm Newtonian!
4: If you can see the disc well, then, can you spot the pole cap on Mars? (You'll need a good eye and 175x and more!)
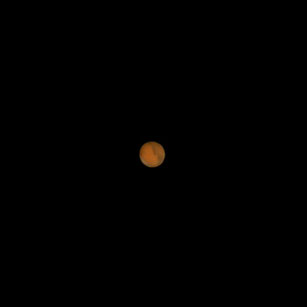
PIC: Gareth Jackson's excellent image of Mars, showing good detail on the disc of the planet using his SkyWatcher 150mm f8 Newtonian.

URANUS and NEPTUNE: Binocular objects - An easy spot when you know their location! These outer planets can be seen as tiny blue points. Follow their star-like discs, week to week.
These distant and dim planets are easily observable in telescopes of any size and 10x50 binoculars, for about nine months of the year, despite their
dimness.
Two planet projects with the same tasks to perform... With different results! Both planets about equally easy to find!
Uranus Magnitude 6 and a pleasant greeny blue, Neptune Magnitude 7 and very, very blue indeed!
1: Locate these dim and distant worlds using the Stellarium program. Their colour is obvious in 10x50 binoculars and telescopes.
2: Follow them week by week, as they move slowly against the background stars, in binoculars or a telescope.
3: Carefully plot the track on a printed star map. Use a pancil to accurately plot the position - You can erase pencil errors.
4: Compare the track length of each planet, after a few weeks or months, to see the difference in observed speed of each planet.
4a: Compare the speed of Mars to these two!
4b: Maths fun! If you can get a figure for how long it takes for a planet to go between two points (Stars?) over a whole year exactly can you use this information
to estimate the total orbital period for the planet? Please, don't try to short-cut this process by just doing a month or so, it won't work! Persevere!
PIC: A SkyWatcher 130P mock-up view of Uranus and Neptune, showing a typical view of the planets.
Fun Fact: This mock-up is not an impossible view! Uranus and Neptune were only about one degree apart in mid October 1993. They are now well separated and will not be that close together in our telescopes again until August 2165... Don't wait up!
These planets are fun to find, if a bit disappointing detail wise. They are beautiful colours and can easily be spotted in 10x50 binoculars. Your telescope will show a blue dot amongst the stars. They look very similar, with Uranus a greeny-blue and Neptune a vibrant, light blue. I've tried my best with the colours on the pic mock-up. (Click to enlarge)
Mercury: If you can find it at 'elongation' (Mercury is nearly always seen in a light sky - Apparition difficulty varies by month.)
Mercury has up to seven apparitions a year (Morning and evening apparitions combined).
1: Locate this ellusive, crepuscular world very soon after the Sun has set or just before sunrise. See if there are any conjunctions that will help you to find it.
2: See if you can observe the half phase of Mercury with your telescope. You'll need 150x
or more magnification for this observation.
3: See if you can detect any planet colour in your telescope.
BE VERY CAREFUL NOT TO LOOK AT THE SUN WITH YOUR TELESCOPE OR BINOCULARS - WAIT UNTIL THE SUN HAS SET TO FIND MERCURY.
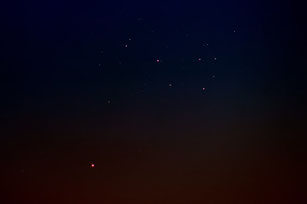
PIC: Gareth Jackson's amazing image of Mercury in a reasonably dark sky near the Pleiades, low down. Note the reddening of all objects!
Note: Mercury is a tricky object - Not 'difficult'. Because it is so close to the Sun, and its orbit is exaggerated to one side, it means that sometimes it isn't that far from the Sun, even at greatest elongation. The angle of the ecliptic also plays a big part and despite being at elongation the planet can still be very low to the twilight horizon and invisible in the bright sky. There is a good reason that Mercury is at the bottom of the 'easy list'... It is very much the hardest to locate! In the UK, elongations in late winter and early spring are the best chance to observe in the evening (Late summer and early autumn, in the mornings). There is a window of about nine days (five days at most other elongations) when you have a chance. Mercury orbits the Sun in 88 days, so, there are up to seven elongations (am and pm) in any one year. Mercury only gets up to 28° from the Sun max!
The ASTEROIDS: An interesting project. You will need something like Stellarium to locate these objects.
Use the 'search' facility in the Stellarium program, or whatever planetarium program you use, to find the asteroids among the stars. Use star hopping to locate them
in your scope. Unless you have a GoTo telescope! (Star hopping explained at top) This is one area where the
GoTo telescope comes into its own.
Each minor planet is observable for about nine months of the year, despite their dimness. There are always several around to see.
1: Using Stellarium look up the positions of the four brightest asteroids and, using a wide angle telescope / low magnification, locate each object.
2: Plot their motion on a printed star chart from night to night - week to week. Sometimes it is possible to spot their movement over just a few hours, if they are close to a couple of stars.
There is not much else to do with these intriguing bodies but spot them and track them! None of them is large enough to show a disc in our telescopes and some colour estimation may be possible but by no means obvious.
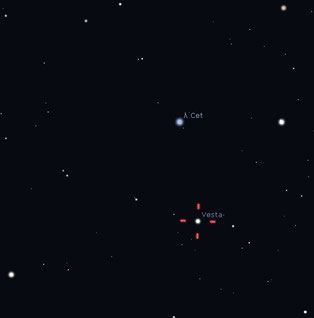
PIC: Stellarium screenshot of the position of Vesta.
The asteroids that you will be able to locate with Stellarium and observe with a small to medium telescope are:
Name Magnitude
Ceres 6.9
Pallas 8.1
Vesta 8.4
Juno 9.7
Deep Sky Objects:
To locate many DSOs you will need to use some form of star atlas or a computer program such as 'Stellarium' (Download PC version free HERE - There is also an APP for your mobile
phone.)
The first four DSOs on my list can be spotted without a telescope!
Deep Sky Objects don't change much in our lifetimes, but there are still interesting projects you can undertake:
1: Locate each object in the Messier catalogue (Keep a list or tick chart of your progress - DON'T try to do them in order - M1 is one of the hardest to find!).
2: Make a drawing of each object.
2a: When you have more experience draw it again and see how your abilities to pick out detail have improved.
2b: If ever you get a bigger telescope, draw them again and see how much better the view is!
3: Find other DSOs in the NGC, Caldwell, Cambridge, Bayer, and Herschel
catalogues. ('Messier' objects are all NGC objects, but not vice-versa!)
Here is the suggested list of DSOs in order of ease of finding:
These first four are about equal in difficulty and bright enough to be visible by eye without optical aid! Any size binoculars will show these objects better and give a wonderful wide-field view. Arguably better in wide field binoculars, you can also spot all these DSOs in a medium focal ratio, f5 - f8 refractor telescope of 70mm diameter plus, or especially an f4 - f6 parabolic Newtonian of 100mm diameter plus. Larger telescopes of any kind from f5 to f6 will show even more detail in these objects. Higher f number telescopes will not show DSOs as clearly or as easily.
Unaided Eye DSOs: These four can be spotted without optical aid, but are great to explore in binoculars or telescopes!
M42 'The Great Nebula in Orion': Bright nebula with faint wisps and the beautiful Trapezium stars to resolve with your telescope. (Orion)
M45 'The Pleiades': An open cluster of young blue stars. The light from this cluster started out to Earth when Galileo was alive! (Taurus)
Caldwell 41 'The Hyades': A loose V shaped cluster running down from Aldebaran, a 1st magnitude red giant star in Taurus. (Taurus)
M31 'The Andromeda Galaxy': This elliptical smudge is another galaxy 2.2 million light years away from our galaxy! (Andromeda)
These can also be seen in binoculars but not without them. An f5 - f8 60mm or larger telescope, with its superior light gathering, will show them better.
M44 'The Beehive Cluster': A lovely large open cluster of older, yellow stars, well seen in wide field views on low power. (Cancer)
M13 'The Great Globular': One of our satellite galaxies. A compact sphere of 100,000+ stars. Can you spot individual stars? (Hercules)
M27 'The Dumbbell Nebula': Tiny dicky-bow shaped nebula which is nice and obvious to find. (Vulpecula)
Caldwell 14 (NGC 869 & NGC 864) 'The Double Cluster': Two dense patches of stars close together. (Perseus)
M11 'The Wild Duck Cluster': A nice compact open cluster of stars. The brightest ones form a V shape. (Scutum)
M57 'The Ring Nebula': A lot smaller than you might think. Tricky but not impossible, even for children. (Lyra)
M15: Another globular cluster, smaller but similar to M13. An easy find in (Pegasus).
M35: A small open cluster that will be a challenge, but not too difficult. Good practice for the harder objects to come! (Gemini)
M29: A compact cluster in Cygnus, which looked to me like a tiny Pleiades when I first observed it in 1978 with a 6" Newt! (Cygnus)
M65 / M66 & NGC3628 'The Leo Triplet': A group of three galaxies in the same low power view. (Leo)
M81 / M82: Another two galaxies in one view! You will need experience to find these two. They're in a bland bit of sky. (Ursa Major).
M101 'The pinwheel Galaxy': A nice face on view of this spiral galaxy. Decidedly dim in our telescopes - See below. (Cassiopeia)
The remaining 95 Messier Objects: vary in their ease of location in a small telescope, but they should all be visible in a refractor telescope of 90mm diameter or a 114mm parabolic Newtonian... (This is where the parabolic Newtonians of 130mm have the advantage with their superior light gathering and short focal ratios!)
The only proviso to seeing them all is that Messier compiled his list in Paris (48° North), with a 100mm refractor. So, to see the more southerly Messier objects, in our sky-glowing modern skies, you have to be somewhere near that latitude. Observers from the latitude of the English midlands (52.5 degrees N) and further north, may have difficulty with some objects in the far southern part of the sky.
As you gain experience, you will be able to track them down, I have no doubt. I know a person (Paul Money FRAS FBIS) who has managed, on at least two occasions, to spot all 110 objects in a single night! (It's called The Messier Marathon). This can only be completed during a particular week in April and is easier the further south you are in the Northern temperate zone! (Paul was in the Algarve at 37° N)
This website may help you to locate these objects: "Online DSO Finder Charts" website: HERE
A word of advice about finding DSOs.
Use a low-medium magnification to find the object (20x - 40x You're looking for a faint fuzzy patch). Center it, then step up the magnification. Trying to find DSOs as a beginner with 80x or more is nearly impossible for any but the brightest objects!
Double Stars:
The location and observation of double stars is another interesting project for the budding observer. Once again
you'll need a star chart or use 'Stellarium' to locate these stars. (Download PC version free HERE - There is also an APP for your mobile).
These beautiful Double Stars don't change much in our lifetimes, but there are still interesting projects you can undertake:
1: Locate each object in the list below. Tick them off when you have seen them.
2: Make a drawing and notes about each object (Colours / Separation / Ease etc).
3: Revisit them time and again and have a look at them in other telescopes if you get the chance, to see if you can spot any difference between the two scopes.
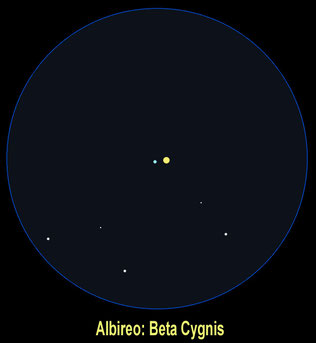
Albireo: Beta = β Cygnus
A Beautiful Gold and Blue pair in the head of Cygnus, the swan. Any telescope will show it in a northern summer sky. I return to this double time and again.
Alcor and Mizar: Zeta = ζ Ursa Major, The Plough asterism
These can be split with the unaided eye, but Mizar itself is also double seen in a telescope. Between Alcor and Mizar off to one side is a 9th magnitude star called, Sidus Ludovicianum. An interesting point to know!
Algieba: Gamma = γ Leo
Beautiful pair, both golden yellow and the same magnitude, a beautiful double seen in the telescope.
Almach: Gamma = γ Andromeda
Another Gold and Blue pair in Andromeda. Similar to Albireo, but fainter and with a smaller separation.
Alpha Herculis: Alpha = α Hercules
Another amazing contrasting double star pair. Deep Red and Greeny-Blue. One of my favourites.
Cor Caroli: Alpha = α Canes Venatici
A lovely pair with a big difference in brightness. White and Yellowish.
Polaris: Alpha = α Ursa Minor
A test for you. The bright 1.2 magnitude Polaris has a 9.0 magnitude companion. Can be tricky, but is seen in 70mm+ scopes at 100x.
Epsilon Lyra: Epsilon = ε Lyra
The famous 'Double-Double Star'. All components are equal, white and quite tricky to separate. A good test for a refractor telescope of 70mm.
Note: If double stars turn out out be a hit, there are plenty of lists for beginners and more advanced observers online! Start here!
WHERE ARE ALL THE GREEN STARS?

Thought Experiment: You may wonder why there are no green stars? There is just about every other colour, why no green?
The answer is that stars put out most of their light in a range of frequencies, with the main colour being dominant - See diagram. But, there are some other frequencies, either side of the main one, always present. So, your red star puts out it's mainly red light, but there is also some orange, and infra-red. Our eye will see mainly red. A blue star puts out mainly blue, but also violet and blue-green, so it looks blue (Our eyes like blue light!). A 'green' star, that puts out most of its light in the green part of the spectrum also puts out yellow to orange and blue to violet, and such a spread of colours, I'm sure you'll realise, gives white light!
SO, there are two possibilities - White stars are green - or Green stars are white. Either way, what we see is white stars!
PS: The reason we don't see purple stars is that our human eyes much prefer to see blue, so purple stars appear blue as there is blue and ultra-violet (which we can't see) to each side of the purple. The colour spectrum is weighted towards blue for purple stars - We see blue.
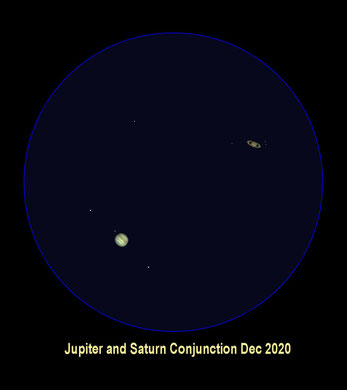
Conjunctions and Occultations:
Planets can approach very close to each other. This is called a conjunction. A wide angle telescopic view can have two planets in the same view when the conjunction
is very close.
They occur between two or more planets, between planets and stars and the Moon has conjunctions and occultations with all the different bodies, the most striking occultation is called a Solar Eclipse!
There are several conjunctions each year to watch out for. There is little scientific value, but they are quite amazing to witness. You can observe the planets getting closer and closer day by day until they are at the closest point. In recent times the conjunction of Jupiter and Saturn made the news in late December 2020.
With the Moon, conjunctions take a matter of a few hours, but planetary conjunctions can be observed over a number of nights leading up to closest approach and
afterwards until they move well apart. The Moon is a large object in the sky (half a degree in diameter) but it is surprising how few bright stars it passes in front of during the
year.
You can look for past, present and future events using STELLARIUM - (Download free HERE)
Lunar Conjunctions 2025:
The Moon, due to its relatively fast movement through the sky, has regular conjunctions with the planets and bright stars. The Moon moves through the stars by
its own diameter every hour! Over 12.5 degrees per day (about 25 diameters!). Every month there is a list of lunar close approaches! Search "Lunar Conjunctions 2025".
Lunar Occultations 2025:
With the Moon, it is even more interesting to witness rare occultations, where the Moon passes in front of a planet or bright star. There are many lists online detailing these occurrences that you can plan to observe. You will find that there are none for the remainder of 2025... there were four in Jan and Feb!
Search "Lunar Occultations"

Man-Made Satellites:
Observing satellites is great fun for everyone!
Man-made satellites can be seen without optical aid as 'stars' that pass through the night sky. There are many thousands and hardly an observing session goes by without seeing one or two.
Sometimes they pass into the Earth's shadow and disappear from view. Other times they brighten and fade as the different parts reflect the sunlight differently. They are interesting to spot and all the more fun if you know which one it is or when to look!
One impressive selection are the 'Starlink' satellites. They can be seen in an impressive line of forty or so as they pass overhead. They can be found by looking up your location with a finder web-page . Many astronomers think they will spoil the night sky, but they are very impressive, and at the moment,
weeks can go by before a favourable show! I found this little video to give you some idea.
There is, of course, a webpage that allows you to find out when the Starlink Satellites will be visible for you:
Here> FIND STARLINK (You will need to set up your location.)
Another impressive object is the International Space Station (ISS). This can be very bright as it passes
over. A single satellite is about the size of a Ford Transit Van, but the ISS is getting on for the size of a football field! At different times of the year the station may pass
into the Earth's shadow and just 'disappear', other times it can be seen for several minutes on a good pass.
Naturally, there is a finder website for the ISS too:
Here> ISS PASSES (You will need to set up your location on the top right of the page.)
Variable Stars:
Variable Stars brighten and fade over a period of time. It is interesting to follow the light curve and provides a good project over a number of days, weeks or even
months. This is a project that suits locations where cloud is an issue requiring a clear night only every so often and not necessarily on a specific night in many cases!
There are many types of variable star:
Eclipsing Binaries, Cepheid Variables, Algol Variables, Tau-Tauri, Irregular and Semi-irregular variables to name a few. My 'beginner's list' below contains four different types.
Using your unaided eye, binoculars or your telescope,there are very interesting projects you can undertake with Variable Stars:
1: Find and record details of each object on the list and observe the brightness, colour and ease of finding. You can observe the difference in brightness by comparing to other nearby stars.
2: Estimate where the brightness is on the light curve (The current brightness compared to its max and min)
3: Observe at regular intervals, once a week or even once a month for some, and update the record. Keep comparing to nearby stars to create yourself a brightness record.
4: Try the "Trapezium Challenge" (Last item on the list - You'll need a telescope of 100mm or larger!)
5: Try more difficult variables. There are many lists online of new ones to try (You will never run out!)
Important Note About Brightness:
Although the range of brightness difference sometimes doesn't look much on paper, it is very noticeable when observed. Each magnitude reduction is 2.512 times as faint as the previous. A range between Mag 3.3 to Mag 4.4, for instance, represents a brightness dimming of 62%, and not the 25% you might otherwise reasonably assume.
Here is a list that will get you started comprising brighter stars that can be easily found and followed in your telescope. All these stars are easily visible from the Northern hemisphere:
Click the constellation diagrams to enlarge.

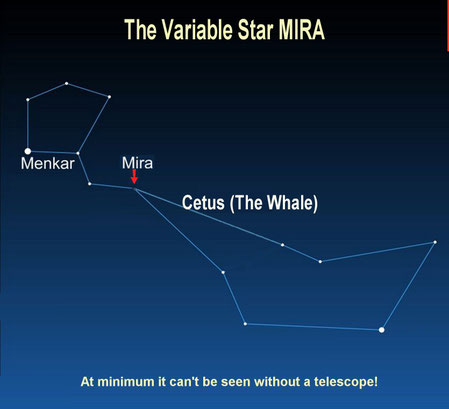
Mira: Omicron = ο Cetus
Mira has the largest range in this list by far and represents a great long term project.
Brightness Magnitude Range: 3.4 - 10.0
Period: 332 days
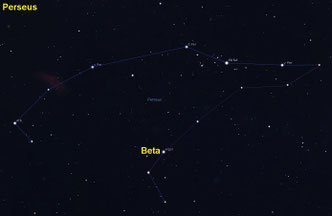
Algol: Beta = β Perseus
Algol has the shortest period in this list and represents a great starter project, with visibility all year round above
50° N. An eclipsing binary, the light dip takes a few hours only. It's
called 'The Demon Star' and represents Medusa's eye, winking! This phenomenon had been noticed well before the invention of the telescope, so be assured, it is quite obvious!
Brightness Magnitude Range: 2.1 - 3.4
Period: 2.87 days
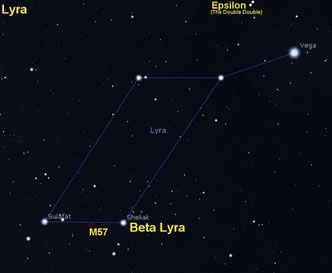
Beta Lyra: Beta = β Lyra
This star is easily found high overhead in northern summer, not far from the 0.0 magnitude star
Vega. Lots of close-by comparison stars that make up the small constellation of Lyra, the lyre.
Brightness Magnitude Range: 3.3 - 4.4
Period: 12.9 days
Also note: Epsilon Lyra, the 'Double Double' near Vega and M57 the 'Ring Nebula' close by Beta.
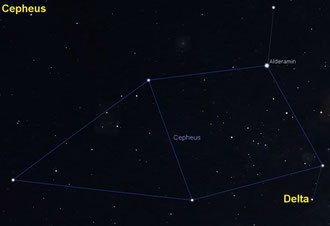
Delta Cepheus: Delta = δ Cepheus
This star can be found all year long circling the northern celestial pole,
with visibility all year above 42° N. The constellation of Cepheus,
representing the King Cepheus, is an unassuming pattern of relatively faint stars. Most are magnitude two or fainter.
Brightness Magnitude Range: 3.5 - 4.4
Period: 5.37 days
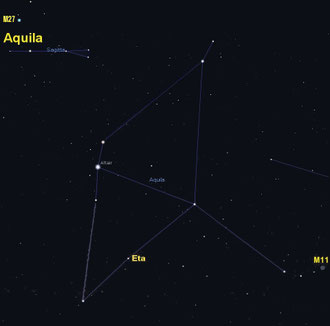
Eta Aquila: Eta = η Aquila
Another 'northern summer' variable star, not far from Altair in Aquila, the Eagle.
Brightness Magnitude Range: 3.5 - 4.4
Period: 7.18 days
Also Note:
M11 The 'Wild Duck' Cluster on the far right of this pic.
M27, The 'Dumbbell Nebula' is found just above the label 'Aquila' (Easy to find from Sagitta).
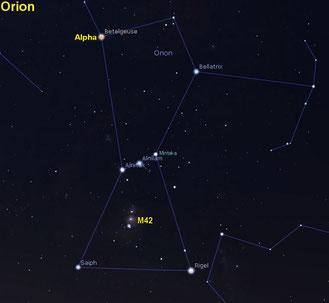
Betelgeuse: Alpha = α Orion
A northern winter and spring constellation. The famous Betelgeuse in the shoulder of Orion the
hunter. A red giant with problems! There is much talk about an immenant supernova event involving Betelgeuse.
Brightness Magnitude Range: 0.4 - 1.3
Period: Irregular. Betelgeuse fluctuates in brightness in a noticeable range and does so without regular pulsations. Scientists think it is about to collapse
and explode.
Also Note: M42 The 'Great Nebula', containing the 'Trapezium', also on this illustration.
Betelgeuse fades to half its maximum brightness at times, and is easily compared to other stars in Orion by eye. Betelgeuse is another good long term project,
with the added bonus that it is genuinely of scientific interest as it is irregular, and may go supernova in our lifetimes (and maybe not). If it does, it will be visible in the daytime and
will outshine everything in our sky except the Sun!

Do you fancy tackling a more difficult variable star project?
"The Trapezium Challenge"
For beginners I would suggest you only try this with a telescope of 100mm or larger, and only after some success with the variable stars in the list
above.
Trapezium A and B: Theta = θ Orion
Within the famous M42, in Orion, are the Trapezium stars.
Two of them are variable stars. See Orion diagram for M42, just above.
A is a regular variable. Relatively easy to compare.
Brightness Magnitude Range: A = 6.7 - 7.7
Period: A = 65 days (The best comparison star is D, also at Mag 6.7)
B is an eclipsing binary. Difficult to observe the dip in brightness.
Brightness Magnitude Range: B = 7.9 - 8.6
Period: B = 6.47 days (For just a few hours!)
Comparison Star Note: You can't use a Variable Star to judge the brightness of another variable Star! Only use regular stars to compare a variable to!
Illustration:
The stars of the Trapezium.
Depending on your optical system, you may have to invert, rotate, or flip this map to get the Trapezium how you see it!
Give this 'tricky but fun' project a try when you're experienced with variables!
Note: On star maps, you will see a representation of the magnitude by circle size. Variable stars are shown as concentric circles showing the two extremes of their light curve. See stars A and B in the illustration.
Astro-Photography:
Not anywhere near as difficult as you might imagine! Even if you don't have a telescope or a DSLR camera, there are still fun things you can do with your phone! Have a go at simple Astro-Photography. You don't need to buy any expensive equipment to try astro-photography - Use your phone!
To get a good light balance, you have to touch the brightest area of the image to get the phone to show some colour in the sky, but, planets and the moon after sunset is a good place to start.
If your phone has trouble detailing astro objects in the night sky, you could try downloading an app such as "Night Cap" or "ProCam X Lite". These apps let you change the exposure parameters of the phone's camera to bring out more detail in low light / high contrast situations.
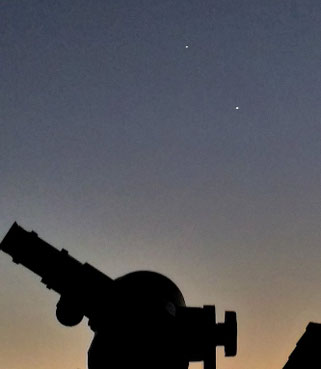
Pic: A picture of the Venus and Jupiter (Lower white and upper creamy respectively) conjunction, taken Feb 28th 2023
a few minutes after sunset, two days before closest approach. No special app used.
I just clicked on the brightest part of the image and the auto-exposure
altered to show the planets in a lovely evening sky.
I had an 'experimental' telescope in the foreground for artiness!
---------------------------------------------------------------------------------------------------------------------------------------------------------------------------------------
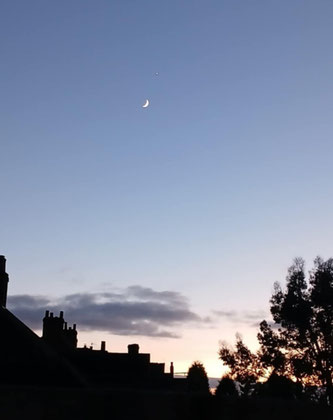
Pic: Another quick snap. Taken as I put something in the trash! 16:32 on 3rd Jan 2025.
The crescent Moon and Venus, just above the Moon - Click to enlarge.
If you see something nice in the sky, you don't have to interrupt your life! Just take a quick pic and add it to your lovely photos collection. Nothing could be simpler, or get as many
'wows' from your friends and colleagues.
When you have a little experience with your telescope, try pointing your phone down the eyepiece! It's surprisingly easy to take a nice astro-shot. Focus the telescope as accurately as you can, then shoot down the eyepiece. Keep the phone flat to the eyepiece rubber and look at the image on the phone screen. You may find it easier to use a delayed timer exposure so you can concentrate on keeping the Moon in the shot and as still as possible while the phone takes the picture.
If you think this might be something you'd do regularly, you could invest in a universal phone mount. This attaches to your telescope eyepiece and holds the phone in the right position for the shot.
Pic: You don't actually need a phone mount, though it makes life ten times easier! Hold the phone so it looks down the eyepiece, arrange the image on the screen how you like, and
snap away. My friend, Callum Lawson did just that using his phone and my 150mm f8 SkyWatcher 'Classic Dobsonian', for his first ever astro-photo!
(Pic ©Callum Lawson, 2023)
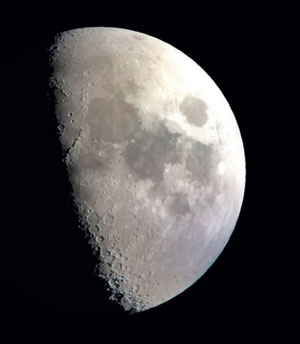
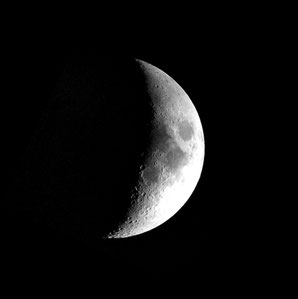
IF you have a telescope on EQ mounting and a phone holder, visit the Moon Photography page in this website to learn about the astro-photography process, you could easily turn out a photograph of the Moon like this one.
Pic: This is a single shot image of the Moon taken with a simple parabolic Newtonian on AZ, a SkyWatcher 100P. You can match the quality of this shot after a little practice and go on to produce better photos, I'm sure. (Click to enlarge)
Note: You can buy cheap telescope eyepiece cameras for under £20 which sounds like a good idea, but, in my experience, they aren't anywhere near as good as your phone! The camera in your phone is much better quality than those cheap 'telescope cameras'.
My Best advice: When starting out in astro-photography, use your mobile phone!
PLEASE, HAVE A GO!
When you get adept at simple astro-photography, you could choose to add to your equipment, and train yourself to take stunning shots as my
friend, Gareth Jackson, has done from his garden in North Wales.
Gareth has only been taking 'proper' astro-photos since 2020, but he has found that he has the skills required to be excellent at this activity. It has taken a lot of study, trial & error
and great skill to get his superb images. But it shows that it doesn't take long to become excellent at astro-photography.
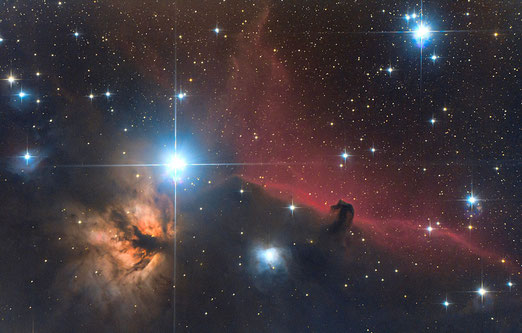
Pic: Gareth's beautiful multi-exposure, stacked image of the Horsehead Nebula and the Flame Nebula in Orion. Taken with his Canon 600D camera, attached to a SkyWatcher 150PL on EQ5 guided driven GoTo mounting under the beautifully clear and dark skies of North Wales. My Getting into Astro-Photography Page HERE (Pic ©Gareth Jackson, 2023)
Location: This nebula region is surrounding the left hand star in Orion's Belt, Alnitak. (The brightest star on this pic is Alnitak).
And, there you have it.
My suggested projects and observations for beginners and their telescopes. There's quite a lot to be going on with there. As you can see the scope of projects is wide and interesting. One project can take many years and another be done in a single observation. Astronomy is a superb hobby that surprises and delights for years and years. There is always something going on in the night sky, and something else to look forward to in the near future.
I hope you will enjoy pursuing the objects and projects on this page.