
Moon Photography
I often get asked how I get such 'great' Moon pictures when I test my telescopes. This guide tells you all about simple Moon photography using a
mobile phone and your telescope.
Let me tell you, I do NOT consider myself to be a good astro-photographer by any stretch of the imagination – However, I will take you through the process by which I get the images of the Moon I use when 'showing off' a scope's capabilities. These approximate the view through the eyepiece when looking with your eye.
Personally, I don't see the point of taking pictures of things that hardly ever change (DSOs for instance). Planetary images and the Moon, which are always different, are another subject. Amateur photos can reveal details that have never been seen before.
Firstly, let me say that 'reasonable' photos can be taken of the Moon directly through the eyepiece with a smart-phone. (Right). This is how I used to take pictures until I discovered the alchemy of stacking! More of that very shortly...
You can leave your Moon photos on your phone for viewing and edit them there, or you can transfer them to a PC or Laptop for editing.
It helps to be fairly well adept at copying or moving phone pictures onto your computer and have some form of simple picture editing available (I use Paint Shop Pro
6 – But you can use anything that will do the job. You need to be able to adjust contrast, brightness and sharpness. Despeckle feature is also useful.) But you can edit them on your
phone.
The picture taking methods I describe here are great for producing 'artistic' and pleasing photos of the Moon - I do not claim that these photographs are scientifically important!
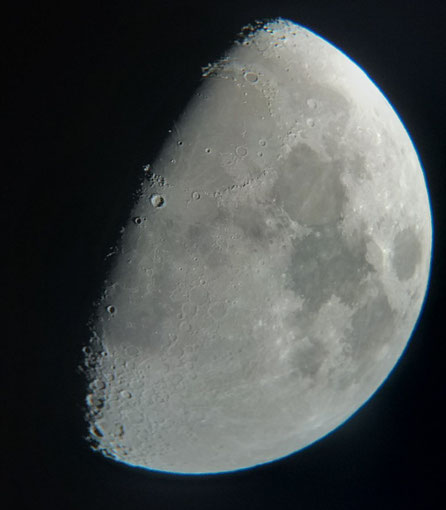
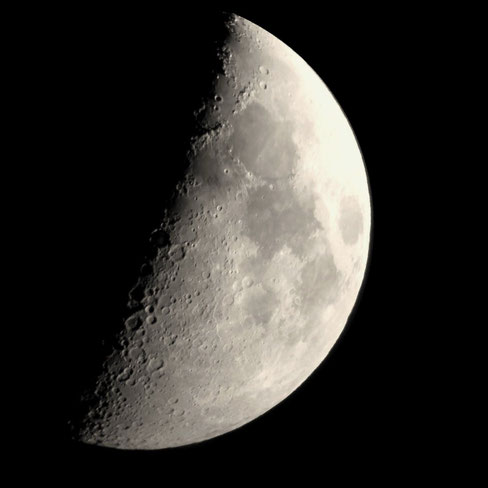
Pic: Moon single shot:
Hand held 5" SkyMax 127 Maksutov-Cassegrain f11.8, with 25mm eyepiece.
A monochrome version of this pic is used in the banner for this website.
See the blue fringe around the edge of the Moon? That's introduced by the eyepiece.
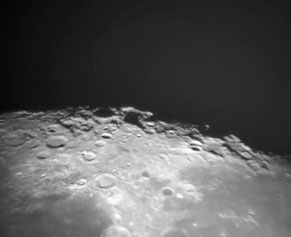
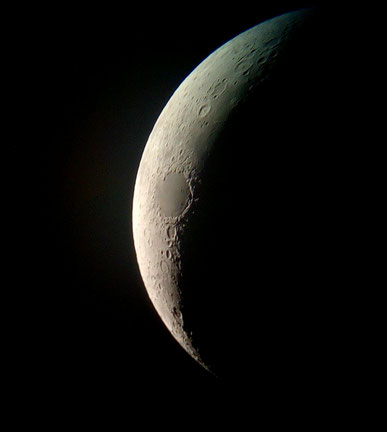
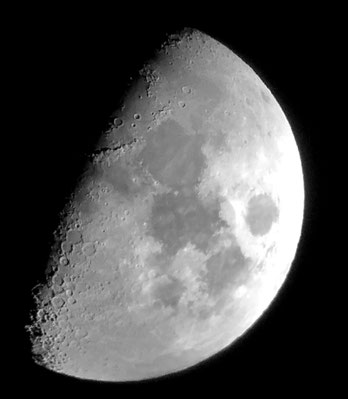
Pic: Moon terminator single shot. Monochrome image (3rd April 2023 at 19:07 UT)
This pic was taken using a phone mount. 150mm f8 Parabolic Dobson mounted telescope undriven.
Equipment You Will Need:
Your Telescope:
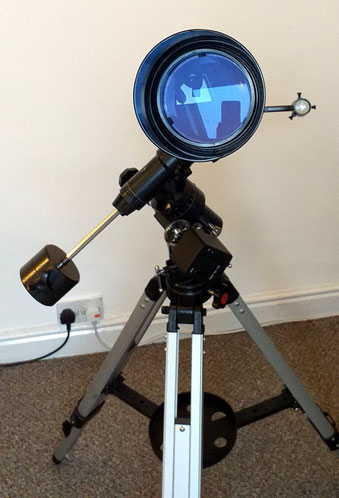
Whatever type of astro-photography you intend to embark upon with your telescope. You really need to have the instrument mounted on a reasonably well aligned
equatorial head (EQ).
This is not essential but will make life so much easier because it will allow you to follow the objects simply by turning the Right Ascension (RA) control knob or running the motor drive if you have one
(Picture - An EQ3 with a motor drive supports this Konus 90mm f12 refractor).
It is sufficient when shooting the Moon, for example, to rotate the RA flexy control knob by hand for about thirty seconds while you take your shot or shoot your video. You can see the Moon on your phone and keep it steady (See information later).
It is possible to get some good results without using an equatorial (EQ) telescope mount, but it is so much easier and predictable with one!

A Phone Mount:
The equipment you will need to get the best photos from your telescope is a phone holder that attaches in some way to your scope.
Some of them have a 0.965" or a 1.25" barrel that fits into the telescope draw-tube (see pic left) and other types have a clamp (see pic right) that grips the eyepiece, while the eyepiece fits into the telescope draw-tube as usual.
Either way, the phone mount holds the phone critically in the correct position to view the image produced by the telescope and keeps the phone steady during the exposure.
You can hold the phone by hand, but a device like this is cheap enough at less than £20, and worth it if you think taking photos of the moon is going to be an interest. Also, it takes so much stress out of the proces it's well worth the investment.
NOTE: One other important thing is to make sure that the phone lens is very clean before you attempt astro-shots. Any marks will blurr the image and we want it as clear as possible.
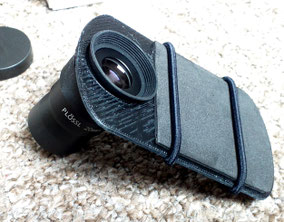
This is the SuperShooter MkIII phone holder.
It is a simple 3D printed phone holder that accepts 25mm diameter eyepieces and holds your phone safely while you take the video or single shot. Your phone simply slips beneath the rubber bands and sits on the foam pad securely looking down the eyepiece, resting on the rubber cap, to provide correct spacing of the lenses.
I designed it to be effective and cheap to produce. It worked well. I supplied one of these with all the telescopes I sold in 2020 through 2023. (about 350)
It is very easy to use and does a good job of keeping everything still and aligned.
The MkI and MkII SuperShooter phone Mounts had screws that held the eyepiece in place, but were found to be non-essential and only added to the expense and time to make! (I only made three MkI and two MkII before I redesigned to the MkIII.)

Pic:
The phone is attached to the mount, as described above, and the mount, with the phone looking down the eyepiece, is slotted into the telescope draw-tube. We're ready to take our pictures!
Simple 'Single Shot': Moon Photos
The trick to taking a good 'through the eyepiece' Moon shot, is to follow these simple guidelines.
1: Image the Moon: Use a magnification that has the moon about half filling the view through the eyepiece when you look through the scope.
2: Frame the image:Use the zoom feature to make the image of the Moon as big as practical on the phone screen (Select the
whole or section you require). You might have to experiment with how far the phone needs to be from the eye lens. I usually have it resting on the eyepiece rubber eye-cup - It seems
to work for me. Too close or too far away and the field becomes too small to line up on!
3: Keep everything as steady as possible and in focus when taking the shot:
Sometimes adjusting the phone pushes the draw-tube in a bit - Check your focus before taking the shot. It is recommended that you use a delayed picture (2 – 5 secs is enough) so you can concentrate on holding the image steady!
(When you touch the phone to take the picture it can introduce a little wobble - By using a delay the wobble can stop before the exposure is made - Also: Don't use flash!)
4: Edit the picture: This can be done in the phone or after you move the picture to a PC or
laptop.
Perform the following actions:
-
crop to a 'square format'
-
increase the 'contrast' slightly. (Don't overdo it or you'll lose detail in the bright areas.)
- That's it!
Pic above: The Moon: A 'single shot' . Look how much better it is than the hand held one at the top! I took with SuperShooter phone mount, and my Samsung J6+ mobile phone, through 6" Celestron C6-N a parabolic f5, with 25mm eyepiece 30x magnification. (Magnification doesn't mean much when you're zooming with the phone too!)
Using the method described above it is quite easy to get some stunning results from quite modest equipment and absolutely amazing results from medium-large equipment.
Once you have mastered 'Full Moon Disc' shots, you can add magnification and try doing sections of the Moon. (See below)
It might be worth mentioning here that the reason I don't mention planet or star pictures is that those objects are a whole other ball-game! Very small discs need a lot of magnification to see the detail. Also with that come tracking issues and contrast difficulties.
My Advice: Start with an easy object with lots of ight and detail ... MOON, and move on when you fancy a real challenge!
Single Shot - A First Attempt:
I was showing some friends the Moon through my SkyWatcher 150mm Classic Dob one night, and while my back was turned, one of them decided to try
photography!
He took out his phone, lined it up with the eyepiece, tapped the Moon on the screen to set the exposure and then shot the pic.
As you can see, this hand held, 'first go', was very good indeed. Callum did a great job of his first astro-pic. He will have a pic he can print off and frame on his wall and show to all his friends for years to come.
Pic: Courtesy Callum Lawson, Feb 23rd 2023 app 19:20 UT.
'Zooming In!'
Pictures with more detail are taken in the same way, but we use a shorter focal length eyepiece and, maybe, zoom in more with the phone.
A 10mm eyepiece, or a 25mm with a 2xBarlow, will increase the magnification and enable images similar to the one here.
The contrast is not so much of a problem with higher magnification images, but manually following the Moon becomes a bit more of an issue. You have to turn the slow-motion knob very smoothly so the telescope doesn't wobble during the exposure and follows the motion of the Moon perfectly.
There is so much light with the Moon it's actually a good thing to double the focal ratio using the Barlow lens!
Pic: Moon: A 'single shot' I took with a 25mm eyepiece and a good quality achromatic 2xBarlow, using Sky-Watcher 200P f5 Newtonian and Samsung Galaxy J6+ phone.
Stacked Shot: Moon Photos
By far the best way of getting stunning images from your telescope is to use a stacking program.
There are many different ones and each has its pros and cons and each its supporters and doubters... The choice is up to you!
The ones I use are FREE and are called “PIPP” and “Autostakkert”.
Autostakkert can only handle files that have been prepared by PIPP. Both of these programs are FREE to download and use, they are the ones I recommend to you for your first foray into the wonderful world of stacking. They are relatively easy to use and produce excellent results in a few minutes. I will try to talk you through the process, though a visit to the subject on YouTube (Stacking programs for Astronomy) will return a lot more useful things! Nevertheless, stick with me for now, and I'll tell you the process...
What is Stacking?

'Stacking' is the term used for taking the very best of many pictures to make one really good one.
Most imortantly: lt's not 'cheating' and it is a true representation of the data in the picture.
What we do is very similar to the process above for taking a single shot, but we take about thirty to fifty seconds of video instead. Now this produces about 800 to 1200 individual shots of the Moon.
As the image shimmies and blurrs with the atmospheric turbulance you'll video many good shots and a lot of pretty poor shots too. The stacker program sorts the wheat from the chaff...
You have to be more careful not to allow the Moon to move about too much in the view, and keep the image size large on the phone to enhance the contrast shown. A phone adapter that holds the phone on the eyepiece is essential. (You can't hand hold a video shot!)
Pic: The image on the left is a single shot, on the right is a stacked image. They are both imaged by the same 3" f16 Mitsuka refractor telescope, and are taken on the same evening.

Atmospheric Effects:
Here is a typical example of the Moon through a small telescope, (2" 50mm Celestron Travel Scope) in the early evening. The atmosphere is playing havoc with the image! As the Moon rises higher, and the atmosphere cools down, this atmosphereic tremble lessens somewhat.
Can you imagine the chances of clicking the camera at exactly the right time to get a good photo?
This is where video and stacking comes in handy! The stacking program throws out all the blurry and out of focus images and leaves you with only the best shots.
We do see moments where there is a good focus and good detail... These are the pictures the program strips out of the video.
Aside: Notice that there is very little chromatic abberation in this £60 telescope (Celestron Travel 50). Unfortunately, because it is
such a small telescope, there's also very little detail. It was the nearest telescope that l had to hand to shoot this video for the website!

When you download the movie from your phone you will need to convert it into a format recognised by your stacker program... I know, right? Why couldn't they just design a stacker that uses MP4 files? Simple answer, "Dunno!"
This is where PIPP comes in... This process runs a simple converter to change the one format into another and also performs another couple of other useful processes!
Pic: The PIPP program converting a movie. As well as changing the format, it also sorts the images into best to worst order according to its own criteria.*
* Click the images to enlarge them if you like...
Your Stacker Program Process:
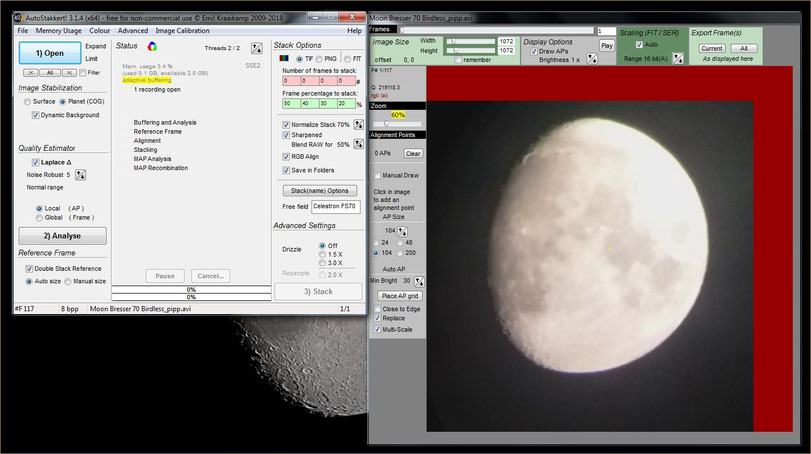
"OPEN"
1: When you click open and select a file to examine, it registers on a few distinctive features and lines all the pictures up.
* Please excuse my error... When I did the screenshots I had forgotten to change the 'Stack Name' to Bresser 70... It's says 'Celestron FS70'. This is a field you have to change manually, and I forgot! This is a movie from a Bresser SkyLux70.
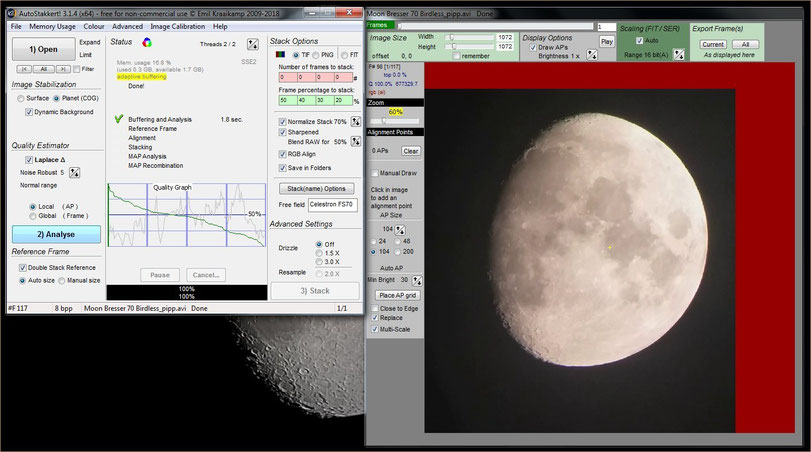
"ANALYSE"
2: You then need to analyse the sharpness of each picture and the program ranks the pictures in order of clarity and detail (This process is somewhat streamlined by the PIPP program doing a similar sortation).
Left: It produces a 'Quality Graph' that you use to select the best section of the movie (Usually just under 50% where the green quality line makes it above the bottom half of the graph! See the position of the bold green vertical line on the graph in the next picture)
3: Then you select what portion of the pictures you would like to use. 50% 40% 30% etc
* note the green section line on the graph. It uses all pictures to the left of this line in the stack.
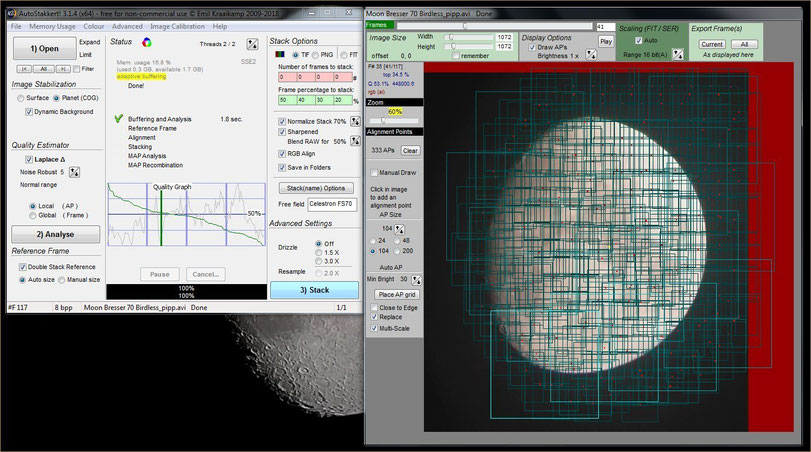
The green squares on the Moon are put there by the program automatically. They represent 'alignment points': Just click 'Place AP Grid', and it's done for you...
"STACK"
This produces different stacks dependent on what proprotion of the stills you want to include in the finished picture. Therefore we can specify several different pictures from one movie.
4: Then it stacks the pictures, superimposing each to bring out the best detail.
5: Then it presents these pictures to you in files containing images made from the percentages you asked for.
Left: These are in a general format that can be opened in many different applications. You can edit and save as you want from these files.
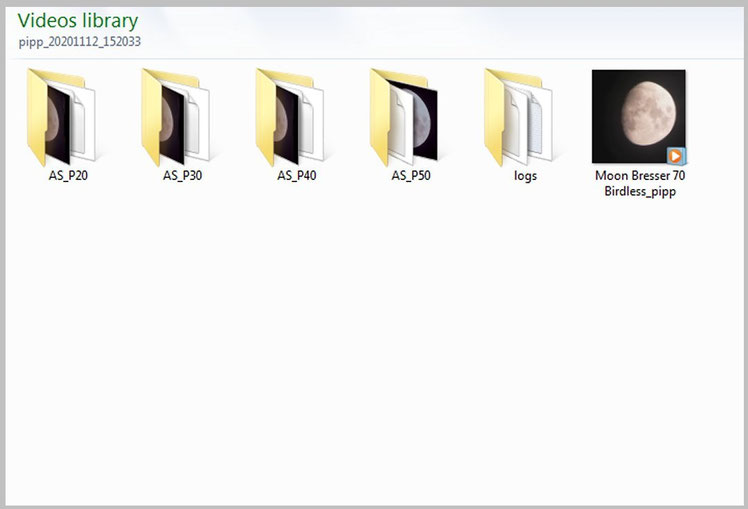
* The movie file I used was called "Moon Bresser 70 Birdless". (It is an edited video of about thirty seconds of Moon through the bresser 70mm f10 refractor. There was another clip that showed birds flying across the face of the Moon - It was a rare night for photography! I have added it for your viewing pleasure at the bottom of this section.)
The files are named similar to "AS_P20" = Autostakkert Stack - Percentage 20
Finishing the Image - Presentation:
It is then up to you if you want to change the contrast or sharpness at all... Usually there's not much to do, except remember to close your mouth after you've seen the pictures you've produced!
I hope this process as I have described it makes some sense and you can see the benefits of stacking stills from a video, compared to the image produced by using a simple single shot.
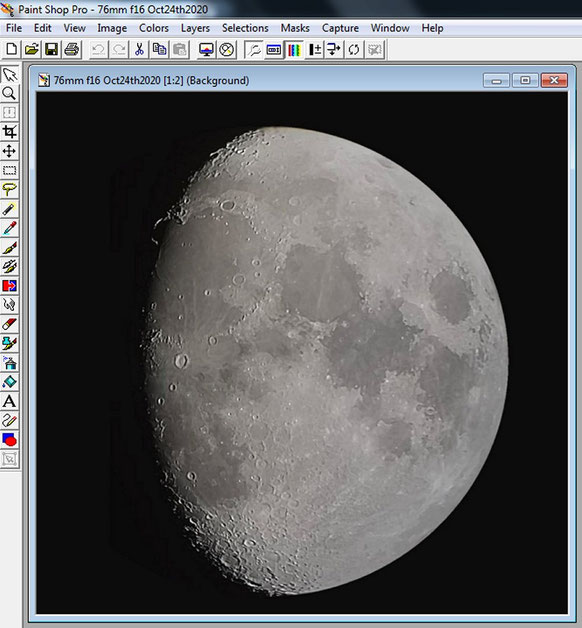
So we see that a movie, from a mobile phone of about 20 seconds duration (in this case), taken through the eyepiece of a 76mm f16 refractor on a hazy night
with clouds to avoid everywhere, can be turned into this shot...
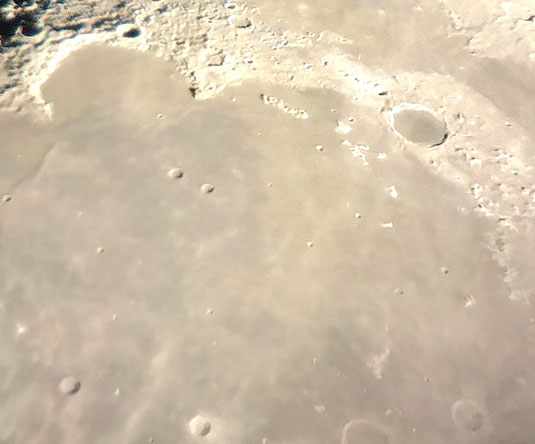
Pic: The finished article. A lovely detailed image, produced from a blurry movie of the Moon.
Imagine if I had waited for a good night and not had a rush on!
*Please, have a go at stacking for yourself. I promise, after I decided to have a go, I had my first picture in under an hour! It now takes me about ten minutes to get a good picture (Most of that is processing time - Not me!) - Amaze your family and friends!
A Few Thoughts:

Pic:
My first full disc Single Shot effort through my SkyMax127 Maksutov-Cassegrain.
I didn't think that mobile phones could produce good astro-photos until I tried it for myself!
This was a tracked image even though it was just a single shot. It makes all the difference to detail!
Full colour shot showing a deal of chromatic abberation as blue fringes at the top.
These can be lessened by making the image 'monochrome' Or by using a much better quality eyepiece!
An Undriven Single Shot:
This is the best I managed after nearly twenty shots through a Bresser 130mm Parabolic f5 'Dobsonian' AZ Mounted telescope.
Any attempt to follow the Moon resulted in so much shake I might as well have mounted the scope on a bike!
Although this image is pleasing, in a small size, because of the lack of tracking the object is very slightly blurred and could be much better. If you click to
enlarge this image and look closely at the sides of the craters, especially at the bottom, they're sort of crinkly blurred!
My advice? Use a scope with an EQ mounting for your Moon photography. Set it up well, and track carefully.
Video: For your entertainment and pleasure I have added the video clip below of the birdies flying across the Moon from the Bresser-Birdies video capture as mentioned.