
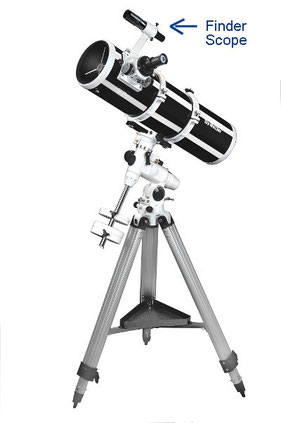
Finder-Scopes.
The Purpose of a Finder
The finder, or finder-scope, is an important part of your telescope. It is a small, low magnification wide field telescope attached to your main telescope tube which is set-up so that the crosshairs that you see when you look through the finder's eyepiece, or the image of the star and dot, precisely line up with the centre of the field of view of the main scope, even at medium-high magnifications.
When you sight an object through the finder you then switch your eye to the main telescope and the object should be somewhere in the field of view. Finders feature on all kinds of telescope and, in the case of optical finders, are an essential aid to finding objects that are too faint for the eye to see.
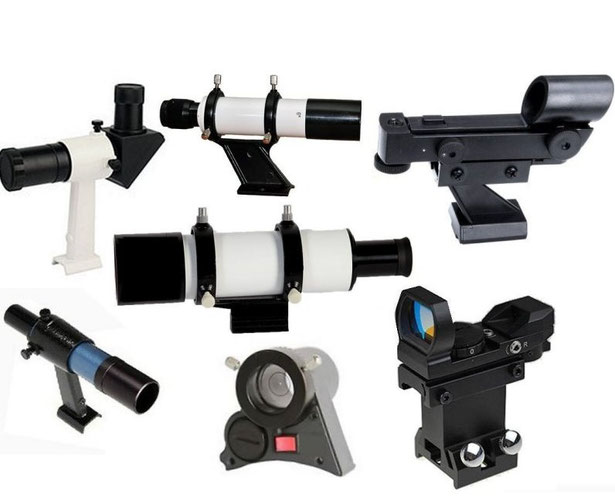
Pic: Types of Modern Finder Often Supplied.

A cheap finder, with a single lens element for the OG is virtually useless. A single lens will spread the light about and give you chromatic aberration, which will lessen the magnitude limit. The image will be blurry and you will have trouble using such a finder effectively. Manufacturers often stop down these single element lenses to reduce 'false colour', but this also lessens the magnitude limit. Although it adds to sharpness and clarity, it's not a very good way of doing things! In a finder, as in the main scope, we need to collect as much light as possible. How dare they claim that a finder is 6x22 when they stop down the OG to 13mm?
Any finder is better than none, but you'll need a finder that will show stars to at least magnitude eight.
Whatever finder you have, make sure it gives crisp images with pinpoint stars and the crosshairs are clear and sharp. It is always worth investing in a good quality, achromatic finder, to aid your telescope use. Struggling with an inferior design, with all its limitations, won't help you enjoy using your telescope at all.
Pic: The Bresser 6x24mm finder is one of the smallest quality finders I recommend. This is a 'good' achromatic finder with a good mounting for precise adjustment. There are many cheaper single lens OG finders, none of which do the job properly! Bresser also did a 22mm finder on their older scopes, that are good qality optically, and will do fo you're looking for something even as faint as Neptune!
NOTE: Different finders come with different mountings and not all will fit your telescope. You may have to find a way to fit a decent finder.

'RED DOT' FINDERS:
These finders won't show you anything you can't see with your eye! If your telescope has one of these fitted, I advise you replace them with an optical finder: See why on this page.
To find M57, or Neptune, for example, would take skill and estimation with a Red-Dot. Not something that a beginner would be too comfortable with. For example, Neptune is not visible to the unaided eye, but is EASILY visible in even a 6x25 optical finder and could easily be put on the crosshairs.
The Red Dot Finder was designed to help Go-To telescopes sight on the bright stars they need to set-up. Consequently, they didn't need to magnify or show anything that the unaided eye can't see. However, they became the 'cheap' option for "beginner's telescopes" and would help you locate bright objects only. As you progress you'll want more than that!
Pic: Red Dot Finder types in common use.
NOTE: To set up a GoTo telescope using an RDF, locate the star approximately using it, then centre the star in the telescope eyepiece using the app controls and a 10mm eyepiece.
It really yanks my chain when companies sell "Beginner's Telescopes" that fall short of what you'll need - It's like they don't care! (I do, I care!)

How Does the RDF 'Work'? (I use the term loosely!)
Light emitted from a tiny LED is reflected in a curved, half-silvered, reflector and viewed by the eye looking through the semi transparent reflector glass.
Light from the star passes through the reflector to the eye at the observation position.
With correct adjustment of the position of the LED (Using adjustment wheels) the light paths coincide. Because the glass is curved, it doesn't matter where you put your eye too much. If you can see the dot the object aligned with it should be in the telescope (As long as it is lined up correctly!)
The brightness of the LED can be varied with an adjustment wheel for different subjects if required (All options too bright for stars below magnitude one in my experience!)
Lining up the RDF:
This process is done at night.
1: With a low magnification eyepiece in the telescope, find a distant Earthly light (Streetlight or red warning light on a mast?) and lock the axes.
2: Turn on the RDF and look for the 'red dot' in the glass and adjust the red dot to the minimum brightness setting.
3: Use the adjustment wheels to place the red dot on the light you are looking at in the main telescope.
4: Move to a higher power in the telescope and re-centralise the feature.
5: Check the position of the dot and adjust further if required.
6: Move the telescope away and then use the RDF to find the object in the telescope.
You are now ready to use the RDF to locate visible astronomical objects. (Don't forget to turn it off after each object has been found - They will go flat over night!)
PRICEWATCH:
The cheapest RDF (Jeez, that's going to be great!) will cost you £25 new in 2025
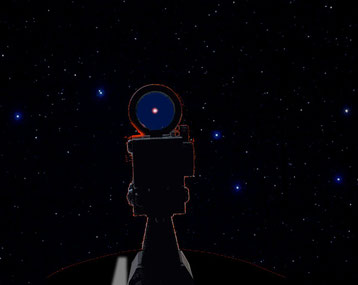
Illustration: A typical view using a Red Dot finder... Where's the star?
And this is a second magnitude star!
Try finding something you can't easily see with the unaided eye with one of these!
The red dot is easy to see, but how can you accurately line up on the much dimmer star?
Once again, with an optical finder, just put the crosshairs on the exact feature you want to see... EASY! (See illustration later)

The Optical Finder:
My recommended type:
An achromatic magnifying, light-gathering, cross-hair finder.
This allows you to easily find objects that are too dim for the eye to see.
For example, again, Neptune, or M27 The Dumbbell Nebula in Vulpecula (Both are easily visible in a 6x30 finder).
Pic: Typical Magnifying finder (6x30mm shown) This one is an older 'classic manual' design with six adjusting screws.
To find objects without a finder, or using an RDF or Telrad finder needs a bit of estimation and a fair bit of luck. The 6x30mm finder would easily show it as a small point (Neptune) or fuzzy blob (DSO M27) that can be put on the cross-hairs. Once on the crosshairs, the object is in the view of the main telescope with a low to medium power.
For our telescope sizes (70mm to 200mm) I would recommend a finder that is never less than 23mm, or less than 20% of your telescope's aperture or greater. (See below)
PLEASE NOTE: The view in an ordinary finder will (usually) be inverted (South at the top). This is not a problem for astronomical objects at all.
Some telescopes come with a right-angle finder. This has a diagonal mirror to re-direct the light from the main lens to an eye-piece that it in the same direction as the telescope's eyepiece (Usually found on Maksutov-Cassegrain telescopes and some SCTs and can be very useful on Newtonians - see below). This type of finder can be tricky for the beginner as the telescope is pointing at 90 degrees to the line of sight of the observer and the image is the correct way up which is usually not the case in the main instrument! A little practice may be in order to get used to this strange feeling to begin with.
Additional: These finders have the added advantage that the image is the 'right way up' and matches the view in your refractor telescope with diagonal. These can be a tad confusing if used with a Newtonian as the image is not erect in the telescope itself. However, you just need to align the star on the crosshairs, not compare views! These finders can be used in daytime for nature viewing without difficulty, as the view in a right-angled finder is the right way up.
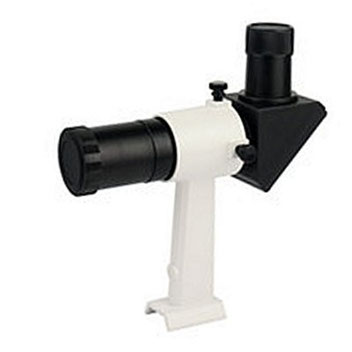
Pic: Right-Angled Finder (6x30mm shown)

Note: Another great advantage to the right-angled finder is that you can arrange the eyepiece so it matches the telescope eyepiece orientation - So, using the finder just involves moving your eye, not your whole position!
Pic: The finder and eyepiece of my 150mm Classic Dob are arranged so I only have to move my eye
position to use either eyepiece. With a straight through finder I have to get off the stool and
reposition every time.

The optical finder usually has front end focusing and lock screw, as it usually only needs to be set once. Some finders have screw adjustment of the eyepiece end.
Being low magnification and often only having a fixed eyepiece, focusing hardly varies and once it is done for the particular observer, it is generally good for a long time. Your eyes may change focus over time and necessitate the finder being refocussed.
Illustration: A 6x30 optical finder and its parts. Note the position of the crosshairs exactly at the focus of the eyepiece. That means that the crosshairs are always in focus regardless of the finder focus.

PRICEWATCH:
Pic: A good quality 6x30 optical cross-hair finder with shoe fitting mount
will cost you around £35 NEW in 2025
There are cheaper versions made of plastic and some of them are passable, but for quality, precision of adjustment and ease of use, get a decent metal finder!
A right-angle finder will cost significantly more, but has certain advantages as discussed above - £45 NEW in 2025
Lining Up Your Optical Finder:
Lining up a finder can be done in the daytime, using a distant object, for newcomers to the hobby. Once you are proficient, you'll be able to do it using bright stars at night in a few seconds. Learning to line up the finder isn't hard, and it's something that you'll have to do regularly to get the best experience.
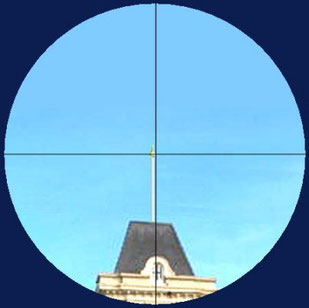
I used to use the golden ball on the top of the flag-pole on the tower of the Imperial Hotel on Blackpool's North Shore promenade as my finder target. It
was visible from my observing position.
Obviously we're not all going to be that lucky, just try to find some distant earthbound object to line up on. If you have no long distance view from your observing site, you'll have to use stars and planets! I use a corner of the crosshairs and not the exact center as a star can actually hide behind them! (see where the golden ball is on the pic. Click to enlarge.)
The Lining Up Procedure:
By using an earthly object it won't move while you make the adjustments as a star would. Once you are adept at lining up your finder you can do it with a star in a few seconds before it moves too much in the telescope.
1: Find the object in your telescope using a low power eyepiece, maybe 20x to 25x, center it in the field of view, and then lock the axes.
2: Change the eyepiece to a medium power of say 60x to 80x, making sure you still have the object exactly centered in the telescope view, using the slow motions to center it accurately. Then, carefully look through the finder. Be very careful not to move the telescope at all.
3: When you look in the finder's eyepiece, if you're really lucky, the object will be near the crosshairs. A little adjustment is usually necessary.
There are two main types of adjustment types of finder mounting. 'Fully Manual' and 'Sprung'.
4a: If your finder mount has three adjustible screws or six, it's a manual type: (These are usually found on older telescopes)
Start by loosening one of the adjusting screws a little and then tighten an opposite screw a little... Try to do them both at the same time! Center the finder in the front ring and adjust at the back if possible.
4b: If your finder mount has two adjustible screws and one spring loaded pusher, it's a 'sprung' type: (These are found on most telescopes produced since 1995). Start by adjusting one of the two adjustment screws... You can tighten or loosen one screw at a time and it will adjust the finder. The spring will allow this without letting anything get too loose.
5: See what difference this has made. Return to the finder eyepiece and repeat. You will, with practice, learn to make the adjustments whilst looking through
the finder.
6: Keep adjusting carefully until you're happy that the finder is accurately lined up. Once the object is centered on the finder crosshairs and in the telescope using a medium-high power eyepiece, you're done with lining up the finder.
7: You can check that all is well by locating a different object in the finder and making sure it is in the view of the main telescope.

You can make the adjustment whilst looking through the finder. This will give a good idea of which way to turn which screw to get the object on the crosshairs. Once the object is lined up, with a manual, three screw, design, you have to make sure all three are reasonably tight, without moving the object! With an sprung design, just leave it!
You can now use the wide angle view in the finder to locate objects, and they will be near the center of the telescope view with medium powers.
Note: I'm not bragging when I say I can set up a sprung finder in about ten to fifteen seconds, in the dark, using a star or planet - This is something anyone can learn, and the reason I mention how quickly it can be done.
Pic: A SkyWatcher 6x25 achromatic finder.
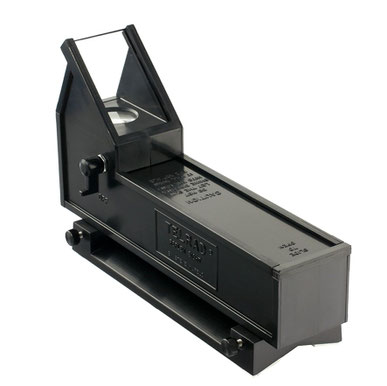
The Telrad Reflex View-Finder
The Telrad is another finder type, and one that I have never used or had the desire to use. Once again there is no light gathering capability so you are stuck with what you can see with your unaided eye.
With this device there are a number of concentric circles projected on the sky. The diameters of these are 1/2 degree, 2 degree and 4 degree. The idea is you can use an object you can see to estimate the position of one you can't. (I have a suggestion - Use an optical finder, it kicks out all the guesswork!)
I have been told by someone who uses a Telrad regularly that it helps him star hop when using the Dobsonian telescope. Maybe it is a more accurate way of
'squinting up the tube' when doing your initial alignment? He then said that he switches to the 9x50mm finder to center the object - There you have it. Optical finders are
best!
Lining up the Telrad:
1: With a low magnification eyepiece in the telescope, find a distant Earthbound light (Streetlight or red warning light on a mast?) and lock the axes of the
mounting. Center the object in he telescope with slow motions if you have them.
2: Turn on the Telrad and look for the concentric circles in the glass.
3: Use the adjustment wheels to place the small 1/2 degree circle centralised on the light you are looking at in the main telescope.
4: Move to a higher power and re-centralise in the telescope.
5: Check the position of the light in the circle in the Telrad and adjust further if required.
You are now ready to use the Telrad to locate visible astronomical objects. (Don't forget to turn it off after each object has been found - Your battery will soon go flat!)
PRICEWATCH:
The Telrad will cost you £65 NEW in 2025 (Why would you spend so much money on an approximator? It's beyond me! My sincere suggestion is to spend half as much on an optical finder and
get some accuracy!)
You can make your own mind up, but SuperCooper is sticking to something that leaves out all the guesswork and shows the object!
Verdict: Get a good quality optical finder guys and gals!
Size: A Most Important Consideration:
Some finders that are supplied with telescopes are woefully small for the telescope they serve.
An achromatic finder of at least 24mm is recommended, and 30mm is much more desirable.
If you are lucky enough to own a telescope of 200mm aperture or larger a 50mm finder is essential. If you think about the light gathering power of sucessively larger telescopes you will be hunting down fainter and fainter objects so larger telescopes require larger finders. As a rough guide, your finder should be at least one fifth (20%) of your telescope diameter, 25% all the better. (But never smaller than 24mm!)
Picture: Zennox 70mm Refractor - Tiny '15mm' finder! (Im sure this had a single element lens and was stopped down to 10mm to lessen the chromatic abberation. Useless!)
The reason for this size recommendation is that if you're hoping to line your telescope up on Neptune, or the fainter Messier Objects, you have to bear in mind that the object is somewhere around magnitude eight, and to find it in the finder, the finder has to be able to show that object.
The Zennox 70mm Refractor in the picture (above) had an awful finder of just 8mm clear diameter - I couldn't see much of anything fainter than Vega! This made it impossible to find even M42, at magnitude 3. You should be able to see objects of at least magnitude nine in your finder to be able to reliably locate many of the objects you want to see.
Hold Your Horses
Don't go changing the finder immediately if it's not a 30mm one. Get to know your telescope before making any extra purchases - Keep your hobby as inexpensive as possible!
If you have a 22mm finder with a nice clear view for example, this can show Neptune easily. So, use it and get to know it. Don't
just replace it because it's not a 30mm. A 30mm finder is ideal for small telescopes, but a 22mm will do fine to begin with, as long as the image is sharp and
clear.
Often, the image in the finder seems crystal clear (Easily showing Saturn's moon Titan, or the Galilean satellites of Jupiter for example) when the telescope is not as sharp. This is usually because it is a low mangification instrument with such a small object glass, and is looking through a smaller slice of atmosphere. It could also be to do with your main scope focusing - Have a look at the focusing guide for advice.
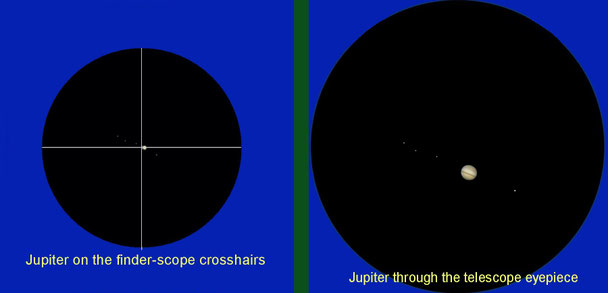
Using the Finder to Locate an Object:
When you want to find an astronomical object:
1: Point the telescope in the approximate direction squinting along the tube of the telescope. (Or use your £60 Telrad to do the same job!)
2: Transfer your eye to the eyepiece of the finder and make small adjustments to the direction of the telescope (usually with the slow motion knobs, if you have them) until the object is sitting right at the intersection of the crosshairs.
3: Transfer your eye to the main telescope and the object should be reasonably near the centre of the view even with medium to high magnifications as seen in the
illustration. Make further adjustments to center and follow the object with your slow motions (If you have them).
If your object is not in the field of view at all, you need to realign your finder. This can be done using bright stars with a little practice. (See instructions above)
As you get more experience it's easy to adjust your finder whilst under the stars, using a star or planet as your target. Get a bright object in your scope, then adjust the finder. Other objects will then be easier to locate.
NOTE: With the optical finder you can choose which part of an extended object you center.
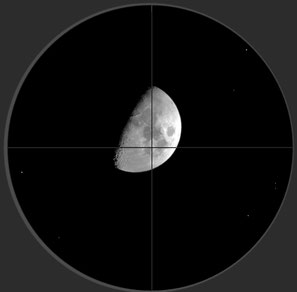
Pic: A typical view of the Moon through a 6x30 finder. Choose which crater or 'sea' to view!

Some examples:
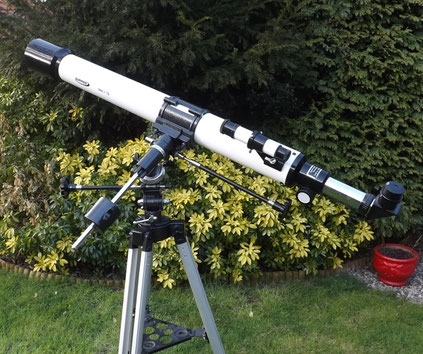
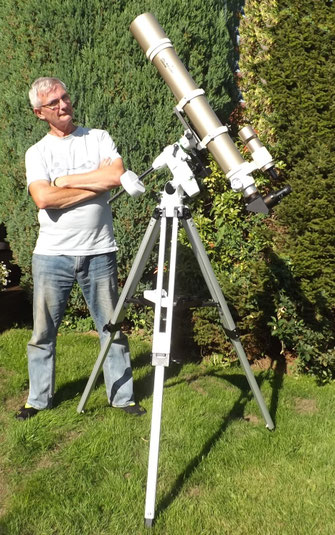
Picture Left: I had a 50mm finder on my Maksutov-Cassegrain SkyMax127.
I can see most things I want to observe in the main scope through the finder. It makes locating objects so much easier. In this case the finder is nearly 40% of the diameter of the main telescope - It helps to have a 'big bad finder'!
Picture Right:
I had a 50mm finder on the 100ED-PRO Refractor.
A 50% finder! "All the better for finding your objects with, my dear!"
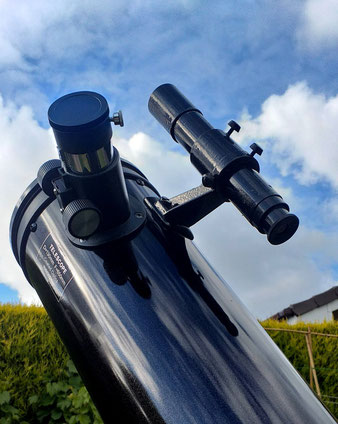
Pic: This GoTo SkyWatcher 130PS-GTI came with a Red Dot finder (LOL). As you can see, I quickly changed it for a classic 6x30
achromatic, crosshair manual finder with a very sturdy metal mounting and metal adjustment screws. I bought it off eBay for £16.
Even a GoTo telescope benefits from having a decent, light-collecting magnifying finder and not a 'bright object location approximator', which is just about as good a description of a Red Dot finder you will find!
Why bother replacing the RDF on a GoTo?
The more accurate your alignment on the stars, the more accurate the Go-To will be in locating other objects. If you are approximate in your set-up, your
Go-To will be approximate in its direction. As we have seen, the RDF finder is best described as a 'bright object location approximator'. You don't want to set your GoTo scope up
approximately! It needs to be as accurate as possible, then the objects you select for viewing will be central in the eyepiece.
Note: Another thing that causes problems with GoTo telescopes is if they are set up with the tripod head not perfectly level. Make sure the azimuth axis is vertical! There is usually a bubble level in the head - Make sure the bubble is in the dead center of the circle!
I have a video about setting up a GoTo mounting correctly: HERE
I cannot stress strongly enough just how limiting Red-Dot and Telrad finders are, compared to the optical achromatic cross-hair finder. RDFs sort of do the job, giving you an approximate position on bright objects, and a Telrad can help locate a region and help with 'star hopping', but neither can compete with even a 6x23mm finder which can show stars down to magnitude 8.5 and place them precisely on the crosshairs at 6x magnification. (JOB DONE!)
PS: An optical finder never runs out of battery and you don't have to remember to turn it off!