
This 'Mountings: Complete Essentials' guide deals with all types of telescope mounting.
Mountings: Complete Essentials
The most important thing to know about mountings before you start...
Whatever type of telescope you have, if you want to use it for astronomy, you will need a mounting for it.
The mounting is designed to support the telescope and allow it to be very accurately pointed at the objects we wish to observe in the sky. There are many different types of mounting. Each has its drawbacks and advantages. Simplicity and lightness, equatorially aligned for accurate and easy object tracking, photography, quick set up, and easy transportation and simplicity of construction are some of the reasons for the different designs.
It's easy, whatever mount type you have, to set up sufficient for visual observing and it is something that can be done in under a minute, whatever type you
have, with a little practice! This guide is intended for those wanting to learn how to set up their telescope for simple visual observation. Let me introduce you to the different
types of mounting you will have to choose from and give some advice on their suitability to astronomical applications.
Having got your new telescope the first thing that will occur to you is that once you have got it together you'll need to know how to set the mounting up and
correctly align it for use. Many people are put off buying a telescope with an equatorial mounting because they think it's hard to set up and use. They think that the more familiar
Altitude-Azimuth with its easy to understand Up and Down - Left and Right motion, known in astronomy circles as Alt-Az or AZ [Ay Zed] will do the job just as well or it will be 'easier to
use'. This is actually quite untrue. The Alt-Az mounting is a very difficult mounting to use well with the heavenly bodies, except possibly Go-To computerised telescopes (see
later).
I recommend the equatorial because it is especially designed for viewing the heavens. Good results can be had with Alt-Az and Dobsonian
mounts, after a deal of experience. But, generally, the EQ does a brilliant job and is easy to use once you have the basics and a little experience.
For the obvious reason that it's not intuitive what the thing does, I have included this explanation of the EQ mount.
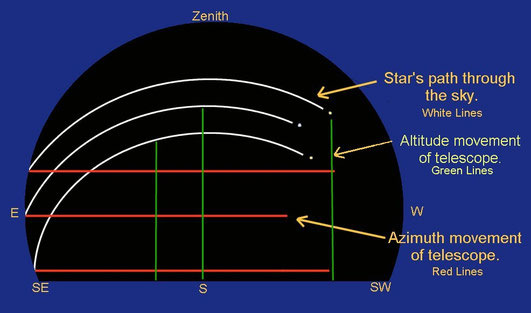
Pic: It looks very complicated, I know, but, this diagram attempts to illustrate simply how the movements of the heavenly bodies and the Alt-Az mounting's up-down-left-right motions aren't very compatible.
The Equatorial Mounting makes following the objects we see in the sky easy and the simple application of the simple instructions in this guide
will see you set up in a very short time. The EQ mounting automatically follows the white lines. This allows you stress-free observation of the wonders of the night sky.
All you have to do is set your mounting up with the correct 'polar alignment'. (See later).
With the equatorial, all you have to do is move one axis (the RA - Right Ascension axis) to follow the object.
When using the AZ you have to move both axes at the same time AND the amount of movement for each axis changes depending on what part of the sky you're looking at. So: While you're moving both axes and concentrating on not losing the object - How do you focus? How do you change eyepiece and find the object easily once it's gone out of view? How do you take photos? Answer - with great difficulty! On medium to high powers, you have both hands full turning the slow motions to keep the object in view. If it goes out of the view you don't really know where it is! Back to the finder...
With a properly polar aligned EQ, if the object goes out of view, all you do is advance the telescope around the RA axis east to west and there it is - Your object is back in the eyepiece. Keeping it there requires just one hand. With a motor drive you have both hands free!
The manual Alt-Az mounting is very difficult to manage in astronomy especialy for planetary observation with high magnifications. (Not recommended) You can't motor
drive an AZ without a computer and even then you get 'rotation of field'! Nevertheless, we will explore all types, including the AZ, and EQ versions in this "Complete Essentials of
Mountings" guide.
The Alt-Az (AZ) Mounting
I will start here, with the ALTITUDE and AZIMUTHAL or Alt-Az or even simpler, AZ, mounting as it is most likely that you are already aware of it's use and many so called 'starter' scopes come mounted in this inappropriate way.
The AZ mounting has a simple up-down-left-right movement, sometimes refered to as 'pan and tilt'. It usually needs no counterweight and is very simple to set up and use.
There are several different types, and some are much better than others. I would go as far as to say, Steer clear of the stirrup or Yoke type altogether! (See section later).
Dobsonian telescopes come on a simple Alt-Az cradle arrangement and are very effective at doing what they do - Which is, provide a stable and easy mounting for low power/wide angle views with a large instrument. Higher magnifications need more control than the manual Dobson mounting provides. Relaxing and easy planetary views are best achieved on an equatorial mounting (EQ). (see section later).
That is not to say that there isn't a place for the Alt-Az in telescopic use. They are ideal for deep sky viewing with low magnifications and short focal ratio instruments and they are ideal for children, who might find setting up and using an equatorial very challenging.
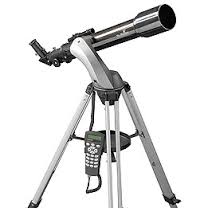
Pic: A simple Alt-Az stand. No slow motions, just friction clutches on the bearings to facilitate easy and smooth movement of the telescope tube to any part of the sky.
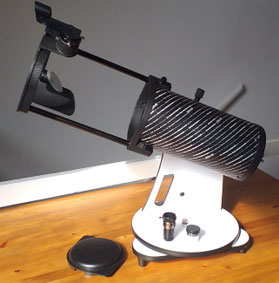
The Dobsonian Design Mounting
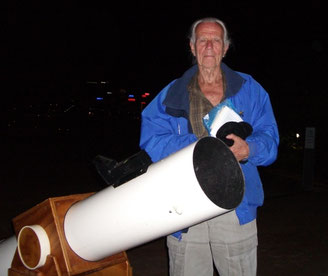
Pic: John Dobson with a proper, home made, 'Dobsonian Telescope'.
This type of mounting is a simple Alt-Az mounting, which does not naturally follow the stars.
It is easy to use with low to medium magnifications, however, tracking an object at high magnifications can be difficult for the beginner. I would only
recommend a Dobson mounted telescope for a beginner who was despirate for light-grasp and Deep Sky Object observation in sizes of 200mm and larger!
The Dobsonian Mounting has all the drawbacks of the regular Alt-Az except that is usually doesn't have slow motion controls! There are GoTo versions, however, and these, if set up correctly can give excellent results. To get the best out of your GoTo Dobsonian, it is paramount that you have a flat surface to place it on. Not merely smooth, but exactly level. Other than that, they perform well.
The manual Dobson mounted telescope is quite intuitive and it's easy to set up and line the telescope up on an object. Following that object can be simple enough, at low to medium powers. The telescope comes off the mounting easily for transportation and storage. Setting up doesn't take long and the experience can be calm and relaxing.
Other Types of AZ Mounting:
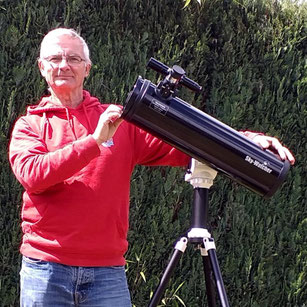
The Single Side Mount Alt-Az.
these are suitable for light telescopes (Up to 130P as shown). They are table-top mountings and need support to about waist height to be used!
They are efficient at what they do, but are limited by the need for support.
The telescopes often are attached to the mounting with a 'dovetail bar'. This is useful, because it means that the telescope can be used on 'Dovetail' EQ mountings too!
The Fork Mount
This type supports the telescope between two prongs of a fork. In most cases from the 21st century, these are driven by motors to follow the sky. Even in AZ
mode!
There is a section lower down describing the set up of the EQ fork mounting.

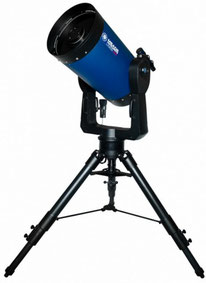
The AZ3 Mounting
This mount is ideal for refractors and Maksutov types.
It has slow-motions to control the scope while you are observing. You can follow an object quite effectively, but you do need three hands!
The tripod legs are extendible to give a useful height during use, and eyepieces can be held on the accessory tray within easy reach.
Should You consider an AZ Go-To mounting?
As with many aspects of amateur astronomy, there are swings and roundabouts in the choice of mounting. You need to take some time to consider which type of mounting will help you achieve your goal.
If you want to learn your way around the sky and be able to use any telescope or binoculars to locate objects at any time, you might opt to learn 'the manual way', with an equatorial mounting that you have to operate yourself and point in the right direction. Use your skill to find convenient guide stars and 'star hop' your way to the object you want to observe. There is a lot of fun in this and it is very rewarding.
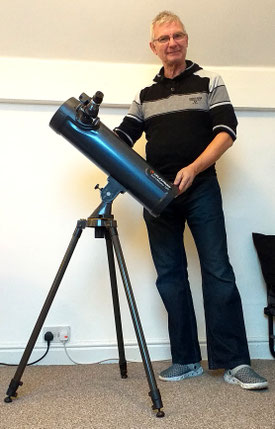
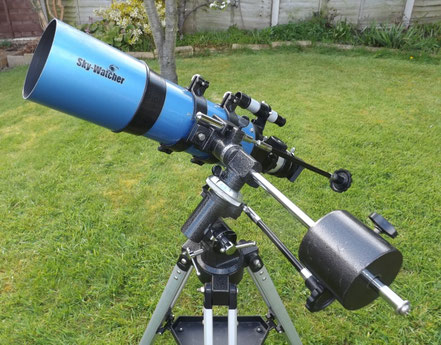
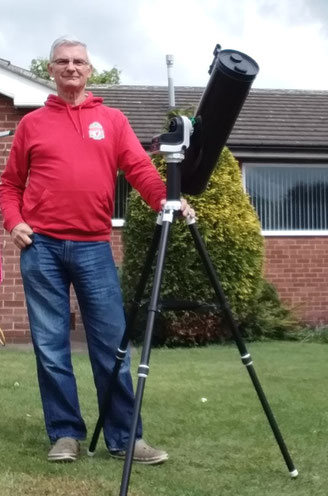
Pic: My 130P on AZ-GTI GoTo mounting by SkyWatcher.
Alternately, you may want to
be sure that you're looking at the right object and forego the learning of the stellar signposts, in favour of a robot telescope that will point to the object you want to see off a list. For you,
the 'GoTo' mount is a good option. Beware, though, you will take much longer to learn where basic astronomical objects are - And your experience, especially in a small telescope, will be a
peg or two lower than observers who have found the object for themselves.
Go-To Mountings have motors and computers that find objects for you from a list. Some of them have a hand-set attached to the mounting to select your objects, while others use an app on a smartphone to control the telescope via WiFi. Granted, they take some of the fun and all the skill out of amateur astronomy and will not allow you to advance much beyond 'telescope user'. However, you will have seen lots of things within the range of your telescope without the palava of tracking them down (sometimes frustration builds beyond belief trying to locate supposedly easy objects - In my case Messier objects M1, M97 and M78... I've still not seen any of those after all these years, and it's not for the want of looking, believe me! I can imagine a scenario where I plug in M1 on the list, the telescope slews to the right bit of the sky and I look into the eyepiece... there you are - NOTHING!)
As you have seen. There are a lot of "howevers" and "alternativelys" in this section. You have to decide which way is best for you.
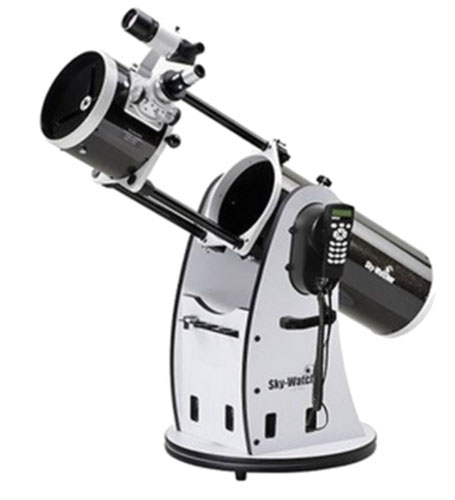
'Dobsonian' Go-To AZ Mountings:
By
adding stepper motors and computer control to the AZ 'Dobsonian' mounting it can be very easy to find and follow astronomical objects. This is good for visual observations, but long
exposure astro-photography is spoilt by rotation of field.
The initial set up invloves manually finding several objects (Two or three stars) and then the computer takes over the pointing of the scope when objects are selected from the list. When you select the object the scope slews with the motors to center the object in the eyepiece view and then tracks the object. Otherwise the mounting operates in the same way as a manual Dobson style mounting. This is very useful when looking for objects which might otherwise be difficult to accurately locate, such as asteroids, variable stars, double stars and faint nebulae.
Pic: SkyWatcher Skyliner Flextube 200P Synscan (Courtesy SkyWatcher Telescopes)
Note: These are the top level of AZ observational instruments. Usually on very stable Dobson style heavy duty mountings with a hand computer controller. They cost a lot but provide excellent support and tracking. Long exposure astrophotography is not possible with these instruments because, being AZ, the field of view rotates whilst tracking - Shorter stacked images can be made though.

My first telescope had an awful styrrup type alt-az mounting which had no slow motions or even a steady bar. This was a very poor start and a difficult mounting to use successfully on the night sky.
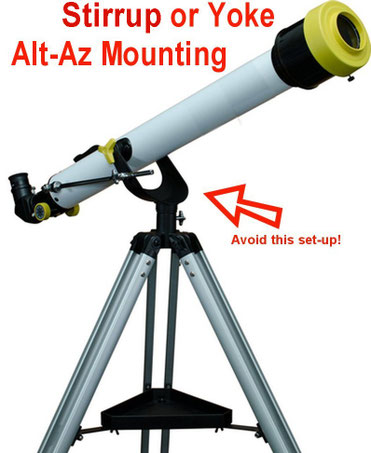
The Stirrup or Yoke Type AZ Mounting.
Please avoid any telescope that is mounted on this type of mounting. It is typified by having drag adjustment bolts at the tips of the forks and a steady bar
(Usually with a rudimentary slow-motion screw that is awful in use). These are more trouble than any other Alt-Az type to use and often become wobbly and unsteady after just a few week's
use. Certainly, in use they are hard to control, being either too stiff or too loose to follow astronomical objects accurately.
Refractors and Newtonian telescopes are offered on this troublesome mount type and all should be avoided.
It would be better to wait and save up for a bit longer to get a better type of mounting (And probably a better telescope too!) than struggle with this design booboo!
Note: Sometimes manufacturers don't even bother with the absolutely necessary steady-bar! These, especially, are to be avoided!
Also - Important: In this picture why have they left the lens cap on with the apperture uncapped? The lens cap should be completely removed for observations and NOT used like this!
The Equatorial Mounting:
A Highly Recommended Mounting for Astronomical Observations.

The principle behind the equatorial mounting is very simple.
The Right Ascension axis is aligned with the axis of the Earth by pointing it towards Polaris. The Earth revolves around its axis every 24 hours. To
compensate for this rotation the mounting has to rotate the telescope around the same angle axis and in the opposite direction at a speed equal to one revolution in 24 hours.
To allow different objects to be seen the telescope mounting has to allow the telescope to move up and down the sky's longitude lines to view different 'latitudes'
(Declinations) in a North-South direction. The mounting therefore has two axes. The Polar Axis, mirroring the Earth's axis, and the Declination axis, looking from horizon to Zenith
and beyond!
Pic: Polar alignment?
The mounting can be motorised to turn at the same speed as the Earth, or it can have manual controls to effect this rotation called 'Slow Motions' or it can be
computer controlled in a Go-To set up. Once your mounting has been set up correctly it can follow the heavenly bodies with ease by rotating around the Polar aligned Right Ascension
Axis. The motors used for telescope drives are highly geared, but still, any sort of load can affect their accuracy. The telescope has to be in good balance to get the best out of a drive
motor or slow motion control.
Balancing the Telescope on the German Mounting:
Before we move on to the polar alignment of the equatorial mounting, I want to spend a moment to talk about balancing the telescope on the mount.
It is very important to balance the telescope in both axes of your mounting, so that the object you are viewing stays in the view and the telescope can follow its motion
accurately.
It also helps the slow motion mechanism on each axis move the telescope more accurately and without strain of the mechanical parts, whether they are manual operation or motor driven.
The way we set up the blance of a telescope is simple, and takes just a few seconds with practice: It doesn't have to be done often.
1: With the telescope on the mounting, in the 'parked position' (the position they are usually photographed in!). Have the clamp locks on and make sure that the scope is firmly held by the tube rings or the dovetail clamp.
Telescopes have one, both or neither of these attachment systems! The scope in the picture, here, has both tube rings and a dovetail attachment. There are several different ways of attaching a scope to the mounting!
2: Loosen the declination axis clamp so it is completely off and slew the scope until it is horizontal. (see pic above.)
(The dec axis is the one with the counterweight on one end and the scope on the other.)
3: Let go of the scope and see if it rotates one way or another (Remember to have an eyepiece in!) The scope should NOT rotate when in balance. If it does, you will need to make adjustments to its balance point (either by sliding the scope through the rings or moving the dovetail-bar along the dovetail clamp) to balance the scope in declination.
4: Once it is in balance leave it horizontal and apply the declination clamp.
(That's the telescope balanced in declination)
NEXT:

5: Loosen the RA clamp until it is completely off.
(The RA axis is the one that points to the pole star.)
6: Slew the telescope around until the counterweight bar is horizontal.
7: Let go of the telescope and see if it rotates around the RA axis. (See pic right)
8: If it does, then you need to adjust the position of the counterweight on the bar.
This is done by loosening the counterweight clamp and sliding the weight carefully in the direction that will counteract the rotation.
(If the telescope is going down, the weight has to move further from it. If the telescope is moving upwards, the weight has to move toward the telescope, along the bar. If you can't get a balance with the weight at the far end of the bar and the scope is still going DOWN, you need to add another counterweight - For there is not enough weight to counter the scope!)
9: Once a good balance is achieved, tighten the counterweight clamp. You are ready to polar align your telescope mounting and begin observing.
---------------------------------------------------------------------------------------------------------------------------
Note: Balancing usually only has to be done once. Once you know where the balance point is, and the counterweight is in the right place, you're set. Remember, if you
add a camera or a different finder, you may have to adjust the counterweight slightly and maybe the tube in dec position to allow for the extra weight by repeating both these balancing
processes.
Caution: If your scope will not balance, because the weight isn't sufficient to counterbalance the telescope, you may have to add more weight. Unfortunately, although they are just a lump of metal, counterweights are expensive items. Be prepaired to pay upwards of £30, even for a small one. The important thing to check is the counterweight hole diameter - Perfection is not necessary, but too small won't fit!
-----------------------------------------------------------------------------------------------------------------------------------------------------------------------------------------------------------------
Here's a little video showing the process as described above. Please excuse the slight out of focusness... Mobile phone malfunction!
Telescopes that have no adjustment in the telescope balance (fwd / back) direction are usually designed by the manufacturer to be at their 'in use' balance point (Remember to add the finder, diagonal and an eyepiece, and also rack out the focuser a short way, before worrying about it not balancing in Declination!)
Left: This particular Meade 4" f7.8 telescope has bolts that protrude from the telescope tube to attach it to the mounting plate and it cannot be moved along for balance - Nevertheless, it is in good balance in declination. The counterweight can be adjusted for RA balance as usual.
NOTE: It is usual to have some of the counterweight bar extending beyond the weight at the 'normal' balance point (See pic left). This is to allow you to balance out a camera or heavier finder-scope, if you're using one, by moving the counterweight even further from the telescope.
Setting Up the EQ: Some practical considerations.
Set your latitude:
Most EQ mountings have a degree scale on the side to indicate your latitude. How many degrees you are from the equator (Your Latitude) is the figure you use to set the angle of the Polar Axis using this scale.
It is easy to find your latitude from Google. For example the English Midlands are 52.5 degrees North. So, when setting up your EQ, the first thing to do is set your mounting to your latitude.
You can check this by sighting polaris along the polar axis as shown in the pic. Make sure the tripod is level and the top of the legs are horizontal. The Polar
Axis should be the same angle as Polaris and neither left or right of it's position. (I know there's a 3/4 degree wobble, but for first attempts this is good enough).
Note: If there is no latitude scale, you can set the polar axis angle to point at polaris while squinting along it! (Pic)
Next you need to assess the place you intend to set up your telescope for observing.
This ideally should be as far from buildings as possible to avoid the heat rising from the warm buildings affecting the view through the telescope. You should also have a good view South
East through South West to get the best out of astronomy. Obviously, 360 degrees would be ideal, but SE-SW is the minimum reasonable sky
view you'll need.
If you plan to take your telescope out to a remote site to do your
observing, then you'll have to set up each time you observe. Getting to know how to set up your mounting is paramount to easy observing. Try to choose somewhere with a hard area to
put your tripod feet.
You need to look at the ground and make sure it is reasonably flat. If not, you
will need to make allowance for any slope when setting up by extending the tripod legs. Some mountings have a plumb-bob or bubble indicator to help ensure this flatness.
EQ Set Up: Polar Alignment - Finding Polaris
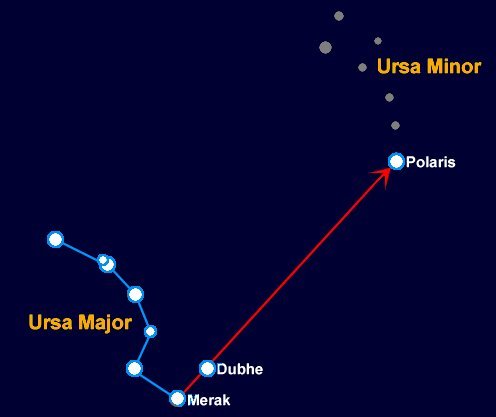
You will find Polaris in a reasonably bland part of the sky and once you've found it a couple of times - it's
easy!
As the sky rotates nightly, and as the seasons progress you will notice that the Plough (or Big Dipper) is found at various positions in the sky. Winter, it's low
down in the North, Summer it's high overhead for us in the Northern hemisphere. This is due to the apparent rotation of the 'celestial sphere'. The pointers always point to
Polaris. Whether that is up, across, down or slant-ways - They are 'the Pointers', and they point! :o)
Pic: The Pointers, pointing!
VIDEO Below: Press 'PLAY>' to see how The Plough moves around the pole with the pointers indicating Polaris.
The position is shown every three hours during a 24 hour period (every 45 degree rotation of the sky).
POLAR ALIGNMENT of the EQ Telescope Mounting.
Set up for the Northern Hemisphere
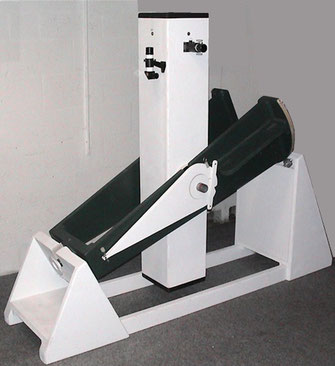
The German Mounting
Let's start by describing the set up of the most comon mounting type.
The set up procedure for the German Mounting is the same for refractors, Newtonians and Maks.
(If your telescope is a Schmidt-Cassegrain Telescope (SCT), then you will probably have a fork mounting with no counterweight. See below).
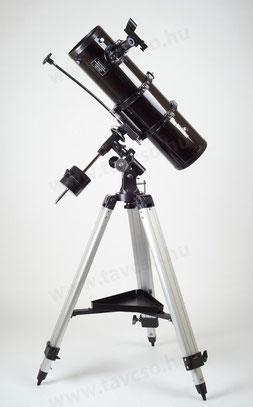
(Image courtesy SkyWatcher Telescopes - The wonderful 130P on EQ2).

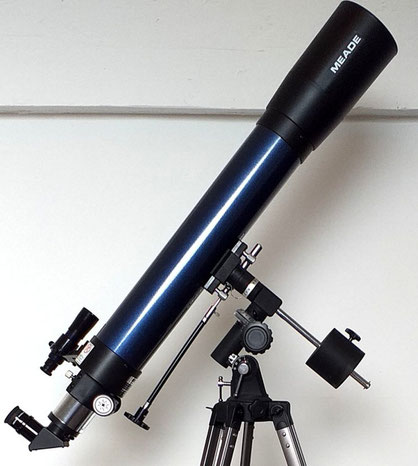
Pic: 3.5" Refractor on German EQ2 Mounting
This telescope is in the 'Parked' position - One that is very rarely used for observation (Image courtesy SkyWatcher Telescopes - The wonderful Evostar 90 on
EQ2).
Note: Most telescopes are shown in what I call, 'The Parked Position'. This is purely to illustrate the mounting layout. You hardly
ever use a telescope in this position. (See pictures later of 'in use' telescopes.)
You then need to align the polar axis (The one without the counterweight) so it points directly at Polaris, by eye. Some mountings have a sight which enables this, ( See below if yours does) others do not - Those that do not outnumber those that do by millions! - Either way it is quite easy to squint along the axis and point it at Polaris.
DON'T TRY LOOKING THROUGH THE TELESCOPE FOR POLARIS - THIS WILL NOT WORK OUT WITH A GREMAN TYPE MOUNT!
Just squint along the axis, as shown below, and point it at Polaris.
Squint: Looking carefully along the Polar axis to line up with Polaris.
This set-up method is sufficient for normal viewing of objects.
You are now set up for observing the night sky.
To find an object: Rotate the scope around the RA axis and Dec axis to center the object on the finder crosshairs, then observe with the telescope. Use RA slow motions, if you have them, or gently and smoothly push the scope round the RA axis, to keep the object in the view. (See video below)
German EQ: Set-Up and Use Video.
Click the video below to see how this all works out in practice. I promise this video explanation will make your headache disappear!
In use the polar axis continues to point at polaris. IT DOES NOT NEED TO MOVE. The majority of the sky is accessible without moving the polar
axis. Actual observation very close to the pole is tricky, and below the pole impossible with an aligned German
mounting! It's a good job that most of the interesting things are well south of the celestial pole.
By reading this guide I hope you will understand the principle and set up correctly for your latitude.
Exercise to get used to using your mounting:
It is beneficial to experiment with your mounting in daylight.
Start by rotating the telescope on the axis with the counterweight. This moves the telescope in the north and south plane (+ & - declinations).
Then rotate about the polar (RA) axis. This is the motion that follows the movement of the sky.
I accept that it's not intuitive by any stretch of the imagination. In use the telescope very seldom looks like it does when 'parked' and pointing to the pole
(As it does in most commercial photos!)
Pic: This ST102 is in a more usual position for viewing to the south. North is in the direction of the top
right corner of the picture. The polar axis points to it as we have seen.
Another useful excercise: To master aligning your telescope on the object you want to view:
Decide on a position in the sky that you'd like to look at and then try to put your telescope in a position that would allow you to view that point. Then decide on another point. You'll soon get the idea of how the mounting moves.
NOTE:
Once polar aligned, on the German Mounting, telescope can be carefully pointed to almost any part of the sky. (Ironically the pole is hard to access!)
Once set up, re-check that the telescope is in balance. That is, that the telescope doesn't swing up or down without being pushed or guided. Make sure the telescope
doesn't rotate about the Polar (RA) axis, either telescope heavy or Counterweight heavy. You can leave the axis locks slightly engaged to stop the fully free movement of the
telescope.
Then, when locating an object, simply loosen off the axis clamps a little so there is only a very slight friction and the telescope will stay wherever it's
pointed.
FORK MOUNTING POLAR ALIGNMENT SET UP:

Polar Alignment:
Older, manual fork mounts need to be polar aligned by the operator:
1: Adjust your wedge to reflect your latitude. Make sure the tripod is level. (The wedge is the adjustible metalware that attaches telescope fork to the tripod head.)
2: Point your forks, with the scope attached, to point exactly north. Adjust the scope to read exactly 90 north in declination and you should see Polaris in a low power eyepiece. (Some people have an extra-low power eyepiece just for this process).
3: Adjust your mount, not your telescope, in altitude and azimuth at the wedge, to center Polaris. Job done! This is close enough for most applications.
Note: Unlike the German Mounting, the fork can easily access the polar regions of the sky.
NEW SCOPES: Modern (All 2015 onwards) fork mounts have drive motors and are computer controlled. They will set themselves up, in a manner of speaking (You will still need to have reasonably close latitude and northing). Your scope will have all the details when recieved how to set up the mounting.
Other Types of Equatorial Mounting
The Simple Fork Mounting
Only found on telescopes from the mid 20th century and earlier. Lining the fork up with the pole is trickier, but not impossible. If there is a RA latitude and
declination scale it is done as described above, if not, there's a lot of trial and error involved and squinting up the fork arm!
This equatorial mounting has a very short polar axis. You could attach a finder to the fork arm that points to the pole.
The telescope is supported on bearings at the tops of the forks. There are knobs with friction clutches to supply suitable drag so the scope can be moved smoothly.
The Horse-Shoe Equatorial Mounting
This type is for permenantly sited, heavy instruments. It is not a portable mount.
In this type, the polar axis is shared between a simple bearing at the bottom and a large horse-shoe shaped bearing at the top.
The telescope is supported between the two declination bearings, one on each side-beam of the mounting.
This pic shows a horseshoe mount that has been built for 'fun'. This 12" telescope isn't so big it must have one!

The English Equatorial Mount
Similar to the Horse-Shoe, the English shares all of the same characteristics. A permenant type of mounting, not suitable for small telescopes.
In this mount the polar axis is made up of two simple bearings on different sized pillars with a connecting RA post between them upon which the telescope is mounted, so it can move in declination.
This pic is a diagram because they're as rare as hen's teeth! I doubt you'll come across one!
Other Information Re: EQ Mountings

POLARIS' POSITION:
Polaris is actually 3/4 of a degree from the celestial pole, in the direction of the W shaped constellation of Cassiopeia. Or, to put it another way - the celestial pole is 3/4 degrees from
Polaris, in the direction of Alkaid, the end star in the handle of the Plough (Big Dipper).
Polaris Co-ordinates = 2h 40m R.A. +89.25 degrees Dec.
If your German Mount has a Polar Axis alignment 'polarscope', you're laughing! This is a small sighting telescope that you use to spot Polaris
through the Polar Axis of your mount. The view shows a 1.5 degree circle (3/4 degree x 2) and with a little bit of calculation, (or just twist your star
atlas around until the constellations are at the same angle), you can figure out what angle Polaris should be in the sight. Once this is known you simply put Polaris on the line as shown in
the example diagram below, and bingo - You're very accurately set up in a few seconds!
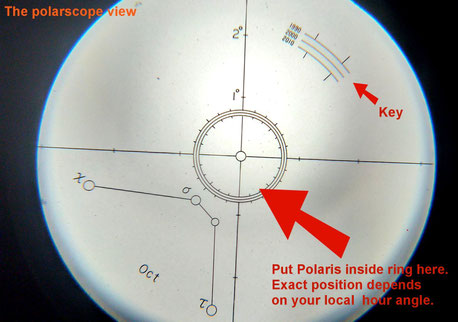
Note: (Pic) Some polarscopes have both Northern AND Southern reticules for use in either hamisphere. So, don't worry if yours has
little circles for stars in Octans as well as a circle for Polaris - The circle is for Polaris and that is great! (The pic is taken in daylight to show clearly!)
It must be stressed that unless you're taking long exposure astro-photos, the set up of the mounting is much less rigorous and merely pointing the RA axis at the pole star will be sufficiant for visual observations of a few minutes.
Motor Driven Mountings:
By adding a speed controlable motor to the RA slow motion, EQ mountings can be made to follow astronomical objects once located. If the polar alignment is sufficiently well done, the object can
remain in the field of view for many minutes. Small adjustments to RA and Dec, to keep the object centered in the view, can be effected by use of the slow motions as usual, even while the motor
is running.
Most modern fork mountings are motorised as standard.
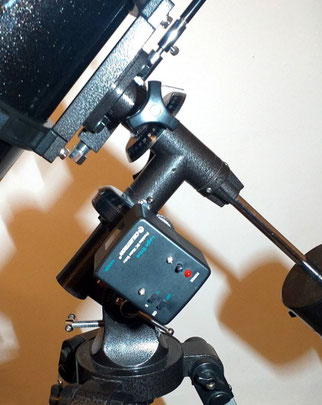
Pic: SkyWatcher EQ2 mounting with battery drive motor attached. Especially with a battery drive it is crucial to have the
telescope in good balance.
Go-To EQ Mountings:
By adding
stepper motors and computer control to the EQ mounting it can be very easy to find and follow astronomical objects. The initial set up is very similar to the normal routine except that
there is an added step to tell the computer where it is. Usually this invloves manually finding several objects (Two or three stars) and then the computer takes over the pointing of the scope
when objects are selected from a list.
When you select the object the scope slews with the motors to center the object in the eyepiece view and then tracks the object. Otherwise the mounting operates in the same way as a manual mounting. This is very useful when looking for objects which might otherwise be difficult to accurately locate, such as asteroids, variable stars, double stars and faint nebulae.
Note: These are the cream of observational instruments. Usually on very stable EQ5 or EQ6 rated mounting with huge heads and tripods, they are very solid and track extermely accurately. They cost a lot but provide rock solid support and almost perfect tracking. Long exposure astrophotography, without field rotation, is available with these fine mountings.
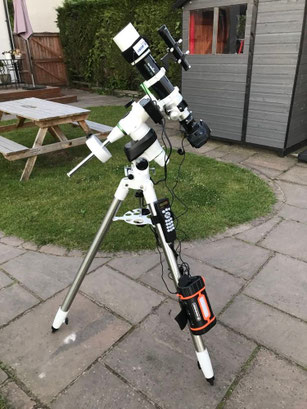
Pic: SkyWatcher ED refractor set-up for Astro-photography on GoTo EQ5 German mounting (Courtesy Gareth Jackson)
Make it Easy to Realign in Future! (Any mounting type.)

So that you can place your telescope mounting in the same position at each observing session, you could mark the positions of your tripod's feet when it is in the correct position to help with alignment next time. Particularly if you plan to take your telescope in and out of the house each time, as so many observers have to do.
If you don't have a hard surface (ie you plan to observe on grass) it is wise to put down some small area to set up your telescope on so the feet don't sink into
your lawn. You can opt for three small flagstones, three 8" circles of cement (Garden centre stepping-stones make good bases), one for each foot, set flush with the grass to allow mowing, or
making a triangle of angle-iron to spread the weight of the feet. Even 60mm plastic carpet protectors will do if spiked into your lawn and recessed to allow mowing. (See video
below)
Mark the position of the tripod feet. Whether you use flag-stones or circles of cement, or observe from a flagged area, you can easily mark the correct leg positions not only the position on the flag, but the length of each tripod leg, if you extend them each time. Make the marks easy to see as you will have to do this by the light of the moon or a dim red torch!
Your 'set up' is now all done. Once you have done the above stages you can begin observing the sky with your telescope, which will be well enough aligned for visual observation and know that it will be just a few moment's work to set it up in the same position in the future...
For photographic long exposures the mounting has to be aligned much more accurately (and permanently is a good idea!) - The setting up of a telescope like this is well beyond the scope of this simple guide!
AZ GoTo Mounting - Alignment Problems:
People buy GoTo telescopes thinking that they will solve all their problems and it will all be plain sailing.
But if you do not set up your mounting carefully and acurately enough it will not find the objects you want to see.
The main thing is to make sure that the telescope mounting is absolutely vertical. This is done by adjusting the tripod legs to align a bubble in a circle (See video below).
If the telescope head is not completely level then the further from the 'set-up' star the object you wish to observe is, the greater the error in the telescope's position. It is worth investing some time to make sure that the telescope mounting is perfectly aligned vertically and that you have input your location data into the software correctly.
(Logically, though, it wouldn't matter if the head was out of vertical exactly in the North-South direction, as the computer would 'think' you were at a different latitude! But, any other direction and you're snookered!)
This is an ideal situation where marking the position of the feet for future use is very much recommended and works very well. With my own telescope, I have set small splastic cups into my lawn for the feet of the tripod to sit in. I know then, that the tripod is vertical and the same way round each time I set up.
Below, there is a video of this process, including the making and laying of the cups. The video assumes that you're having some problems with accuracy - However, if you follow this proceedure beforehand, you will have more successful acquisition of your target objects.
GoTo Scopes for Children?
I would argue against these for children. Having objects found for them will not help with their education of the night sky. They will get used to having everything put on a plate for them and they will more than likely give up on their interest. Simply having everything given to you, without having to work for it, rapidly becomes very boring!
Finding an object for yourself, certainly in small telescopes, is a very large portion of the experience. Missing out on tracking down objects leads to apathy for the subject and may result in 'giving up'.
In a small telescope there are no 'Hollywood' views of the planets or galaxies, they are small, almost featureless discs and fuzzy blobs. The 'view' is not the main thrill... The main thrill is finding them in the first place!
A Go-To telescope takes away most of this sense of achievement. What you can see of the object is largely secondary at this size of telescope.
Nevertheless, it's where we all start, and those that start 'right' carry on and don't get bored and give up! I want your child to thoroughly enjoy their astronomy and never give up
improving their observational skills. You will never forget your first view of Saturn and its rings, or the moons of Jupiter, and finding them for yourself is much more
satisfying.
Learning your way about the sky, and the satisfaction of finding something in all that space and blackness is far more rewarding than just dialling in a number and letting the scope find it for you. There is a place for GoTo scopes, but not in the early years of children's astronomy.
Statements like this can sound pompous and such advice can sound like it has no basis in practicality, but they do serve a serious purpose. I want newbies to have a
good experience. I don't want beginners to feel let down. I want them to be filled with a sense of achievement and enjoy the whole experience.

Dobsonian Telescope History:
For the purists
The term 'Dobsonian' has come to mean any telescope on the 'Dobson Style Mount'. This has become so prevalent that it is even in several astronomical dictionaries as the definition! (Say something often enough and it becomes official - Look at "The Union Jack"... I digress!)
The true definition of a 'Dobsonian Telescope' is slightly different and is worth knowing, especially if you're as pedantic as I am!
Many manufacturers, and even experienced astronomers, mistakently think that the term 'Dobsonian' refers to the type of mounting a telescope is on. An Alt-Az of particular construction. Even 'any' Alt-Az... I have seen many regular / classic type Alt-Az scopes described as Dobsonian! This is not the case.
Having spoken to John Dobson on this subject, face to face and at length when he was a guest at my house, these are the facts:
John was not bothered about patenting his ideas, he just wanted to get as many people looking through big telescopes as possible - Consequntly, there is no
rule about what you can call 'a Dobsonian'. But, one of the overriding feelings I got from John was that it had to be home-made and BIG, above all else - He was
depressed by mass produced and expensive telescopes, especially the tiny ones that flooded the US market. It was rediculous to him that he could make a 20" telescope for the same
price as a simple 6" commercially bought scope.
The overriding rule for John Dobson was: "MAKE THE SCOPE BIG, BUT: KEEP THE TELESCOPE SIMPLE AND THE COSTS LOW".
When John was creating the telescope design that became known as 'The Dobsonian', there were a number of considerations that influenced the design
(ALL of which have to be present for a telescope to be a TRUE Dobsonian).
John Dobson's Telescope Design:
1: He ground large mirrors (12" and larger) out of thin glass blanks, usually 25 - 35mm thick. These were extremely thin by contemporary standards - A 12" would typically have 60-70mm thick mirror and a 14" would have maybe 80-90mm thick glass. John Dobson made telescopes of 20" apperture with 50mm thick glass!
2: He avoided the complicated and expensive mirror cell by laying the mirror on a backboard with a simple plywood cell of three hardboard triangles with three rubber points with a 'bib' over the top, sometimes with a layer of bubblewrap, to support the thin mirror. The weight of the mirror was taken by a support strap underneath the lower half circumference. Because of this, the telescope could ONLY be used on an Alt-Az mounting to keep the sling supporting the mirror correctly.
3: To keep costs low and to maintain portability he had avoided the equatorial mounting. A Dobson telescope was an Alt-Az. John made the mounting from plywood with a large bolt for the verticle axis and teflon pads to minimise friction. The altitude bearings were made of drainage tubing and rested on teflon pads in the semi-circular mounting cutouts.
John was pleased to be able to make a workable 20" reflector for the same cost as a 6" commercially bought equatorial telescope.
There's a video of John himself constructing a 'Dobsonian': Here> https://www.youtube.com/watch?v=snz7JJlSZvw&t=3608s
Watch video from about 55mins, particularly for the mirror support part. At the end he tests it out.
However:
The above facts are largely unknown and figured only in interviews with Mr. Dobson in the astronomy magazines of the seventies and early eighties. The majority of people (even astronomers), following the manufacturer's lead, believe that the type of mounting is all that denotes a Dobsonian Telescope. It is a matter of fact, that this misconception will continue to prevail, and we will have to accept that these Newtonian telescopes of classic design, supplied on a 'Dobson Style Alt-Az mounting', will be referred to as "Dobsonian Telescopes"!
As an end note:
It is because John Dobson wasn't interested in Copyright, that anyone can call a telescope a 'Dobsonian' without it having to follow any of John's principles!