
Focusing

Why does the image get larger out of focus?

Illustration:
This diagram shows how the image gets smaller the closer to the focus point you get. The light rays shown are a very simplified version of what's happening, but I think you can see the cause and effect with this diagram.
What you see when you look into an eyepiece is what is at the eyepiece focus. So...
TOP: The eyepiece is too far outside the primary focus point and sees the defocussed circle of light as the light rays diverge after passing through the primary focus point.
MIDDLE: The Eyepiece and Object Glass cones of light coincide at both their foci and the image is perfectly in focus, a small point.
BOTTOM: The eyepiece is inside the primary focus point and sees a circle of light as the light rays converge on the focus point.
When you focus on an object turn the focusing wheel one way or another and observe the image. If it gets larger, turn the wheel the other way. Do this slowly until the image is as small as possible and the detail comes out. If you over turn, simply reverse the direction of turning and loom for the image to sharpen again.

Those other problems with seeing an image:
As listed at the beginning, in order!
For various reasons the optical system has to be put together in a certain way to see an image. The eye cannot focus an image where the light rays are not
parallel, and the eyepiece has to be at the primary focal point as we have seen above.
The rays of light from the Object Glass or Mirror of your telescope are converging and consequently you won't see anything but a blur, if anything!
Pic:
This picture shows a refractor telescope with all the parts you will need in the right order and correctly set up (apart from the Barlow which is optional).

NOTE: Newtonian Telescopes do not use the diagonal. The eyepiece fits straight into the drawtube . (You may have a Barlow and that operates exactly the same as with a refractor and is optional).
The diagrams that follow show the refractor, but the principal also applies to the Newtoanian or any other type of telescope.

TRYING TO USE - Barlow Only:
The Barlow lens is a negative lens which optically changes the focal length of the telescope.
In itself it is not an eyepiece and the eye cannot see an image if there is no eyepiece in the Barlow.
The Barlow facilitates the use of an eyepiece. It doesn't give a focussed image the eye can see, alone.

TRYING TO USE - No Eyepiece in the telescope:
Very similar to 'Barlow only'.
The eye needs the light coming from the telescope to be parallel. There has to be an eyepiece in the telescope to see an image.
This will produce the same result whether or not the diagonal is in the light path.
This would be the same in a Newtonian, or any telescope, without an eyepiece in the draw-tube.

TRYING TO USE - a Refractor Without a Diagonal:
(With an Eyepiece):
Although it might apear that the diagonal merely changes the direction of the eyepiece for viewing, it also plays a crucial part in getting the eyepiece to the right point along the optical
path.
Remember, the eyepiece has to be at the primary focus to see the image.
The diagonal typically adds about 10cm to the position that the eyepiece is in. The drawtube in many telescopes is not designed to extend far enough to focus without the diagonal. If you want to use the telescope without the diagonal you will need to get an extension tube.

Refractor Object Glass: Lens elements wrong way round:
If your refractor has been bought second-hand and despite following the focusing advice on this page, your stars have a little halo, or look like flowers, there is
the strong possibility that the previous owner has cleaned the OG doublet lens and not put the elements back together correctly. In just four telescopes out of nearly 400 (March 2023) I
have bought second-hand, over the last five years, this has been the case (Only 1% - This is not a big problem!).

Example: The latest one I found was in March 2023, and sparked my writing of this section of the Focusing page. I set up the scope to test it on a distant object in daylight and immediately I could see that the image looked a litle 'foggy'. I waited until dark and looked at Emley Moor Transmitter which is 16 miles distant. The red warning lights all looked like poppies, with the lights surrounded by a gossamer halo. Immediately, I knew what was wrong and stripped and cleaned the main lens, putting the front lens back in the other way round, as described below in detail.
After just ten minutes work, I re-tested the Bresser SkyLux70 and the lights on the transmitter were perfect, crisp little points of red light with detail seen in
the red light glass covers. Job done, and I had a beautiful telescope to sell with confidence.
Pic: Emley Moor Transmitter at sunset. 19/04/23 21:00 16 miles distant using SkyWatcher 130P 650mm f5 and 25mm eyepiece. The phone was a Samsung J6 and phone zoom was 0.0 in single shot picture mode. You have no focusing problems with a well adjusted parabolic Newtonian!
The two elements of the Object Glass 'doublet' in a refractor have four different surfaces. The front lens has two convex surfaces, slightly different to each other (This is the lens that is usually in the wrong way round causing the problems), and the back lens is plano-concave (like a dish - See diagram). Both these elements are carried in a 'cell' and held in place with a retaining ring.

Suspicion:
Your refractor image should be crisp and sharp when in focus. If daytime viewing looks misty, or stars look like little flowers, or have halos round, it would be foolish to try to make useful
observations with such a telescope. A much simpler resolution (no pun intended) is to fix the problem lens!
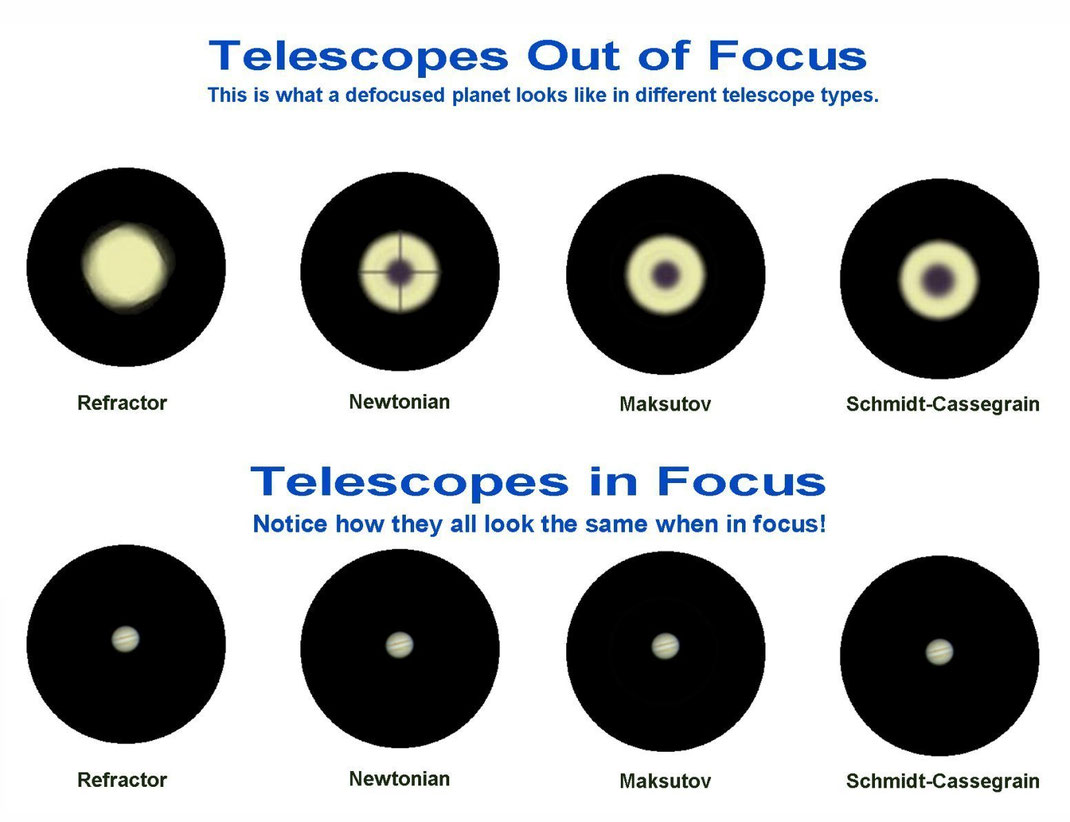
Pic: Star images in a refractor with the lens incorrectly configured (top) and rectified (Bottom).
If you suspect that your refractor OG is incorrectly configured:
Before we start: Let me say that this is not a 'dangerous' procedure and unless you are very careless and drop the lens on a hard surface, nothing will happen to the lens while out of the scope.
The tools you will need are:
Alcohol infused lens cleaning cloths (several, and as many as necessary - See procedure)
A pencil
A clean piece of kitchen roll
A cocktail stick (If your lens has a spacer ring - You won't know until you're in there - Have these items available)
Cleaning your OG or Rectifying a suspected assembly error:
Please, read through this entire procedure before embarking on cleaning your own lenses.
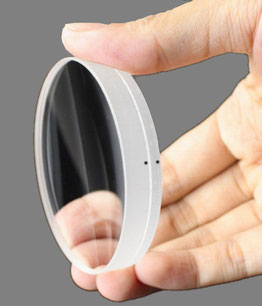
Pic: Once you have read this procedure, you should be able to tell which way round this doublet goes into the scope! These two lenses are
marked so you can see which is the front surface of each by the positioning of the dot toward one surface. When they are put together the dots are both aligned and to the same side.
If you are lucky, your lenses will have manufacturer's marks already on them!
The Procedure:
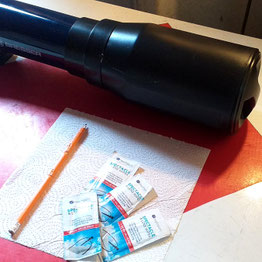
1. Spread out a clean piece of kitchen roll on a flat surface close to the refractor. Put the other items close by.
1a: Remove the dew cap. This sometimes pulls off and sometimes screws off.

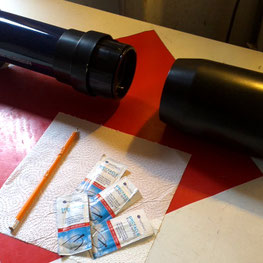
2. Most Object Glasses in our small to medium size are merely held in place in the cell with a front, screw threaded, retaining ring. Carefully unscrew the ring and remove, with the telescope at a positive angle of a few degrees so the lens doesn't fall out. Make sure the cell retaining ring is clean and lay it on the kitchen roll sheet.

3. With a lens cleaning cloth covering your hand 'A', carefully tilt the refractor to allow the front lens (The one that's probably in the wrong way round), to tilt forwards and encourage it to fall into your hand 'B' (Without letting the spacer ring or second element fall out) Pic: A B C.
4. Most important: Before you do anything
else, mark the edge of the lens with a dot of pencil 'C'. Mark it toward the back edge, as you removed it from the scope. With the lens in your hand this should be towards the top of the edge
(Same as the pic, if we suspect it's been in backwards. Put the mark on the front edge if just cleaning!)
If you are just cleaning, mark the bottom/front edge because the lens was correct!
4a. Check for manufacturer's marks on the edge of the lens. (If they are present you can check the correct lens orientation).
5. As you clean it, check that the lens in your hand is the biconvex lens, and feels curved outwards on both sides. (If it doesn't we will have to remove the other lens). Either way: Thoroughly clean the lens in your hand, on both sides, with another lens cleaning cloth. Hold it by its edge over a soft surface whilst doing this.
6. Still holding by the edge, lay the lens gently on the kitchen roll on the flat surface.

7. If there is a spacer ring, remove it carefully and put it next to the lens on the kitchen roll. If you can't get your finger in to remove the spacer, use a cocktail stick or sharp pencil to poke behind it. (Don't use anything metal - This might scratch the lens).
7a. Some lenses have tabs of spacer tape on them instead of a spacer ring (do not remove the tabs), other doublets are meant to be in contact and have no spacer (Nevertheless, the front lens can still be in the wrong way round!)

8. Using yet another cleaning cloth, clean the accessible surface of the back lens. This should feel deeply dished to the touch.
8a. If it feels flat, then it too will have to come out (PIC: A little trickier because they have a thicker, flat edge) - They sometimes get stuck and need a bit of jigglng with your fingers to get it to come forwards.
8b. If this is necessary, and once it is out of the tube, clean this lens thoroughly with a lens cloth and return to the reftractor tube with the curved side to the front. This is achieved by supporting the lens, with the curved surface on your fingers (covered with a lens cleaning cloth) and gently and carefully pushing it up into the vertical tube of the scope. Hold it in place and return to an upward angle.
9. Pick up the spacer ring (if there is one) and carefully put it in the tube so it rests against the lens. If you need to settle it against the glass, use the pencil or cocktail stick to ease it into the correct position.
10. Pick up the front lens by its edge and check the marker dot you applied to the edge. This should now be orientated so that it is on the front
side. You have now turned the lens round and when you put the elements of the OG back together this is now a different orientation. Double check that the lens is perfectly clean - Remaining
dust on the internal surfaces can't be removed once the lens is back in its cell, without going through this process again!

11. Carefully sit the lens on the lower lip of the tube and tilt it back until the lens sits on the spacer ring. If you have to move the lens by hand at all, use a cleaning cloth (I told you we'd need a few) or a cocktail stick.

12. Make sure the lenses are seated properly. (A little shake with the scope vertical, lens uppermost, should do it). Then carefully screw in the retaining ring, making sure not to cross-thread it. It should very slightly impinge on the lens, but not be screwed in tight. The lens elements should not rattle, nor should the ring press hard on the lens. Gently does it!
Note: The threaded front retaining ring will not come loose even if it's not tight! Don't overdo it.
13. Test your scope with a star or distant light at night to check the image quality. It should be much better!
END OF PROCEDURE

Note: If the image quality is not better, or worse! Redo the front lens operation and return the lens to its original position, no harm done.
Maybe, if there isn't a spacer, you need to think about adding some small (3mm square) insulating tape tabs to the lens to give a little space between the elements of the OG. This can be a
lengthy operation adding three more tabs at a time, to build up the correct thickness, until the star image is perfect!
Make sure you have carefully followed this procedure and that you have studied the pics and diagrams carefully before setting off on this rectification.
Pic: 3mm square spacer tabs between the elements of a 60mm doublet.

Newtonian out of Collimation:
If the main mirror of your Newtonian is parabolic, but you still have focusing problems, and your stars aren't points, or they have little tails pointing off to one side like little comets, it may be that your mirrors are not aligned. They may be out of collimation.
Pic: A quick way to check this is to defocus a star or planet and look at the defocussed image. (Jupiter in pic - Note the moons have the same effect). The shadow of the secondary should be central in the planet disc. If not, then collimation is on the cards.
Eg: In the pic the shadow is off to the lower right.
There is another simple procedure to rectify this problem and it has its own page on the website. Please click HERE for page.

Using the Newtonian Telescope the Wrong Way Up on the Mounting and Looking at the Ground:
This is not a silly, or as uncommon, as it sounds.
To the average person in the street the Newtonian telescope is a complete mystery and, having only seen refractors before, they naturally assume that the eyepiece is at the bottom of the telescope.
This means that they end up with the scope pointing at the ground when they try to observe.
Easily done, if you don't know that the light enters the tube and travels all the way to the bottom and is reflected back up the tube to the eyepiece at the top!
Comment: When you look at many eBay or Marketplace listings for Newtonian telescopes so many of them are pictured upside down, it makes
me wonder if that is why they're being sold. The owner didn't understand the principles to use it properly? Sad.

Let's do a bit of focusing practice, eh? (This can be done in the daytime).
I've included a labelled photo of what I'm talking about for the Newtonian users... (the refractor is similar and much simpler).
Let's try a shorter focal length eyepiece (if you have one - Something like a 10mm - 12mm). Look through the telescope at the object in the distance and use the
focusing knobs to bring the image into sharp focus as you have done before - In a shorter focal length eyepiece it's harder to decide when it's at best focus. This is why practice is
important. You will notice that when you change to a different focal length eyepiece the image will be a bit blurry, and you might need to refocus to get the best image. When you are
looking at the planets and stars you may also need to refocus to get the best image. This is normal and expected. This is why it is good to get some focusing practice done in the daylight.
High magnification eyepieces, like the 4-6mm items, take a lot more focusing to get the image as sharp as possible. There is much more leeway in the 'best focus' position in longer focal length
eyepieces as the point of focus is slightly less precise.

Make Yourself a Simple Focusing Mask:

If you're a practical person, and you'd like a side project for those boring cloudy nights, and you'd like to be sure of a good focus, you could make yourself a
simple focusing mask (For your refractor or Newtonian or Mak).
The mask needs to fit the diameter of the tube, and fit snugly over the tube end or dewcap like a lid. It has three equally spaced holes cut in it. You can make it out of cardboard or a plastic lid off a tub, for example.
The important thing is that the three cut out apertures are about 1/6th of the primary diameter and are close to, but not touching, the outer edge of the primary. (See spacing measurements on the diagram - The measurements are different for each size of telescope).
Newtonian tubes are a little larger than the Primary Mirror diameter. Make your mask to fit the open tube end, and space your apertures for the mirror size.
EG: For a 150P Newtonian with a tube diameter of 175mm diameter with a 150mm Primary Mirror:
The mask would need to be 175mm diameter (A) and the three apertures would be 25mm in diameter (B) and their centers placed at 75mm from the center of the mask (C) equally spaced.
Refractors often have a dew cap. Make your mask to fit the dewcap and place the holes for the OG diameter.
EG: For an 80mm refractor with dewcap of 110mm diameter and an Object Glass of 80mm:
The mask would need to be 110mm diameter (A) and the three apertures would be 13mm in diameter (B) and their centers placed at 30mm from the center of the mask (C) equally spaced.
In use: You get three (dim) stars to focus. As they become prefectly focussed they align and there is just one sharply focussed star, instead of
three fuzzy points. Once you know the telescope is in focus with that particular eyepiece, remove the mask to make your observations. When you change eyepiece you'll need to
focus again.
I have recently discovered that Focussed and Focused are both viable and correct spellings of the word.
I have decided that in my website, and correspondence the double S looks more 'English'.