
Binoculars in Astronomy
There has been much written about telescopes in this website with only a brief mention of binoculars. These are indispensible equipment to go alongside your telescope, but also as in instrument in their own right they can provide many hours of viewing pleasure.
The main area in which binoculars are invaluable is in stellar and nebular astronomy. Their wide angle views make finding objects easy and give views that are relaxing and, because of the percieved stereoscopic effect, breathtaking at times.
As far as stars go, there are doubles, star colours and variable stars to watch as they bighten and fade. The location of Deep Sky Objects gives many hours of viewing pleasure. Learning the location of these objects while using the binoculars aids your telescope use.
Projects with the solar system objects using binoculars are limited to position, identification, some satellite work and asteroids. The lack of mounting and large magnifications makes planetary detail impossible, however, there is a lot of pleasure to be had watching them move through the stars.
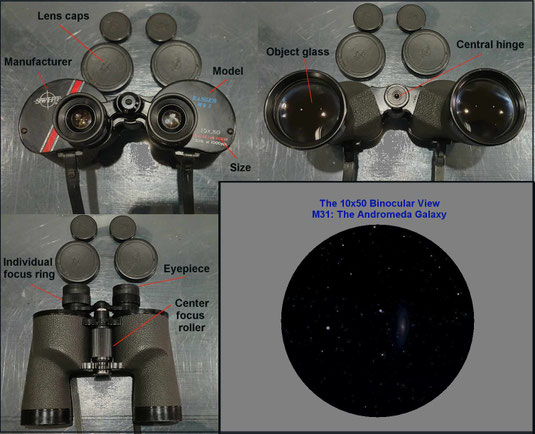
Binoculars - 'Anatomy'
Binoculars have lots of information on them and have several parts that are referred to in this page. You will need to know what I'm talking about, so, it is
worth familiarising yourself with this information.
The main body of the binoculars contains two pairs of porro prisms which rotate and flip the image so it is the right way up and the right way round for viewing. The folding of the optical path also shortens the instrument by about 20%.
The eyepieces are on a common adjustment, and move together by operating the central focussing roller. The single eye focusser is to allow you to compensate for
differences in your eyes.
There is a scale on the central hinge which can be seen from the eyepiece end of the instrument. This is virtually redundant as it is so much easier to adjust the eyepiece separation by looking through the binoculars than read a scale!
As ever, you can click the image to enlarge.
What Size of Binoculars Should You Get?
Any optical instrument will show you more than the naked eye, but some binoculars are more suitable. As a general rule, to avoid disappointment, you should stick to recognised makes,
recommended sizes, and avoid Zoom binoculars of any kind.
A good pair of binoculars can cost hundreds, but there are many models available for under £100 that will serve very nicely. Remember, these are optical
instruments and the better the qualtiy of the materials and manufacture, the more you are likely to pay. With binoculars, as with telescopes, you have to choose a good quality instrument.
Stick to recommended brands and you won't go far wrong.
Please note that good binoculars are not cheap, and poor binoculars are no good for astronomy. To avoid disappointment, generally speaking, you should avoid new binoculars under £60 and second hand under £20. (Of any size!) My second-hand buying guide works for binoculars as well as telescopes. Have a look - Here
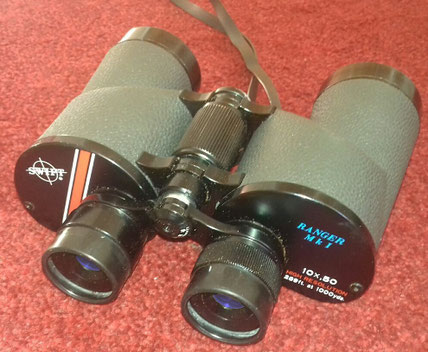
PIC: My Swift Ranger 10x50s. I got them second hand for £25 and they have proved to be an excellent buy. Hand held, they are not too heavy and give excellent star images.
The universally recommended size for astronomy applications is 10 x 50. That is to say, they magnify 10x and the object
lenses are 50mm in diameter. These are big enough to show the faint objects you'll want to reach and yet still be light enough that holding them is not too
exhausting. The slightest strain in holding binoculars translates to hand shake, image wobble and loss of a couple of magnitudes in detectable stars!
Technically able to show magnitude 11.0 stars in coal black skies, 10x50s are large enough for many applications in astronomy. In general magnitude 9.5 to
10.0 is more realistic as a magnitude limit. They will show many stars of the milky way and in clusters such as The Beehive, Pleiades, Hyades, Brocchi's Cluster (The Coathanger) and Coma
Berenices. There is not enough magnification in binoculars for us to need to compare resolution. The magnification limit of a 50mm objective is around 200x, so our 10x magnification
doesn't approach the resolution limit.
Bigger magnifications show up your hand wobble and are difficult to use effectively for more than a minute or two. These larger instruments are usually used
mounted on a tripod, or monopod, and would not be recommended for your first pair of binoculars for astronomy. It goes without saying that a nice pair of 20x80 binoculars would be superb on
the milky way, but for your first pair, stick to the 7x50 or 10x50 formula.
Advice: Smaller binoculars don't really collect enough light, although 8x40s can be a reasonable instrument if they are of very good quality. They are a good deal lighter than 10x50s and may be more suitable if you have trouble with the wiight of
Note: Tiny bins of 6x30 or the small sporting binoculars, (eg 8x22s,) should not be used for serious astronomy.
SELECTION WARNING:
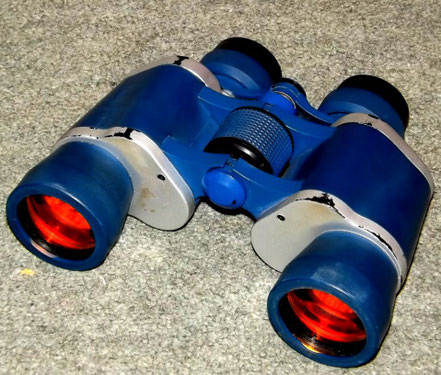
Something to AVOID is red coated optics.
Generally these point to shoddy manufacturing methods and corner-cutting. I've even read that they are a merely a marketing ploy to get people to 'impulse
buy' because they 'look' brilliant!
EG: The "I.R.Vision" binoculars shown here look reasonable when you use them in the daytime, but in comparison to the Swift Ranger 10x50s (above)
they are very poor indeed on astronomical subjects, the fainter stars, which should be easily visible, are smudged or invisible.
Advice: It is always a good idea to check astronomical user reviews online before you buy binoculars. Just
Google your prospective make and model and there will be opinions galore!
Focussing Your Binoculars
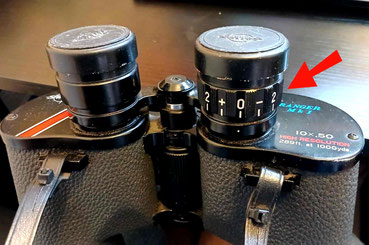
Focussing binoculars is something that you do individually for your particular eyesight. If you look at your binocular eyepieces, you will see that one of
them has a scale on the side (Arrowed in pic). This is the individual eyepiece focus. It is adjusted by twisting the eyepiece. You can see that there are positive and negative numbers on the
ring, this is so you can compensate for short and long-sightedness.
Setting up your Bins:
To start with, you need to make sure that the binoculars have the correct eye distance for your eyes. This is accomplished by adjusting the 'bend' of the binoculars
along the central hinge. When you look through you will see dark shadows on the outside of the view or inside of the view if they are not set up to coincide with your pupils. Adjust the
angle of bend to change the distance between the eyepieces to match your eyes. The view through a pair of binoculars should be clear of any shadows and show a single circle.
Important Note: The binocular view does NOT look like it does in the movies! This 'movie style binoculars view' is just a cinematic device to show the audience that it's the view through the binoculars, and also to reasonably fill the screen. The view through binoculars is a single circle (As seen in the M31 binocular view image above).
To focus a pair of binoculars:
1: Sight a star or distant object.
2: Close the eye that is looking through the eyepiece with the adjustment scale.
3: Use the center focussing roller to focus the image as sharply as possible for your open eye.
4: Open both eyes. You may see that the image in the adjustible side is a bit blurry.
5: Using the single eyepiece adjustment only, turn the eyepiece plus or minus until the image is sharp in that eye too.
6: With both eyes open, now, the image should be in focus for both eyes and you can commence your observations.
Note: Once you have done this operation at the start of your observing session you don't need to adjust the single eye adjustment again. You can make a note of the number that is indicated on the adjustible eyepiece for quick set-up in future. You should check your eye focus reasonably often, as their focus difference can alter somewhat with time.
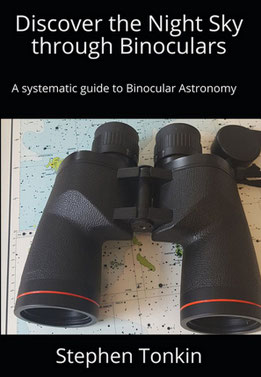
My Recommendation
If you are interested in serious binocular observation I would recommend this fantastic reference book:
'Discover the Night Sky Through Binoculars' by Stephen
Tonkin.
For many years, the advice given to beginning amateur astronomers has been "Start with binoculars".
Stephen Tonkin shows you why this is excellent advice and takes you on a year-long journey through the night sky visible from northern temperate latitudes. At the end of the journey, you will have a sound basic knowledge of the sky and will have gathered useful snippets of astronomical information and miscellany along the way.
(Quotation courtesy Stephen Tonkin)
This is my personal recommendation.
I have no affiliation with Stephen and make no profit from his sales. I wish him well with this excellent and informative book.
Read, absorb and constantly refer to Stephen's excellent guide:
'Discover the Night Sky Through Binoculars'
Research good center focus, porro-prism, 10x50 binoculars to begin with
(Not roof prism for your first pair and definitely no zoom binoculars!)
Do your online astronomer's binocular reviews research before buying.
Choose some 10x50 porro-prism binoculars in line with this guide's recommendations.
DO NOT WEAR YOUR GLASSES when observing with binoculars - Use the binoculars to focus!
Enjoy the wonderful views of the universe using your binoculars.

When I was just starting out, I thought I knew best...
When I moved back to Blackpool, after my year in Manchester, I foolishly bought a pair of zoom binoculars. What compounded the error by trading in my excellent Hilkinson 20x70s too! It was about
February 1983 and I was sure that all the warnings about not getting a pair of zoom binoculars for astronomy was just for other people. I'd used the 20x70s for the last two years with great
success, notably on Uranus in Scorpius... So, what do the experts know?
The zoom binoculars (Can't remember the make!) magnified between 10x and 60x. That sounded like a good idea. They were 50mm bins, and, on paper were a brilliant buy! However, using them with a magnification higher than 25x was almost impossible, due to image shake from my hands holding their weight. The field of view shrunk very quickly, from five degrees at 10x to a tiny circle of aparent field about 0.2 degrees at 60x. I observed Comet IRAS-Araki-Alcock with them just after I got them, and on 10X magnification they performed very well. But, soon after that the Zoom mechanism became stiff to use and often I lost the thing I was looking for when trying to zoom in. Shortly, after an ominous 'click', the zoom mechanism seized up altogether and they were stuck on about 12x for the rest of the time I had them. Luckily they weren't on 60x. Not a good buy, and an experience that taught me that what the experts had said was true - Zoom binoculars are not suitable for astronomy.
What Sort of Astronomical Projects Can be Done With 10x50s?
Stars: You can see...
Stars as faint as magnitude 11.0, (but magnitude 10.0 is more realistic).
You can see and compare star colours.
There are many pleasing double stars within the reach of this size of binocular.
You can follow the light curve of many variable stars.
DSOs: You can see...
Most of the Messier Deep Sky Objects and many more in the NGC catalogue.
Star clusters abound in 10x50s, especially in the Milky Way.
Planets: You can see...
Mercury,
Venus (including the crescent phase when close to Earth),
Mars,
Jupiter as a tiny disc and the Galilean Moons, Europa, Io, Ganymede and Callisto.
Saturn is distinctly oval when the rings are open and its moons Titan, Dione, Rhea.
Uranus,
Neptune.
Asteroids: You can see...
The brightest ten asteroids, they are all within the grasp of 10x50 binoculars.
Track the favourable ones down using the location charts in The Sky at Night magazine, or using the Stellarium application for example.
The ones within the range of 10x50s are: Ceres, Pallas, Juno, Vesta, Astraea, Hebe, Iris, Flora, Metis and Hygiea.
Moon: You can see...
Lots of craters and the seas.
Ray craters when the full phase is presented.
Follow the phases and look at the shadows on the terminator.
Occultations of stars and planets by the Moon are fascinating with 10x50 binoculars.
Conjunctions with stars and planets are beautiful in 10x50s.
Lunar Eclipses.
SUN: DO NOT LOOK AT THE SUN WITH BINOCULARS or ANY other optical aid.
Variable Stars Projects:
Here's a project that's ideal for binoculars.
Variable Stars brighten and fade over a period of time. It is interesting to follow the light curve and provides a good project over a number of days, weeks or even
months. This is a project that suits locations where cloud is an issue requiring a clear night only every so often and not necessarily on a specific night!
There are many types of variable star:
Eclipsing Binaries, Cepheid Variables, Algol Variables, Tau-Tauri, Irregular and Semi-irregular variables to name a few. My 'beginner's list' below contains four different types.
Using your unaided eye, and your 10x50 binoculars, (depending on the star) you can observe the difference in brightness by comparing to other nearby stars.
Here is a list, with helpful finder charts! These will get you started, comprising brighter stars that can be easily found and followed in your 10x50s. All
these stars are easily visible from the Northern hemisphere: Visibility forMira and Aquila is in summer and Orion in winter. The others are circumpolar above 48 degrees
north.) You can enlarge the constellation diagrams by clicking on them.

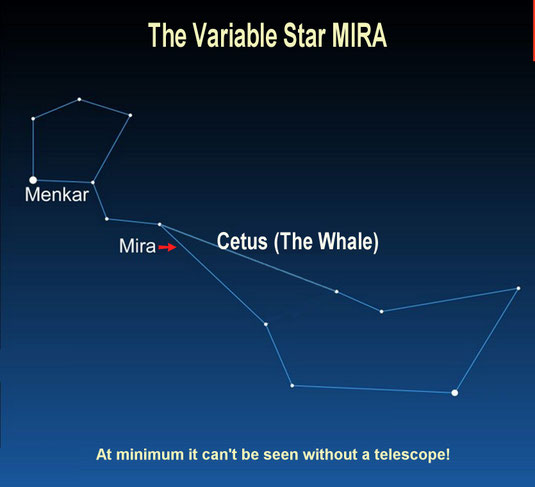
Mira: Omicron = ο Cetus
Mira has the largest range in this list by far and represents a great long term project.
Brightness Magnitude Range: 3.4 - 10.0
Period: 332 days
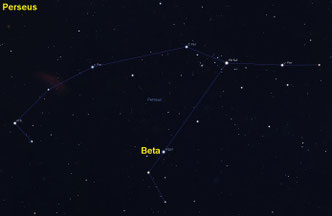
Algol: Beta = β Perseus
Algol has the shortest period in this list and represents a great starter project, with visibility all year round above 50° N.
Brightness Magnitude Range: 2.1 - 3.4
Period: 2.87 days
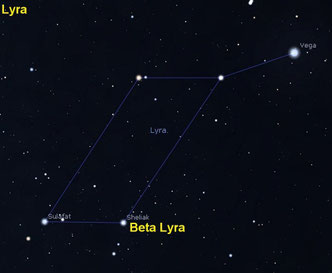
Beta Lyra: Beta = β Lyra
This star is easily found high overhead in northern summer, not far from the 0.0 magnitude star Vega.
Brightness Magnitude Range: 3.3 - 4.4
Period: 12.9 days
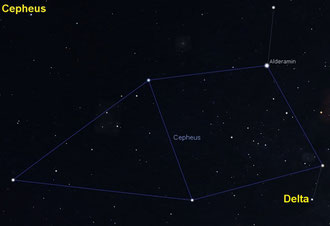
Delta Cepheus: Delta = δ Cepheus
This star can be found all year long circling the northern celestial pole, with visibility all year round above 42° N.
Brightness Magnitude Range: 3.5 - 4.4
Period: 5.37 days
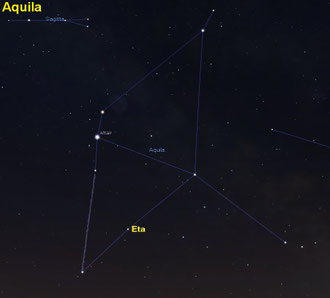
Eta Aquila: Eta = η Aquila
Another northern summer variable star, not far from Altair in Aquila, the Eagle.
Brightness Magnitude Range: 3.5 - 4.4
Period: 7.18 days
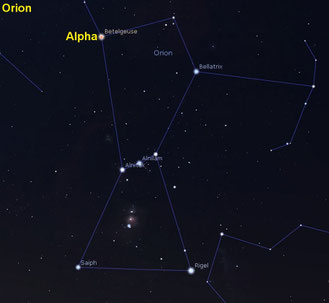
Betelgeuse: Alpha = α Orion
A northern winter and spring constellation. The famous Betelgeuse in the shoulder of Orion. A red giant with problems!
Brightness Magnitude Range: 0.4 - 1.3
Period: Irregular. Betelgeuse fluctuates in brightness in a noticeable range and does so without regular pulsations.
Note: Although the range of brightness doesn't look much on paper, it is very noticeable when observed. Each magnitude reduction is 2.6 times as faint as the previous. A range of 3.3 to 4.4, for instance, represents a brightness dimming of 62%. Betelgeuse fades to half its maximum brightness at times, and is easily compared to other stars in Orion by eye and with your 10x50 binoculars.
A final bit of advice: A Reminder.
Please, if you're thinking of getting some bins, join the rest of the astronomy world and get yourself some 10x50 binoculars. If you get a good pair you will keep
them indefinately and they will be useful throughout your 'astronomy life'.