
Magnification Guide.
Magnification is not the be-all-and-end-all of telescopes!
You can see a surprising amount with relatively modest magnifications - Useful magnifications vary with the size of the
telescope and the object being viewed.
Magnification goes hand-in-hand with resloution:
The larger the telescope, the higher the maximum magnification, but this is always dependent on the 'seeing' or atmospheric
turbulence.
For general viewing around the heavens using 'entry level' size telescopes (70mm - 150mm diameter) you will require several magnifications:
A low power for wide field views (20x – 30x)
A medium power around (50x - 80x)
And a higher power for normal viewing nights (120x - 220).
Above 250x the image deteriorates due to the atmosphere on all but the very calmest nights where you might be able to employ 250x - 300x
magnification. (In telescopes of 100mm - 150mm diameter).
Generally you will find that you will use magnifications in the region of 50x - 150x most of the time regardless of the size of your
telescope!
Examples in my experience: You would be forgiven for thinking that really big telescopes use magnifications of 500x and maybe 1000x, but the truth
is...
l have used the 9" (225mm) Refractor at the Godlee Observatory, Manchester University. We had excellent views of Jupiter at 175x magnification.
The best view I ever had of the globular cluster M13 was in Mark Dunnett’s 22" (550mm) skeleton Newtonian, at just 200x magnification.
I used the 30" (750mm) Newtonian at the Amateur Astronomy Centre, Clough Foot, Nr.
Bacup. And, once again, we had some lovely views of Jupiter, at just 240x magnification.
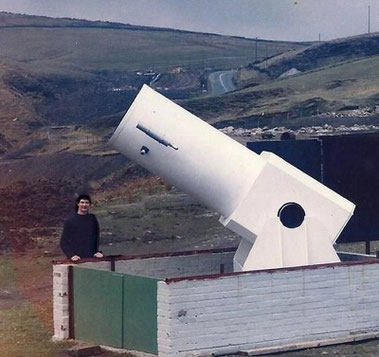
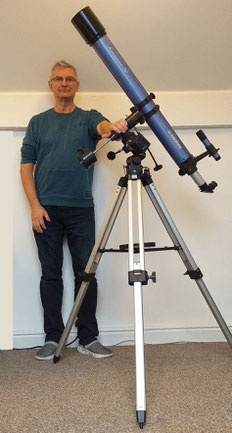
Pic: The 30" Newtonian telescope at the AAC. We used it to view Jupiter at 240x.
(That's me when I wasn't grey! Approx 1988)
So:
Even 'huge' telescopes utilise 'reasonable and usable' magnifications.
If a 30 inch Newtonian only needs to use around 250x magnification, why would a tiny 60mm refractor need 525x?
The answer is that they're appealing to the nine year old inside you that thinks that you'll get a great view at huge magnifications!
This is not the case: Please read on...
The main consideration is the atmospheric turbulence. If the atmosphere is unsettled, then you will be better off using a lower
magnification. The higher magnifications can only be used effectively when the atmosphere is calm and 'quiet'.

Gifs: Here are two examples of different seeing conditions. The clarity of the image is dependent on atmospheric turbulence.
The Wobbly Image is an example of when the seeing is shockingly bad.
This is Jupiter... Put the scope away and go to bed!
The Calmer Image is an example of reasonable seeing.
350mm Newtonian... Have a great night looking at whatever you want!

When I started out I had a telescope that only magnified 60x - That's not really enough. When I got my first 'proper' telescope, I believed that using high magnifications would show more detail.
I saved up for a 3xBarlow so that my telescope would magnify 600x (800mm focal length with 4mm eyepiece and 3xBarlow = 600x magnification). I was hardly able to locate the planet Jupiter,
the image was so dim! When I did, all I could see was a fuzzy disc which was very difficult to keep in the view and which had no detail on it whatsoever and also a very soft edge.
The 150x magnification that came with the telescope was much better suited to the optics of the scope. Showing a sharp disc of Jupiter with three bands crossing the disc. I learned the hard
way that 150x is plenty for Jupiter in a small telescope. Even in a large telescope I have rerely used more than 220x.
The very last thing I want to do is have you thinking that very high magnifications would give you a better view.
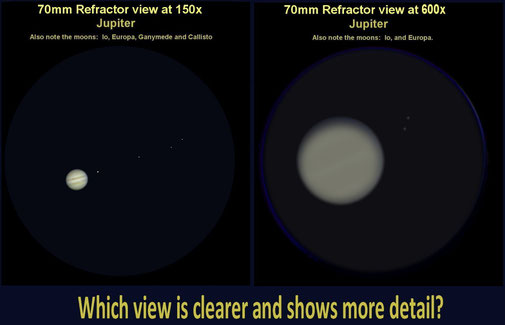
This illustration aproximates the difference between 150x and 600x views in a 70mm x 800mm f11 refracting telescope on a normal seeing night... Observe the detail on the two planets.
Which would you prefer?
I hope you'll agree that using a lower, more sensible magnification gives a better view of the planet. The Great Red Spot is visible on the 150x view!
Read on to see why this difference occurs and what magnifications you should be using to optimise your view.
Why do we need different magnifications, then?
The objects we look at are of different sizes and sometimes we want to see the whole, and sometimes the detail.
This means that we need to be able to 'close in' on something.
For instance, if we want to look at the whole of the Orion Nebula, a 150mm f5 Newtonian would give a superb view at only 25x to 50x, but to view the Trapezium
stars, you could use a magnification of around 120x - 170x to show them to best advantage.
Likewise, if you're interested in planetary detail, you'll want magnifications from about 150x to the maximum your telescope and the atmosphere will allow. If
you want to observe the moons of Jupiter and Saturn, you will only need to use 60x - 80x to fit them in the field of view.
How do we work out magnification?

Each eyepiece (The small lens you look through) has it's own focal length (Usually printed on the side or top) If you know the focal length of the telescope
object glass or mirror, then all you need to do to find the magnification is divide the focal length of the telescope by the focal length of the eyepiece.
Eg1: Focal length of scope is 900mm / eyepiece 15mm = 60x magnification.
Eg2: Focal length of scope is 1250mm / Eyepiece 8mm = 156x magnification.
It can be seen then that the same eyepiece in different telescopes will give different magnifications!
Eg3: a Refractor, focal length 1200mm with eyepiece 10mm = 120x magnification.
The same 10mm eyepiece in a Newtonian with a focal length of 750mm = 75x magnification.
(So, it follows that eyepieces can't have 'magnification figures' printed on them for you.)
Magnification is a big selling point for telescope sellers so you have to accept that they will throw in an eyepiece that is virtually useless just to give that
525x magnification claim. As long as they give other eyepieces that cover the 50x - 100x range and the 100x - 150x range you'll be OK.
But do you know what? You will find that once you get away from the ridiculously small telescopes, manufacturers tend to give more reasonable magnifications!
Quite often a 76mm Newtonian (too small for astronomy) will come with a maximum magnification of maybe 525x (useless), but a 150mm parabolic Newtonian will more likely have 150x as it's
highest 'stock' magnification (One that could be used on most viewing nights). You can even buy eyepieces to give higher magnifications on the best nights for a good telescope, whereas, you
might have to buy an eyepiece that gives a lower magnification to see anything properly in a cheap small one!
Working Out Your Primary Focal Length:
The diameter, focal length and focal ratio of your telescope is usually written on the telescope tube near the focuser on a little plaque, but sometimes not.
It is very useful to know the parameters of your instrument to work out magnification and field of view etc.
But, if you don't know your primary focal length and there is no information on the tube, you can measure the outside of your refractor or Newtonian telescope to approximate the focal length, which will be good enough for most purposes (to an accuracy of about 10mm).
Don't forget, most telescopes are made with round number focal lengths.
Eg: 400mm 500mm 650mm 750mm 800mm 900mm 1000mm 1250mm
So, when you measure you'll have an idea of what the focal length should be.
Eg: If your measurement suggests 493mm it will probably be 500mm. (Not only that, but the specific, 'exact magnification' is of little consequence and should be thought of as a ballpark reference anyway!)
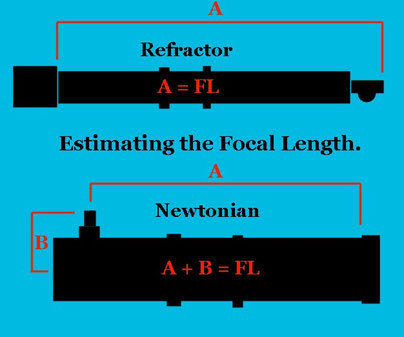
Method:
Have the telescope focused on a distant object or star.
Then remove the eyepiece.
Measure carefully and exactly as shown in the diagram.
Note: Refractors are easiest to estimate where the object glass is. Newtonians have a cell in the bottom that holds the main mirror. This presents the mirror surface a small distance from the bottom of the tube. If your telescope has a band as seen in the diagram, measure from the top of the band as shown.
Otherwise subtract a figure from the total as suggested here > 130mm Newtonian about 30mm or 150mm Newtonian about 40mm - any Larger use 60mm.
Once you know your primary focal length in millimetres, you can find magnifications easily.
Don't forget you can always buy more eyepieces to get the usable magnifications you require.
So... Following my advice further, it stands to reason that to utilise the higher magnifications to the full, larger telescopes are
essential!
A five inch (130mm) Newtonian can manage to produce good images using 250x on an excellent night, but a six inch 150mm Newtonian could stand 300x magnification
on the same night. The image quality is also dependent on the seeing quality.
Logically, then: If you buy smaller than my recommended 130mm Newtonian Reflector, or 70mm Refractor you won't see the detail that you
want to see or be able to use magnifications that will give a big enough image scale. You can really only expect to use magnifications up to 50x per inch of aperture for Newtonians, and 100X
for refractors.
A point of interest: You CANNOT measure the ouside of a catadioptric telescope (Maksutov-Cassegrain, Maksutov-Newtonian, Schmidt-Cassegrain or Catadioptric-Newtonian or even a traditional Cassegrain) to find out anything other than its overall tube length!
These telescopes have optically defined focal lengths and that doesn't have much to do with the actual length of the telescope (EG: My 127mm Mak, is 1,500mm focal length, but the tube is only 400mm long.) There is no way to know what the focal ratio is by measuring the outside of the tube, so we can't work out the focal length of any catadioptric system by this method. If catadioptric telescopes were all f10 it would be simple, but they vary from size to size and manufacturer to manufacturer.
*SEE "EXIT PUPIL" LATER FOR FINDING FOCAL LENGTH OF CATADIOPTRIC TELESCOPES.

Schmidt-Cassegrain Example Diagram:
You can see how the Schmidt-Cassegrain (And other catadioptric telescopes such as the
Maksutov-Cassegrain) present a problem when trying to measure their focal lengths. The angle of the cone of light coming into the eyepiece is what determines the focal ratio. When the cone
of light is modified by the convex secondary, there's no way to know the focal length or focal ratio by physically measuring the telescope. In this illustration the eyepiece sees a cone of
light that would result from the virtual lens over on the left, but this is well outside the telescope tube (seen on the right).
Remember: The focal ratio (f number) is the optical system focal length divided by the aperture of the objective.
Eg: In this f12 system the components would most likely be, as follows: Primary mirror f4, Secondary mirror f-3 (minus three), total system 4x3= f12
If your telescope had a 127mm clear aperture the focal ratio of f12 would give you an optical focal length of 12x127= 1524mm (approximately 1500mm)
THE MAXIMUM USABLE MAGNIFICATION on a very good seeing night is:
Patrick Moore used to recommend 100x per inch of aperture. But, most of us have atmospheric conditions that preculde this highest limit. Personally, I have found
that a slightly lower limit is useable on most nights, reserving the highest 'possible' power for really good nights. I don't want to give you the impression that an 80mm refracting telescope can
untilise 300x on more than a couple of nights a year! The 'maximum' I describe here is useable on most nights.
I hope that the information above has shown you that you shouldn't really be hankering after the 'highest magnification'. But, if you must know, I have found, over 50+ years observing with 70mm+
instruments, that about 2.5x per millimetre diameter for any telescope type useable on only the best seeing nights! You can find the higest practical power by using
60x per inch of aperture or 2.5x per millimetre of aperture.
This limitation comes about because you don't want to be magnifying more than necessary. There is a magnification at which your telescope will be presenting all the detail it can to the eye (The diameter of the telescope determines this, remember?). If you magnify more than this, you will have inferior image quality but see no more detail. Stay below the maximum and you will have good results on nights of excellent seeing.
Eg: Metric calculation: 102mm Celestron OMNI refractor: 102mm x 2.5 = 255x
Imperial calculation: 4" Celestron OMNI refractor: 4" x 60 = 240x
So, whichever way you cut it, the most you should consider for your 102mm / 4" is about 250x. These 'limits' are not hard and fast. Depending on the atmosphere you could be able to use 300x or limited to 100x... It always depends on the seeing conditions!
Minimum Useful Magnification!
It might seem strange to suggest that a telescope can have a minimum useful magnification. However, this is a real thing and one that needs some consideration when choosing eyepieces for astronomical applications.
When you look through the eyepiece from a distance of about 30 - 50cm, with both eyes, with the telescope pointed at the daylight sky, you will see a circle of light. This is called the Exit Pupil. This is a disc into which all of the light passing through the telescope is packed.
Now, the pupil of your eye, even in total darkness, only opens up to about 7mm (and this, only after half an hour or so, and before middle age starts to wreak its vengeance!).
This means that any magnification that produces an exit pupil larger than about 7mm will be wasting light.
The size of the exit pupil depends on the focal ratio of the optical system and the focal length of the eyepiece. The diameter of the primary is of no consequence and, for example, an f5 system of any diameter will produce the same exit pupil size with the same eyepiece. For a telescope, the diameter of the exit pupil can be calculated by dividing the focal length of the eyepiece by the focal ratio (f-number) of the telescope.
Eg: f5 telescope with 40mm eyepiece = 8mm exit pupil. This is too large and should not be considered.
Eg: f6 telescope with 25mm eyepiece = 4.2mm exit pupil. Fine for use.
Eg: f15 telescope with 10mm eyepiece = 0.67mm. Fine for use.
Note: It doesn't matter if the exit pupil is very small, all the light from the telescope will be in that circle and will be seen by your pupil. Long focal length telescopes can have very small exit pupils when using high magnifications!
It's easy to work out the size of the resulting exit pupil: devide the system f ratio by the eyepiece focal length in mm. This gives exit pupil diameter in mm.
Small exit pupils are no problem, especially if you're observing the planets or the Moon, but, please, don't exceed 7mm
Your telescope's longest focal length "useable eyepiece" would be given by 7x your telescope's focal ratio.
Eg: - The Longest focal length eyepiece that can be used with each focal ratio is a follows:
f10 = 70mm
f9 = 63mm
f8 = 56mm
f7 = 49mm
f6 = 42mm
f5 = 35mm
f4 = 28mm
In practice, eyepieces over 40mm are rare and expensive things! So, for telescopes over f6, the exit pupil is not a major consideration.
The magnification is different for different focal lengths of primary, but the exit pupil size for each eyepiece will remain the same for each focal ratio!
Eg1: 500mm F/L 100mm Diameter = f5. A 10mm eyepiece = 50x magnification and an exit pupil of 2mm.
Eg2: 1200mm F/L 240mm Dia also = f5. A 10mm eyepiece = 120x magnification but the same exit pupil of 2mm.

CATADIOPTRIC TELESCOPE SALVATION!
So, you may have realised that if you know the eyepiece focal length and you measure the exit pupil, you can determine the focal ratio quite accurately. If you measure the primary diameter and you know the focal ratio you can easily work out the focal length. This is how focal length is determined for catadioptric telescopes (Maksutov-Cassegrain, Maksutov-Newtonian, Schmidt-Cassegrain or Catadioptric-Newtonian or even a traditional Cassegrain).
Worked Example:
What you can measure: Your Exit pupil is 2.0mm using a 25mm eyepiece in your 150mm diameter Maksutov-Cassegrain.
So, we can work
out:
25/2.0=12 So you have an f12 optical system.
Once we know its focal ratio: 150x12 = 1,800mm is the focal length of the primary! "Yippee", job done. You know the focal length!
Magnification: You'll now be able to easily work out that you have 1,800/25= 72x magnification.
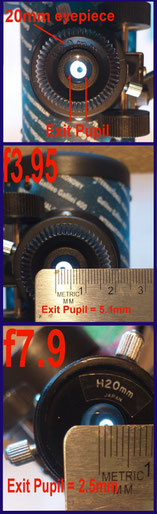
Measuring the Exit Pupil
(A steel rule will be sufficient for our needs!)
Pic 1: Look at the eyepiece from a few centimetres away. You will see a circle of light in the Eyepiece eye-lens.
Please Note: The eye lens is larger than the light circle. The small dark circle in the centre of the exit pupil is the
image of the secondary mirror. We are interested in the size of the whole light coloured circle. (Refractors don't have the black dot as they don't have a central
obstruction.)
Pic 2:
In this f3.95 telescope the 20mm eyepiece gives an
exit pupil of 20/3.95 = 5.1mm
Actually, this eyepiece looks more like a 22mm, as the exit pupil is clearly about 5.5mm - You can trust the mathematics of optics over the manufacturers of
cheap eyepieces!
EG: If your verified 25mm eyepiece's exit pupil is about 3.8mm your telescope is f6.5
If you believed that it was f6 the exit pupil supplies the evidence! That is: 25/6= 4.2mm whereas 25/6.5 = 3.8mm
Pic 3:
In this f7.9 telescope the 20mm eyepiece produces
an exit pupil of 20/7.9 = 2.54mm
We could have predicted this:
Twice the focal ratio = half the exit pupil size...
Another aspect to checking the exit pupil size:
You can check the accuracy of the eyepiece focal length by carefully measuring the exit pupil. But, if ALL your eyepieces are out by the same percentage - It's the telescope focal ratio that's questionable!
This brings us nicely onto:
The Barlow Lens
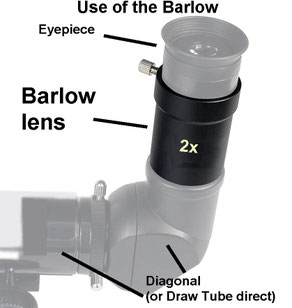
The Barlow lens optically increases the telescope's focal length. Usually found in 2x and 3x varieties these can be useful or awful!
A good quality, achromatic 2xBarlow lens is a very useful thing to have at your disposal. By doubling the focal length, it can allow you to magnify, on excellent nights, to the limit of your telescope's ability. It can also allow you to use available eyepieces by doubling the focal ratio, therefore halfing the exit pupil size.
Please make sure it is an achromatic Barlow and not a single lens unit.
A poor quality Barlow can also add unwanted colour into the image, distort the detail and cause focusing problems. Always carefully examine the image. If there is any degradation, please leave it out.
The Barlow lens is added to the optical path by inserting it into the draw-tube and then adding an eyepiece. (please don't try to use the Barlow without an eyepiece!). Another benefit of owning a good quality Barlow is that for each eyepiece you have two possible magnifications in any particular scope. However, that doesn't mean that the magnification is useable... You still have to abide by the rules of magnification limits!
There are a couple of ways to work out the resulting magnification:
Firstly: The easiest way is to work out the magnification for the eyepiece as usual, then double it.
EG: 650mm/10mm = 65 x2 = 130x
Secondly: You could double the focal length of the primary and divide the eyepiece into its length.
EG: 650mm x 2 = 1,300/10mm = 130x
Don't forget: The Barlow will also affect your focal ratio. If you're looking at Deep Sky Objects you will want the 'fastest' optical speed you can have - So, Barlows are not recommended for DSOs. If you're observing Planets or Double Stars, you may require the longest focal length you can get, to give the magnification you require, but you're not interested in wide angle views of this single small object - So, good quality Barlows are our friends!
Exit Pupil Considerations: As mentioned, a Barlow lens affects the focal ratio of your telescope. Consequently it also affects the exit pupil for any given eyepiece. This means that an eyepiece that is not recommended for your telescope might be useable with the Barlow (All is not lost!)
Eg: 1,000mm f5 with 40mm eyepiece gives an exit pupil of 8mm. This is not recommended as it is larger than 7mm, but with the 2xBarlow the exit pupil would be 4mm, which is fine!
The 3xBarlow is only really useful if you have an extremely short focal length primary, and both the telescope optics and the Barlow is of sufficient quality. Personally, I would only use a 2x Barlow and I would advise using only 'achromatic' Barlow lenses. I have two all metal 2xBarlow lenses, for use with my telescopes and they were only £10 more than the cheap plastic single lens types. They give excellent images and sometimes I forget I am using them as they make virtually no difference to the image quality.

The View Through the Eyepiece:
AFOV = 'APPARENT' Field Of View.
The Apparent field of view is the angle that the eye sees when it looks into the eyepiece. It is not the telescope's field of view nor does it affect the size
of the object in the eyepiece. (See illustration)
For example, you could have two 10mm eyepieces, say a Kelner and a Plossl. In your telescope they both would magnify by the same amount, thanks to their equivalent focal lengths. They would have the same exit pupil due to the telescope's focal ratio. However, they may have very different AFOVs. (See diagram and note that the planet's image is the same size but the apparent field of view is different).
The Kelner might have 30 degrees Apparent Field of View, whilst the Plossl may have 50 degrees Apparent Field of View! You get the same magnification but it 'looks' different in the eyepiece... I hope this diagram explains it. Whilst the view is narrower in the 30 degree view, the magnification is the same and the planet appears the same size to the eye.
If you were observing planets this doesn't matter so much, but if you were observing star clusters (The Pleides for example) your experience would be much more fulfilling with a wider AFOV.
Actual Field of View:
The maximum actual field of view from the primary can be worked out if you know a couple of figures regarding your optical set-up. The eyepiece provides the magnification and the apparent field of view. The bit of sky we see is dependent on the AFOV of the eyepiece and the magnification.
The actual field of view (the size of the bit of sky you're looking at) through the eyepiece is found by dividing the apparent field of view by the magnification.
Eg: If your eyepiece has an AFOV of 52 degrees and your system has magnification of 80x: 52/80 = 0.65 degrees of the night sky. So, if you wanted to take a picture of the half a degree disc of the Moon, you can work out that, in this case, you can fit all of the full Moon into the view using this 52 degree AFOV eyepiece in your telescope.
ATMOSPHERIC CONSIDERATIONS Revisited:
The atmosphere is a major player in the 'What's the highest magnification I can use?' debate.
The rule is to use a magnification that still shows a steady clear image. Too much magnification on a poor night, and you'll see less
detail!
Sometimes the atmosphere is really steady and you can use the highest magnification your telescope will allow. But, more often, there will be warm and cold currents churning up the view. In that case you have to moderate your magnification so you can see the best view you can get. This usually means that you have to use a maximum magnification of about 150x on a 150mm Newtonian telescope, one that boasts a maximum of 300x.
When I went to live in Lanzarote, I was looking forward to 300+ clear nights a year, but what I didn't realise was that the atmosphere would boil from sunset until
four a.m. The views before midnight were nearly always rubbish! The best viewing was before dawn once the ground had cooled down.
In temperate latitudes we have it a bit better. The atmosphere in the UK is usually good after the Sun's been down an hour, getting very good on many nights
of the year, after midnight almost any time of year. Once the atmosphere is calm you can regularly use half your telescope's maximum magnification. On really clear and still nights
you can observe at the max.
A slight mist is not always a problem - It depends on the subject. A bright planet will hardly be affected, but the Owl nebula, M97 in Ursa Major, will be a washout
on all but the clearest nights. Clouds can be observed round by looking through the gaps. But rain or snow is a definite no-no!
The Effect of Aperture on Resolution:
There is a lot written about magnification not having as much relevance as aperture regarding detail in the image - But I've not seen many examples of it in print or on the web. To the novice it would seem obvious that magnifying more would bring out more detail.
This section aims to redress the balance and sort out this misconception with some examples of the expected visual view through the scope of the familiar astronomical object, Jupiter, all at the same magnification.
Pic: A 90mm f11 EQ3 Konus refractor with 6x30mm optical finder - An Ideal planetary telescope.
Planetary Views: Shown below. Using a telescope to observe Jupiter, you will see something like these images. These views demonstrate the resolution differences between different diameter telescopes at the same magnification.
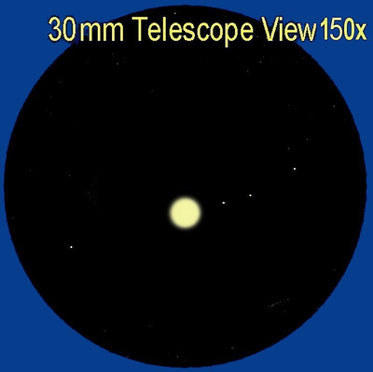
The 30mm refractor view.
Jupiter is usually a whiteout with no detail and maybe a bit of flaring of the disk.
The moons are pinpoint specks as you would expect.

The 40mm or 50mm refractor view.
I have never seen detail on Jupiter in anything smaller than a 60mm refractor. For beginners, you'll need a 70mm refractor before the planet begins to show detail.
The moons are pinpoint specks.
Note: My first telescope was a 60mm f7 and showed no detail on Jupiter at all.

The 60mm refractor view.
In good quality, long focus, classic 60mm f15 refractor, such as the Prinz 550 telescope, Jupiter begins to show some detail.
The moons are pinpoint specks.
Note: My first telescope was a 60mm f7 and showed no detail on Jupiter at all.
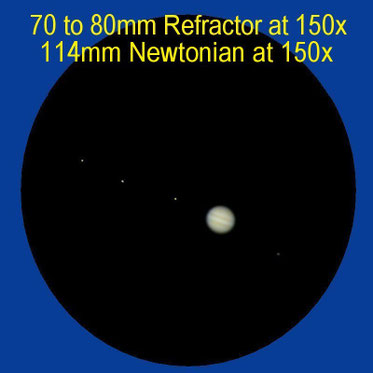
The 70mm to 80mm refractor view
The 114mm Parabolic Newtonian view
Jupiter shows clear detail in this minimum useful size 'entry level' refractor.
The moons are still points but they are steady points.
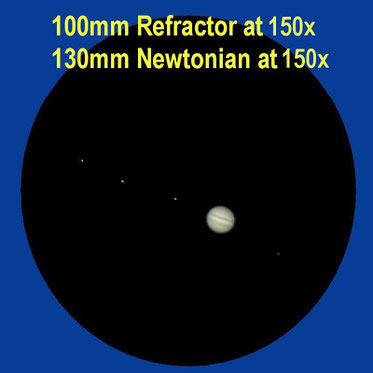
The 100mm refractor
and 130mm Parabolic Newtonian View.
Clearly more detail on the planet.
The moons are pinpoints, but Io shows a slight yellow/orange tinge.

The 120mm refractor view
and 150mm Parabolic Newtonian View.
Jupiter shows some detail in the belts. The Great Red Spot can be visible when it's dark in colour.
The moons are still pinpoint specks, but Io shows a distinct yellow/orange tinge.

The 150mm refractor view
and 200mm Parabolic Newtonian view.
There is lots of detail on Jupiter and in the belts. The Great Red Spot is usually visible when it's on the earth-facing side of the planet (As it is in this
pic).
The moons begin to show some hint of their planetoid nature on nights of good seeing. They can be glimpsed as tiny discs on nights of exceptional calm and clarity. Io shows a distinct yellow/orange tinge.
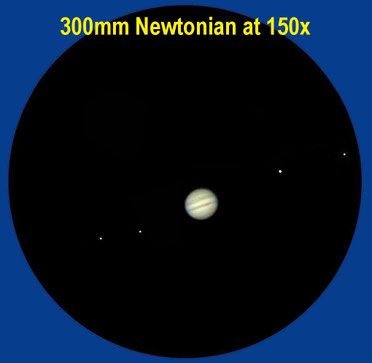
The 300mm Parabolic Newtonian View.
Loads of detail on Jupiter and in the belts. Detail even seen in the poles with multiple bands and belts. Great Red Spot clearly visible at times (Seen on this pic).
The moons show obvious disks on most nights. Io is clearly yellow/orange.
So, you see that the detail in the above images increases with telescope diameter.
NOTE: Obviously you would be able to utilise a higher magnifications in larger telescopes to have a larger image scale, and the detail that is in the image would more readily be seen - However, it is NOT the magnification that is bringing out the detail, but the telescope's aperture.
Your maximum magnification on regular viewing nights should be kept down to about 50x per inch of aperture, or 2.5mm per millimetre. On superb nights you can nearly double this figure, but those nights are rare!
Conclusion.
Magnification makes no difference to the maximum amount of detail available. That is dictated by a combination of aperture and atmospheric
seeing. You do need to magnify to bring out the detail in the image formed by the primary lens / mirror, but it is important to stay within the suggested limit of 50x per inch of
aperture.
A larger aperture will present more detail at the same magnification as a smaller telescope and can take higher magnification to show a larger image with
the same detail. At some point, any telescope will reach its maximum resolution or the atmospheric turbulance will impose its own, and no higher magnification will add
detail.
For further exploration of detail in telescopic images and magnification see SUPPORTING PARENTS section.