
PLEASE DO NOT BUY ANY TELESCOPE UNTIL YOU READ THIS!
Choosing Your First Telescope for Astronomy: Complete Essentials.
You can get an instrument capable of giving years of excellent astronomical views for around a week's wages...
There are big pitfalls with certain telescope designs. I will tell you how to avoid these... Please read on!
"There is a very good reason that so many disgruntled people are
selling their tiny telescopes ...
...It's because tiny telescopes are no good for
astronomy!"
++++++++++++++++++++++++++++++++++++++++++++++++++++++++++++++++++++++++++++++++++++++++++++++++++++++++++++++
I don't like the term "beginners' telescope", it implies that those who are new to astronomy don't get to use a 'proper telescope'.
So, what would be a 'great telescope'
to start you off into this wonderful hobby? Read on!
The aim of this website is to make you aware of the things that you need to know to make a good telescope selection. This will enable you to avoid the many
awful telescopes with optical flaws, inappropriate magnifications and ineffective mounting designs that are out there!
If you're interested in science, then, like me you'd probably want to know the 'WHY?' behind the advice. To this end, my website educates and does not ask you to blindly follow - However, I do ask you to trust my experienced word!
There are all sorts of pitfalls waiting for the unwary. This site gives you clear guidance and information to allow you to get yourself a telescope that will satisfy without compromise on image quality or functionality.
I will give you all the information you'll need so you can select the right equipment and at a price you can afford. I will save you wasting your
money on something that will not perform properly. My mission is to give you the knowledge tools you need to select a good telescope for yourself, at an affordable price, that will not
disappoint.
If you want easy answers to which telescope would be best for your needs, without the full and detailed explanation, for instance if you are buying a telescope for a present for someone else, please click this link: QUICK REFERENCE.
SO, YOU NEED A TELESCOPE ?
Sooner or later, if you're interested in astronomy, you'll decide you want a telescope... If you buy yourself the wrong one, you may end up giving up on astronomy because your expectations have been let down. My advice will save you throwing away money and will get you a telescope that you will be able to keep using for many years without great expense.
Any telescope is better than no telescope at all, but very small telescopes have very limited applications in astronomy and will soon have you wanting to see more.
There are many different telescope types and the reason for this is different subjects require different optical perameters.
Choosing the right one for you is a bit like choosing shoes! There are many different types of shoe, and some are suitable only for certain activities. Others, the ones I will guide you to, are suitable for many applications. You wouldn't wear high heel stilettos to play in a tennis match - Or use an f15 refractor for Deep Sky Objects (DSOs). Let me to guide you to the 'smart training shoe section' (A good durable shoe that is suitable for many, many different activities!)
Please: Allow me to guide you towards your first 'scope with an explanation of the considerations you need to make while choosing.
With
qualifications in astronomy, having been a director of an astronomical company, running a telescope trading operation, and with over fifty years experience in observational astronomy, I hope you
will trust my informed guidance in this matter.
I recommend the beginner starts by using one of TWO types of telescope and I'll give you a guide on the SIZE that you need to buy.
Size is
the most important consideration: Especially for the beginner.
In this guide I have explained to the best of my ability with many pictorial examples why this is the case.
In this guide there are 20+ photographs, 30+ illustrations and at least 2 videos!
It's a lot to take in about a very complicated subject! - Strap in
and let's get you started.

TWO TYPES:
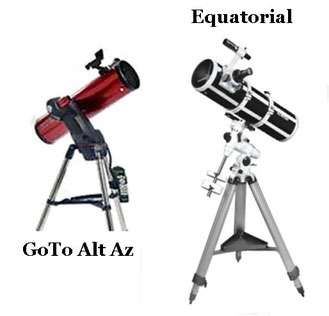
The two types of telescope I am going to recommend are: 'Newtonian Reflector' and 'Astronomical Refractor'. I will generally refer to them as Newtonian and Refractor, to save confusion between reflector and refractor.
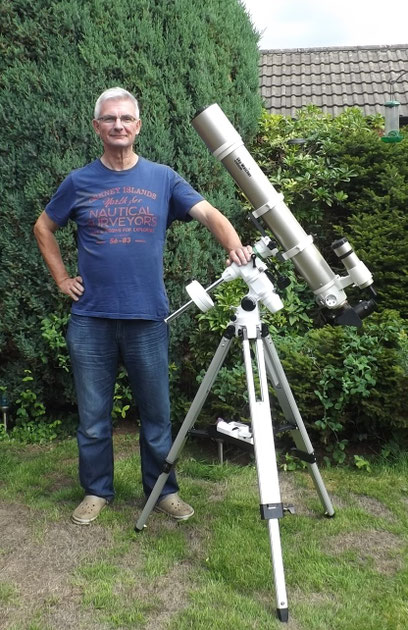
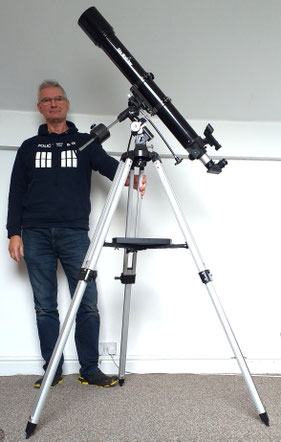
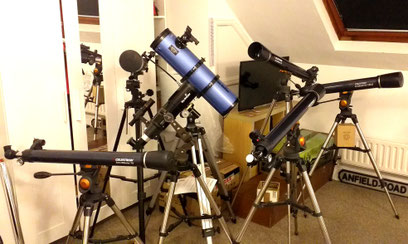
These two (left) are impressive looking instruments, with their equatorial mountings and slow motion controls, but they are too small to be of any real use in amateur astronomy. They are extremely limited in what they will show. I will direct you to the right telescopes in this page.
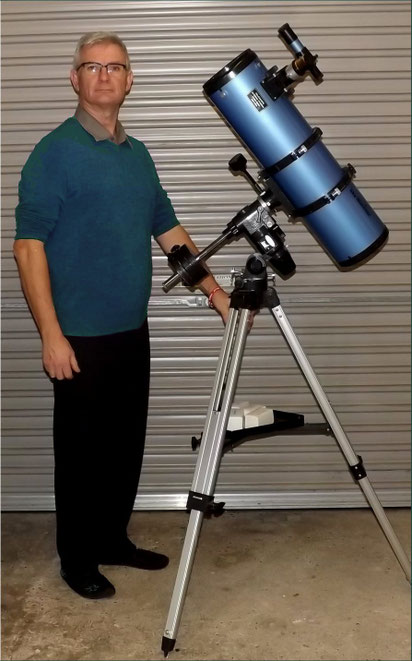
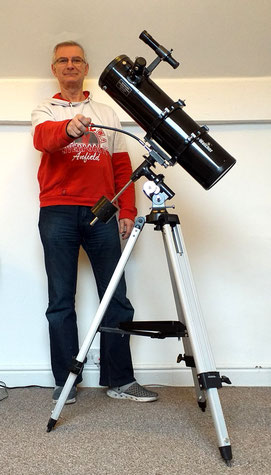
Although, technically, the 120mm Newtonian should be at least equivalent to an 80mm refractor (See 'Resolution' section later) this model has a spherically
figured mirror (see 'Parabolisation' section later) and would not produce images as good as an 80mm achromatic refractor. The smallest Newtonian I recommend for a proper start into astronomy is a
parabolic 130mm (See the Newtonian Reflector section below). Parabolic mirrors are sometimes, rather confusingly, called
'Aspherical' mirrors. What you really want to avoid is a spherical mirror! ... and Catadioptric 'Bird-Jones' Newtonians - see later.
The reason I recommend only the refractor and the Newtonian telescope types is that these are the two best suited to the beginner. This is the case because they are the
simplest and therefore have the largest aperture for your money available - So you can get into the right SIZE of telescope with the minimum
outlay.
Please read on to get information on the size of telescope you need to see the things you want to see.
There is also complete information covering most other types of telescope that you may have come across, for those that are interested. However, the beginner is recommended to get themselves either a refractor or a parabolic Newtonian, dependendent on your area of interest or preference.

I would always advocate buying from a telescope supplier or at least buying a well known make second hand.
Please don't be fooled by ANY advertisement for a 'professional' telescope... Unless it costs in excess of half a million!
PIC: This Meezaa, for example, is available from Amazon. It looks like a decent scope. It's certainly large enough. It is mounted on a flimsy AZ mounting, and doesn't have slow motions, but it does come with reasonable eyepieces. Although this would probably be an OK buy, why do they have to spoil their credibility by claiming it's a professional telescope?
If their optics and build quality are good, lying shouldn't come into it!
Professional astronomers don't buy their own telescopes! (At least, not these days).

Rather than looking at getting a telescope quickly, I would suggest you read this guide and get to know what you need and what it will deliver before parting with any money. There are many advertisements out there that look promising and deliver laclustre goods. This website will steer you in the right direction. If you read and digest this page of this extensive website, you will have a very clear idea of what you need and whether any particular telescope is suitable for your needs.
You will find lots of snippets of information in this website that will help you to choose and use your telescope to good effect. For example, see the picture left... Lots of adverts show telescopes only half upcapped! You might reasonably think thats how they're used... They're not - You want as much light entering the ooptical system as possible!
Please, read on.
The REFRACTOR TELESCOPE

The refractor is the telescope with the big
lens at the front and you look in the small end!
You'll need one with a front lens (Object Glass) of AT LEAST 2.75" or 70mm to see anything
useful!
(If you can get an 80mm or 90mm... All the better, for not much more money! A good 100mm would be useful for many years!)
An equatorial mounting with slow motions is ideal - A manual Alt-Azimuth mounting is difficult to use effectively on astronomical objects with magnifications over 100x.
Refractors are particularly good if you're interested in the planets, double-stars or the moon (Though they can be used for any subject with experience and varying results). They show great detail for their size and when used on the relatively bright planets, the objects are easy to locate, even given the small field of view.
If you're buying one of these make sure it's an 'astronomical refractor'
(NOT A TERRESTRIAL REFRACTOR or a 'SPOTTING SCOPE')
Picture: My Phenix 127mm (5") f10 Astronomical Refractor - A very nice bit of kit that cost me £90 second hand.
(Bargains are out there once you know what you're looking for). This telescope was one of the best refractors I've ever owned. Beautiful images of stars and great detail on the
planets too.
Refractors are robust and can stand a good deal of handling without going out of alignment. They do need longer than Newtonian reflectors to cool down to ambient temperature for the best image quality (Because they are closed tube optical systems). The refractor is the telescope type that transmits the most light for its size and reveals the best detail. All other types have some sort of obstruction in the light path and this deteriorates from the quality of the image.
All Refractors suffer slightly from chromatic abberation or 'false colour' but on most
objects this is minimal (Achromatic telescopes give excellent images when fitted with qualtiy optics). Some refractors have object lenses made from very expensive 'Extra-Low Dispersion'
(ED) glass. These produce much better images, but be prepared, they are nearly five times as much to buy new! (See Chromatic Abberation section
later.) ED lenses give a better view, but is the view five times better? I'm not convinced, even though I've owned an ED 100mm refractor and it was
superb!
Although I recommend 70mm as the smallest size refractor telescope - There are some very nice 80mm and 90mm telescopes that are not that much more expensive and are so much better! - These represent an excellent, rather than a 'bargain basement', start to astronomy.
The newcomer to telescope use will find the small field of view and relatively high focal ratio of most refractors make it difficult to find 'Deep
Sky Objects'. A beginner who wants to spend a lot of time looking at Galaxies and Gas Clouds would be best to get a Newtonian Reflector (See below).
Pricewatch:
A
SkyWatcher 90mm (3.5") f10 achromatic, equatorially mounted refractor: New price in UK is about £229
(November 2025)
If the 90mm is still too expensive and you really can't manage to afford one - A Bresser 70mm SkyLux or Bresser LYRA 70mm achromatic, equatorially mounted refractor might have to suffice (if you really can't manage the extra to get a really great telescope!) as an 'entry level telescope'. New price in UK is about £199 (Nov. 2025) or from eBay from £80 for a good example in original box.
My advice, though: Please SAVE UP for the 90mm! If you have the will to wait, you can get a superb planetary refracting
telescope.
You wouldn't buy a pair of Wellington boots in the wrong size for ballroom dancing would you? - Why choose the wrong type and size of instrument for your first telescope?

The Refractor uses a large lens, the object glass, to collect and focus the light to a point. The image at this point is examined by the use of an eyepiece. Different eyepieces magnify the image differing amounts.
The parts of a refractor are there to hold the object glass and the eyepiece in precisely the correct relative positions no matter where you point the telescope. It can be seen that the light rays pass uninterrupted down the tube, passing through the holes in the baffles (often called 'stops') and arriving at a focus near the eyepiece. This is a closed system with nothing in the way of the light to detract from the image.
The Dew Cap stops moisture forming on the cold glass.
The Cell, holds the lens and accurately directs the light path down the centre of the tube.
The light-tight tube holds everything in place.
The stops help to 'stop' internal reflections. (Not all refractors have more than one, it's just a lightproof disk with a circular hole in the centre).
The focuser allows precise movement of the draw tube in and out of the main tube.
The Draw Tube holds the eyepiece.
The eyepiece magnifies the image formed by the Object Glass.
The NEWTONIAN TELESCOPE
THE NEWTONIAN REFLECTOR
This is the simplest type of reflector. It uses a mirror to focus the light instead of a lens and the observer looks into the side of the tube instead of up it!
Newtonian reflectors are not recommended for study of the Sun.
If a Newtonian tickles your fancy, you really need to read this section very carefully, as Newtonian telescopes are the most varied in quality and suitability for astronomy.
Technically, a 100mm Newtonian could be approximately equal to an 80mm refractor - But it would have to be parabolic - Many smaller telescopes (Up
to 150mm) are NOT parabolic and this detracts enormously from the quality of the image, giving very poor results on instruments with a focal ratio of less than f8. (Focal length divided by
Apperture Eg: 650/130 = f5 750/150, also f5)
To have the best start in amateur astronomy you'll need one with a parabolic mirror AT LEAST 5" or 130mm in
diameter. A telescope with a parabolic 6" (150mm) mirror would be all the better but it will probably be 1.5x the
weight and 1.5 times the price (Except second hand - See second-hand telescopes section)!
Remember: Parabolic mirrors are sometimes, rather confusingly,
called 'Aspherical' mirrors. This is NOT a 'spherical' mirror! (Confusing, eh?)
150mm parabolic Newtonians are great
all-rounders. The short focal length ones (f4 = 600mm focal length to f5 = 750mm focal length) are especially good for 'deep sky' (Galaxies, Nebulae, Star Clusters). Focal ratios of f6 upto
f8 are superb for planetary views! Newtonians over f8 (1200mm/150mm) are very cumbersome and should be avoided, principally, but not only, because
they will be spherically figured tat.
Pic: My 150P on SkyScan2001 EQ3 mounting. A great all-rounder telescope. Good for Deep Sky objects but also reveals good detail on the planets. A very nice bit of kit that cost me just £100 in 2017(Bargains are out there once you know what you're looking for).
An equatorial mounting with slow motions is ideal - A manual Alt-Azimuth mounting is very difficult to use on astronomical objects over 100x and makes astrophotography virtually impossible. Though a Dobson mounted Newtonian is good for Deep Sky visual obsevations.
If you don't want to be bothered with learning your way about the sky, you could consider a Go-To telescope - But you have to be
reasonably technically minded. Personally, I would recommend the manual equatorial mount as your first port of call in this hobby.
Mirrors can go out of alignment with rough handling - Nevertheless, in my experience it takes quite a big jolt to upset the optical settings - Bearing this in mind it's advised that you be careful when setting up or carrying!
Newtonians (And ALL other reflectors) have obstructions in their light-paths and so suffer from deterioration of the image. In the case of Newtonians, they also have open tubes and suffer at times from tube currents. However, they are great value for money and give excellent views on the best nights.
I recommend at least a 130mm parabolic telescope - These represent an excellent, rather than bargain basement, start to astronomy.
Pricewatch:
A 150mm (6") f5 parabolic, equatorially mounted SkyWatcher Newtonian Reflector New price in UK is about £430 (November 2025)
SkyWatcher 130P Starquest EQ2 = New price in UK is around £240 (Nov. 2025).
If the 6" is too expensive and you really can't manage to afford one - the 130mm (5.1") parabolic, equatorially mounted Newtonian may have to suffice!
Pic: A SkyWatcher 130P Explorer EQ2 = New price in UK is around £250 (Nov. 2025).
If you can't afford that - Please SAVE UP! Don't buy any Newtonian smaller than a 130mm
parabolic!
You wouldn't buy a pair of fluffy slippers for country walking would you? - Why choose the wrong type and size of instrument for your first telescope?

The Newtonian uses a mirror to focus the light by reflection. (Ideally this mirror should have a Parabolic figure). The light would pass out of the tube but for the secondary flat mirror that directs the light out through a hole in the tube to an eyepiece. Different eyepieces magnify the image different amounts.
The parts of a Newtonian Reflector are there to hold the Primary and Secondary Mirrors and the eyepiece in precisely the correct relative positions no matter
where you point the 'scope.
The Cell holds the parabolic Primary Mirror and has adjustments that direct the light precisely down the center of the tube toward the secondary mirror.
The Secondary Mirror is perfectly flat and directs the light at 90 degrees out of the tube to the correct point near the eyepiece.
The Spider holds the secondary mirror mount, which itself can be precisely adjusted to bring the light to the correct focus point.
The focuser allows precise movement of the Draw Tube.
The draw tube holds the Eyepiece in the correct position to view the image.
It can be seen that the light rays are interrupted as they pass up and down the tube, passing through the vanes of the spider and being reflected a second time by the secondary mirror (Usually between 15% and 25% of the primary mirror diameter depending on focal ratio), finally arriving at a focus near the eyepiece. This is an open optical system with air currents and obstructions along the way of the light path which detracts from the quality of the image. Because of this interruption in the light path, to get the same detail in a reflecting telescope you need a slightly bigger size to counteract the effects of the interrupted light path.
The telescope Tube holds everything in place. This needn't be a solid tube, it can be a lattice or framework, as long as the optical components are correctly positioned relative to each other. The only thing to watch out for is stray light getting into the eyepiece, to avoid this on skeleton and lattice tube Newotnians, there is usually a box or tube section where the focuser is fitted.
You can imagine, therefore, that the Newtonian is a slightly more delicate instrument than the bomb-proof refractor and should be handled more carefully and the alignment of the mirrors checked periodically. Aligning the mirrors correctly is called 'collimation', and makes sure the column of light passes down the very center of the optics.
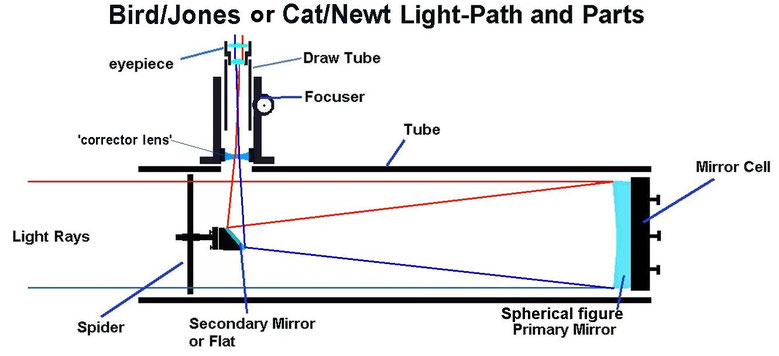
WARNING:
DO NOT invest in a "Catadipotric-Newtonian" of "Bird/Jones" design.
TRUST ME - THESE ARE RUBBISH AND WON'T FOCUS PROPERLY. You deserve to have clear images. AVOID THESE!
This optical configuration is very poor and you will be lucky to get good views at magnifications over 50x.
The idea is that you can avoid spherical abberations (non-focusing of some of the light-rays) by inserting a 'corrector lens' into the
system. But, this 'corrector lens' doesn't do the job, and it also makes collimating a nightmare too! It's a cheap fix and done on the cheap too - This is never going to result in good
optical quality.
My serious, though admittedly simple and honest advice is:
As a rule of thumb:
Always, I repeat: ALWAYS make sure your prospective Newtonian telescope has a
parabolic mirror! If it has a parabolic mirror you can bet it doesn't have a 'corrector lens', as it is optically perfect without one!
Examples of this awful design are : Celestron PS1000 and Celestron PowerSeeker 127 though there are many out there from all companies!
There are some companies producing f5 and faster optical systems with spherical mirrors but without the 'corrector lens'! - These also give an attrocious image quality - Check out the spec of your prospective telescope before wasting your money on Bird-Jones or Spherically figured tat! MAKE SURE YOU HAVE A PARABOLIC MIRROR!
I told you that the Newtonian is the easiest to get wrong, didn't I?
PLEASE NOTE: No manufacturer refers to their telescope as a "Bird-Jones" design. They all state "Catadioptric/Newtonian", makes it sound fancy. If you Google "Bird-Jones Telescope" you'll see why they never admit to this!
Specialisation:
As you
learn more about the things you're looking at you'll get an idea of the direction you would like to go and decide what your favourite types of astronomical object are. You may already
know! General viewing / Planets / Moon / Deep Sky / Comets / Asteroids / Double Stars etc ...
Different areas of astronomy require different optical equipment. You'll read about needing
a big Newtonian for Deep Sky objects, and the planets are best seen through a large, long focal ratio refractor. These are the kinds of considerations you will learn to apply to your future
optical equipment planning. IF you already know (I did at 13 years old!) you can get the right telescope NOW!
Also, as you read more, and talk to people to learn about astronomy, you'll come across other types of telescope. Some of these are very well suited to specialisms. In particular and
worth a mention here is the Maksutov or Maksutov-Cassegrain telescope. Absolute wonder on the planets! However, I would still not recommend a beginner to start here - Get some
experience with the simpler telescope types before spending too much!
For now, please, take it from an expert that you will do best to start out with
a refractor or a parabolic Newtonian...
Note: The reason I laugh at advertisements that claim you can see Jupiter's moons, is that you can see them in ANY instrument! They were the first thing discovered by Galileo when he looked at the planet with his, frankly, awful little telescope. He had a single lens 20mm f30 telescope that magnified 6x - So, OF COURSE you can see Jupiter's moons with a modern achromatic tiny refractor, you can even see them in small binoculars!
OTHER TELESCOPE TYPES
You may be interested in other types of telescope. I will indulge your interest a little.
The Dobson Mounted Telescope
(Also called The Dobsonian)
This type of telescope uses precisely the Newtonian optical layout. You should still be looking for a parabolic mirror to get the best image quality.
This type of telescope comes on an Alt-Az mounting which does not follow the stars. It is easy to use with low to medium magnifications, however, tracking an object at high magnifications is difficult for the beginner. I would only recommend a Dobson mounted telescope for a beginner who was despirate for light-grasp and Deep Sky Object observation as the large 'Dobsonian' can be cheaper than smaller equatorially mounted scopes.
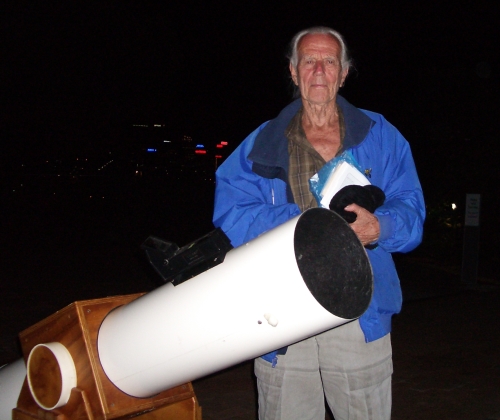
Picture: John Dobson with a 'genuine' 10" 'Dobsonian' Telescope. ( I was honoured to have John stay at my house in Horncastle for two nights in
2002. He was very entertaining and ate the nasturtiums in the courtyard! A memorable visit.)
The Dobson mounted telescope is intuitive and it's easy to line the telescope up on an object. Following it can be simple enough at low to medium powers (20x - 100x). The telescope comes off the mounting easily for transportation and storage. Setting up doesn't take long and the experience can be less challenging.
Recommended for the beginner if your interest is soley in Deep Sky. The easy use mounting and easy-peasy set-up is intuitive and natural. At low to medium magnifications these telescopes give great images and can be recommended for Deep Sky fanatic beginners.
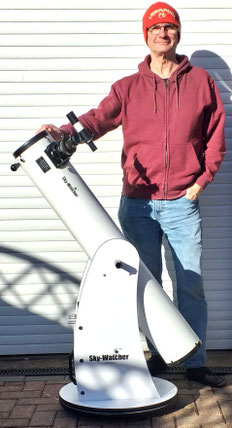
'Starter Size' Dobsonian "Highly Recommended".
If you fancy starting out with a Dobson layout telescope you won't go wrong with the SkyWatcher 150/1200 f8 Parabolic "Classic Dobsonian 150"
The long focal length makes achieving good magnifications on the planets a doddle. The 10mm eyepiece gives 120x and a good quality 2xBarlow makes it a very
useable 240x. (But watch out for objects shooting out of the field of view at that magnification!) A 150mm long focus Newtonian can make good use of 300x on the best nights.
I have owned and used this capable telescope and detail on Mars was well seen a couple of months after opposition at 225x. The mounting is smooth enough to
allow an experienced observer to follow the object, even at this high magnification.
All-in-all, a very nice instrument with potential. Use with a stool for most comfortable observing.
Pricewatch: New in the UK at £290 and second-hand from eBay, around £150 (November 2025)

The MAKSUTOV-CASSEGRAIN
This type is a catadioptric system: A catadioptric optical system is one in which refraction and reflection are both employed in an optical system via lenses (dioptrics) and mirrors (catoptrics).
You don't need to check for parabolisation in a Mak. This type of telescope has spherically figured optics and consists of a spherically figured meniscus lens at the front, the spherically figured main mirror and a secondary mirror spot (aluminised onto the inner surface of the meniscus lens). These telescopes are sealed tube instruments, typically f11 to f15 in focal ratio. Consequently, they have quite narrow fields of view, ideal for planetary, lunar and double star observations. Unfortunately, because of the high focal ratio, Maksutovs don't do very well with Deep Sky Objects.
I don't recommend them to beginners only because of the relative expense. If space is a premium, or weight is a consideration, please see more details about Mak scopes on the 'Best Value New Telescopes' page on the website for full appraisal of this capable telescope type. They are excellent telescopes and can be treated as very similar in performance to a refractor of the same diameter, however, because they have a folded light-path, physically, they are very much shorter than an f15 refractor of the same diameter.
Pic: The f12 SkyMax127 in this picture has an optical focal length of 1,500mm in a physical tube less than 400mm long. It gives planetary images equivalent to a 150mm Newtonian on the best nights, it will rival a 130mm Newtonian on any night.
Maksutovs, like refractors, take longer to cool down to become optically excellent, because they are sealed optical systems.

The Maksutov-Cassegrain is a sealed unit and consequently the only parts, like the refractor, that we come into contact with are external.
The light passes first through a spherically figured Meniscus Lens (Thicker at the edge) and falls on the spherically figured Primary Mirror. This reflects the light back up the tube toward an aluminised spot on the back of the Meniscus Lens which reflects the light back down the tube to the Eyepiece.
Focusing in the Maksutov is done by moving the primary mirror. The focusing knob is found on the back plate and not the draw tube in this design.
The telescope Tube holds everything in place. This must be a solid light-tight tube, it can't be a lattice or framework.
The mirror support holds the spherical Primary Mirror and has adjustments that direct the light precisely down the center of the tube toward the secondary mirror (This is set at the factory).
The Secondary Mirror or 'Spot' is a small aluminised circular zone (usually between 16% and 20% of the diameter) on the back of the meniscus lens and directs the light back down the tube to the correct point near the eyepiece. The light ray angle is much reduced so optically increasing the focal ratio.
The tubular Baffles stop stray light from the meniscus lens, other than that from the 'spot' entering the eyepiece. (Baffles are 3D stops! see refractor
parts.)
The Draw Tube holds the Eyepiece in the correct position to view the image.
The Focuser knob on the back-plate allows precise movement of the Primary Mirror to affect focusing.

Should you choose a Maksutov telescope as your first scope?
The main reason I don't recommend the Maksutov type as your first telescope is the relative expense of a new one! They also hold their price well, and so the price of a second hand telescope of this type will also be relatively high (compared to a second hand refractor or Newtonian).
Pic: The Celestron Mak 90 an f13.9 on tall EQ mounting, an excellent little Maksutov.
Another reason is that they are not very good with DSOs as the focal ratio is between ten and sixteen. Consequently, Maks are not ideal for Deep Sky Objects
and so a 'beginner' wouldn't get a wide renge of objects to view with their new scope. Maks are brilliant on the Moon and planets though. If you interest is mainly or only for
observing these objects, then a Mak will suit very well.
Maks come in various design specifics detailing the exact optical properties: Pure Maksutov or Maksutov-Cassegrain. But they all have a broadly similar optical train. This type has a catadioptric optical system: A catadioptric optical system is one in which refraction and reflection are both employed in an optical system via lenses (dioptrics) and mirrors (catoptrics).
There is a 'meniscus lens' at the front which changes the direction of the light rays very slightly so that the spherically figured primary mirror focuses the light into one single point. This means that you don't need to check that the mirror of a Mak is parabolic, in fact it shouldn't be! The light then passes back up the tube and strikes another spherical convex mirror (The 'secondary'). This is strongly negative and is usually an aluminised 'spot' on the back of the meniscus lens (brilliant design, eh?). The converging light rays are then directed out of the tube at the back through a hole in the unused area of the primary mirror to the eyepiece.
Typically, Maks are found in the range f10 to f16, with the majority being around f15. They are suitable for planetarty, lunar and double star observation in particular. Though they can be used for any application with varying results.
IMPORTANT NOTE: Don't get suckered by the forums and the undersized mirror scaremongers! In a Mak, the light rays are slightly modified by the meniscus, converging by a few degrees. Consequently, the primary mirror doesn't need to be 'full diameter' and is usually about 94% of the meniscus diameter. The light seen in the eyepiece is from the full meniscus diameter and not merely the primary diameter. Therefore: All the light that falls on the 127mm diameter meniscus lens of a SkyWatcher SkyMak127 is reflected from the 119mm primary to the secondary and out of the draw-tube apperture to the eyepiece. So, the light collecting diameter is 127mm, not just the 119mm of the primary mirror, as some people mistakenly believe.
Maksutov-Cassegrain: Not recommended for the beginner only on on price! - If you're not sure about astronomy, spend little first! (See above
types)
Pricewatch:
SkyWatcher Skymax 127, Maksutov-Cassegrain f12 AZ5 = £540 (November 2025)

In Conclusion:
If you can afford a MAK and you'd like to view the Moon and planets in excellent detail with a small package with a big punch. And you're tunrned off my DSOs and
would never want to look at one! Then, by all means get yourself one of these powerful telescopes.
Pic: Orion StarMax 90 on EQ1 (New price, 2020 = £299) The manual EQ1 model is now discontinued. It is now only supplied on tabletop AZ or
GoTo. So, to get a useable version, you'd better buy second hand!
The SCHMIDT-CASSEGRAIN TELESCOPE (SCT)
This type is also a catadioptric system: A catadioptric optical system is one in which refraction and reflection are both employed in an optical system, via lenses (dioptrics) and mirrors (catoptrics).
These telescopes are externally similar looking to Maksutovs. They too have a corrector plate but have a different optical configuration and are even more
expensive! (Bordering on the rediculous for no optical improvement!)
This type of telescope has spherically figured optics and consists of a corrector plate at the front, the main mirror and a secondary mirror. They are sealed tube telescopes, typically f10 to f12 in focal ratio and have quite narrow fields of view, ideal for planetary observations. They are good telescopes and can be treated as very similar in performance to a Maksutov of the same diameter, however, they don't quite stack up to the refractor of the same size. Because of their high focal ratios, Schmidt-Cassegrains, as with Maksutov telescopes, don't do very well with Deep Sky objects.
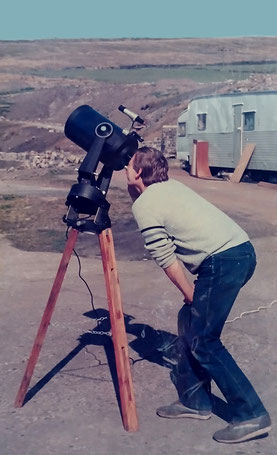
Picture: Nigel Brown uses his fork mounted 8" Meade 2080 SCT to observe the waning third quarter Moon at the AAC - Approx. 1989.
I only avoid recommending them to beginners because of the high expense for no noticeable improvement in optical quality.
The Meade 8" 2080 Schmidt-Cassegrain Telescope is an f10 system with 203mm aperture optics. The instrument has a focal length of 2,000mm in a tube of just 460mm long. It gives planetary images better than a 200mm Newtonian on most nights, and it will equal a 150mm refractor for planetary detail on any night. So, these are the sizes to compare prices with if you fancy an SCT. Schmidt-Cassegrains, like refractors and Maksutovs, take longer to cool down to become optically excellent, because they are sealed optical systems.

The Schmidt-Cassegrain is a sealed unit telescope and consequently the only parts, like the refractor, that we come into contact with are external.
The light passes first through a Corrector Plate and falls on the spherically figured Primary Mirror. This reflects the light back up the tube toward a Secondary Mirror housed in its own cell set into the corrector plate. The Schmidt-Cassegrain has the largest obstruction to the lightpath of all reflecting types. The Secondary reflects the light back down the tube to the Eyepiece.
Focusing in the Schmidt-Cassegrain is done by moving the primary mirror. The focusing knob is found on the back plate and not the draw tube in this design.
The telescope Tube holds everything in place. This must be a solid light-tight tube, it can't be a lattice or framework.
The Baffle is a tubular stop which prevents stray light from the corrector plate being seen by the eyepiece. Only light from the secondary can be seen in the eyepiece.
The mirror support holds the spherical Primary Mirror and has adjustments that direct the light precisely down the center of the telescope Tube toward the secondary mirror (This is set at the factory).
The Secondary Mirror, supported in its cell (Usually between 27% and 35% of the diameter) directs the light back down the Tube to the correct point near the Eyepiece. The light ray angle is much reduced so optically increasing the focal ratio.
Focusing is achieved by a knob on the back-plate that moves the Primary Mirror inside the telescope.
Schmidt-Cassegrain: Not recommended for the beginner on price! - If you're not sure about astronomy, spend little first! (See
above types)
Pricewatch: New equatorially mounted Celestron VX6, 150mm Schmidt-Cassegrain f12 = £1,899 (November 2025)
Meanwhile a 150mm parabolic Newtonian on EQ3 would cost under £500, less than a third of the price!
Beginners, please, don't start with an SCT!
Broadly speaking:
Pic: One week's 'stock'
in Telescope Towers.
Refractors:
Recommended Sizes:
Smaller than 60mm = useless!
60mm = Absolute minimum size: Long
focus, good quality optics show some detail on the planets. (f12+)
70mm = The minimum size for good views: Starts to show more detail on the planets (f10+).
80mm = Good size for detailed views of the planets: Starts to show detail in the detail!
(F10+)
90mm = Excellent detail level on the planets and good views of all objects*.
100mm and larger = Superb planetary detail and excellent views of all objects*.
* DSOs require short to medium focal ratios to be seen well.
Newtonians:
It is with the Newtonian reflector that you have the most chance of buying something truly awful.
Please heed the following advice:
If Newtonian reflecting telescopes do
not have a parabolic primary mirror, any size is virtually useless, giving blurry smudged images! I've heard some amateur astronomers defending their f6 spherically figured
Newtonian telescopes, but don't get one! Buy yourself something that works well, without compromise!
DO NOT BUY spherical mirror Newtonians.
DO NOT BUY Newtonians with built in barlow lenses (Catadioptric / Bird-Jones designs) They will be awful.
PLEASE ONLY BUY Newtonians with a PARABOLIC
PRIMARY MIRROR.
Parabolic mirrors are sometimes, rather confusingly, called 'Aspherical' mirrors, but whatever you call them they focus the light into a single point!
Recommended Sizes:
Smaller than 100mm = not enough light grasp or resolution (Very unlikely to be parabolic) = useless!
100mm Parabolic = Absolute minimum size: Will show some detail on the planets in a handy travel size.
114mm Parabolic = Good size for reasonable views of the planets with Barlow in use, nice wide field for DSOs without.
130mm Parabolic = My recommended smallest Newtonian:
Good views of detail on the planets:
The minimum size for a good start in astronomy.
150mm Parabolic = Excellent detail and light gathering power for all objects: Minimum size for serious astronomy.
200mm and larger Parabolic
= Superb planetary detail and excellent views of all objects. Superb DSO capability with f5 instruments.
Any Newtonian
over f8 will almost certainly have a spherically figured main mirror - leave it alone!
Advice:
If you're interested in general planetary views, the moon or double-stars, then the recommended size for a great experience would be the long focus 70mm refractor or larger (A 90mm is not much more money than a 70mm, and gives much better image quality and detail!)
If you're interested in all aspects of astronomy and would like to look at everything, (comets, nebulae, galaxies, globular clusters, variable stars, star clouds, Moon and planets.) then the 130mm Parabolic Newtonian would be the minimum size you would want, and the 150mm Parabolic Newtonian gives better views of everything!
If you were only interested in Deep Sky, then a 'Dobsonian' would also fill the requirement.
But, you still need one with a parabolic primary mirror of at least 150mm diameter and nothing over f8. SkyWatcher produce Newtonians with parabolic
primary mirrors of f5, f6 and f8.
You can see a good number of astronomical objects with smaller instruments - Any optical aid is better than none - But, if you are setting yourself up for a good look around the sky, and to see if amateur astronomy is for you, why start off on the minimum? Good telescopes are available at very reasonable prices and you'll get a lot more satisfaction out of your instrument and move further on in the hobby before you have to 'upgrade' if you get a decent instrument to begin with!
Please read on to discover which type and size you need. I have called this 'Complete Essentials' because you really need to be aware of all these things when
considering which telescope is the right one for you.
So now we move onto the detail behind my size and type recommendations.
Buckle up - There's a lot to consider!
============================================================================
Why Does Aperture Matter So Much?
Resolution in the image and 'light gathering power' is dependent on the diameter of the mirror or lens. If you can't resolve the detail then NO AMOUNT of magnification will show it! You can also only see stars of a given minimum brightness with a telescope of a given aperture.
Bigger telescope = More detail and dimmer star limit.
Some telescope companies state things like, 'Collects 250 times as much light as the human eye,' in their adverts. This sounds like a gimmick, but actually it's a very good point. Light gathering power is dependent on aperture minus any obstruction. If you like to think in terms of multiples of the human eye that's fine. (which is pretty standard at 7mm diameter = 38.5mm squared, fully dilated). Just be aware that the eye is a funny thing and twice the light doesn't look twice as bright!
A Very Quick Word About Star Magnitudes:
The brightest stars are known as 'first magnitude'. The unaided eye can see stars as faint as magnitude 6, without optical aid. The magnitude scale is logarithmic. Each successive magnitude is dimmer by a factor of 2.512 times.
Magnitude (Mag) 0.0 (example, the star Vega) is about 2.5 times as bright as Betelgeuse (Mag 1.0) which in turn is 2.5 times as bright as Dubhe (2.0) Dubhe is, therefore, only about 1/16 th as bright as Vega even though it's a magnitude 2 star and Vega is magnitude 0. Which means that a 6th magnitude star is about 100th of the brightness of a 1st magnitude star...
==================================================================================
The bigger the diameter of your
objective (lens or mirror) the more light (fainter stars)
and more detail will be available for observation.
Eyeball Performance: Resolution 'R' = 3.0' Magnitude limit = 6.0
This is enhanced by the use of optical instrumentation.
Diameter of Primary
30mm 1" telescope:
50mm 2" telescope:
80mm 3" telescope:
100mm 4" telescope:
130mm 5" telescope:
150mm
6" telescope:
200mm 8" telescope:
250mm 10" telescope:
300mm 12" telescope:
Resolution
R = 4.5"
R = 2.3"
R = 1.5"
R = 1.1"
R = 0.9"
R = 0.7"
R = 0.6"
R = 0.5"
R = 0.4"
Magnitude Limit
Mag 9.0
Mag 10.5
Mag 11.4
Mag 12.0
Mag 12.4
Mag 12.9
Mag 13.5
Mag 13.9
Mag 14.4
NOTE: The magnitude limit for nebulae / galaxies is about two magnitudes
less. This is because DSOs have a magnitude derived from
the
combined brightness of
all
the light in the object, and that light is spread out over an area and is not in one single
point.
Eg:
Star limit = Mag. 10.0
DSO limit = Mag. 8.0
So, for detail
and dim objects you really do NEED the BIGGEST objective you can manage (either financially or physically - telescopes get heavy!) to allow detail to be shown and faint stars and galaxies to be
glimpsed, no matter the magnification used!
Here's an analogy:
If you 'zoom' in to a high resolution picture
on your computer you can find more detail than if you view the high res picture small on screen. But if you print the small picture and use a photocopier to enlarge it there is no more detail to
be had.
This is analogous to a larger telescope where higher magnifications can be used as they bring out details that cannot be seen at lower
magnifications. (The eye can only see detail that has been presented to it above a certain size, hence the need to magnify at
all!) The tiny telescope presents all its information at a smaller size - Further magnification is wasted, it just enlarges the low-resolution
image without bringing out any new detail.
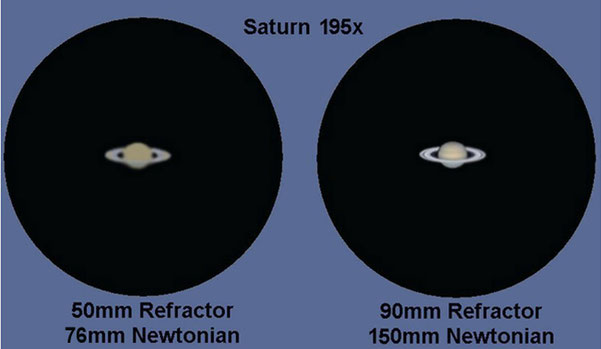
Left of
Pic: Approx view of Saturn with 50mm (2.0") refractor or a 76mm (3") Newtonian.
Right
of Pic: Approx view of Saturn with 90mm (3.5") refractor or a 150mm (6" approx.) Newtonian.
(I'm happy with this image representing a really still night using a parabolic f8 150mm Newtonian!)
If you use more magnification than the telescope can show, this is called 'empty magnification'. See magnification section
later for more.
Eg:
In a 70mm refracting telescope, if you used a magnification of 250x you would see no more detail than if you used 175x. You will have a more blurry image, probably giving less detail than if you stayed within the optical limit of 2.5x per millimetre (2.5x70 = 175x).
Deep Sky Objects and Dark Adaption:
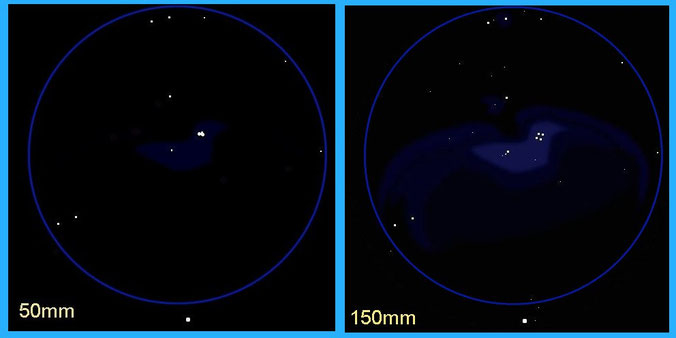
Pic: Orion Nebula: The nebula M42 in Orion. Once again the central star is not split with a tiny telescope and remains a blob, but shows itself clearly to be a 'Trapezium' of four stars in the bigger 'scope.
Also note
the number of faint stars and the amount of nebulosity that can be glimpsed in the bigger telescope. In this illustration, both these scopes are f5 optical
systems.

As far as star images go:
There are two main considerations: Splitting binaries (resolution) and the visible star magnitude limit (light gathering). A larger telescope will always show closer pairs as individual stars and show fainter stars than a smaller telescope will. (Close pairs of stars cannot be split with tiny telescopes by adding higher magnifications.)
Pic: See the Difference:
On the
upper frame is the Pleiades Cluster as seen with a 50mm telescope at 20x.
On the lower part there is another 20x view of the Pleiades (M45) as seen with a 6" 150mm telescope.
Note:
Not only there many more stars to be seen in the larger telescope, but also notice the splitting of the double star, circled, just below centre. Not just two stars but four are visible in
the larger telescope.
Resolution: The triple star shown near the centre bright star (Alcyone) resolves itself through use of larger telescopes - Not higher
magnifications.
< Have a Look!:
This video demonstrates the effect of widening the aperture from 50mm to 150mm and back.
LIGHT GATHERING POWER & RESOLUTION:
You may notice the obvious difference between the two telescopes I'm advocating. Their size!
The Newtonian is one and a half times the diameter of the refractor. This means that the 150mm Newtonian transmits about three times the light of the 70mm refractor. (It's only three times, not 4x as you might expect, because of light losses due to reflections in the Newtonian and the shadow of the secondary, cell and spider).
You may wonder, what effect this will have on your observations? The difference in light gathering area means that you will gain just
about one magnitude (ie. You can see about twice as many stars) with the Newtonian. Remember the logarithmic magnitude scale, each
magnitude is 2.512 times fainter than the previous one? If you had a 130mm Newtonian you would get just over one magnitude fainter stars than a 70mm
refractor.
The surprising thing is that the refractor will under most conditions show just as much, or even more detail than the
bigger Newtonian! This is because the obstructions in the light path and the open tube arrangement of the Newtonian means that the
resolution suffers somewhat. The refractor, whilst not gathering as much light, will show planetary detail at least as well as the bigger reflector and sometimes better! With planetary
observations high light gathering is secondary to detail in the image and a refractor is the instrument of choice (Or a Maksutov-Cassegrain telescope which, you may remember I told you, operates
very much like a refractor).
Consequently, I can recommend a good 70mm refractor, and tell you that, on the most nights, it will be just as good at showing detail, as
a 130mm Newtonian <(Click this link if you
like for my Best Value New Telescopes page).
If you're really interested in spotting very faint objects, (comets, nebulae, galaxies, globular clusters, variable stars and star clouds) then the Newtonian would
be the one for you as it prioritises light gathering over detail somewhat. If you're interested in planetary detail, the moon or double-stars, then the large refractor would be a better
bet.
However, if you're interested in having a good stooge around and having a look at everything within range then either type would be fine! (Just buy one big enough to show you the detail you want to see).
Note: The reason I laugh at advertisements that claim you can see Jupiter's moons, is that you can see them in ANY instrument! They were the first thing discovered by Galileo when he looked at the planet with his, frankly, awful little telescope. He had a single lens 20mm f30 telescope that magnified 6x - So, OF COURSE you can see Jupiter's moons with a modern achromatic tiny refractor, you can even see them in small binoculars!
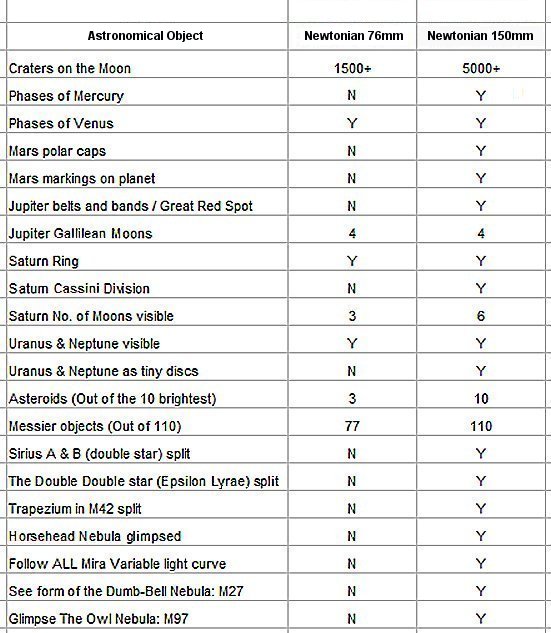
Table: A rough guide to the differences seen between a tiny 76mm f9 Newtonian and a parabolic 150mm f5 parabolic Newtonian:
By no
means exhaustive, but I think there are several things there that show the essential differences between the different sizes.
The objects seen in the larger telescope are visible because of the larger light gathering capability and greater resolution of the larger optics.
For the sake of getting a good telescope of 150mm diameter, rather that a tiny 76mm telescope, you can see all these extra things!
A similar set of differences are seen between a 50mm refractor and an 90mm refractor - The smaller isn't much better than a toy, whereas, the larger will satisfy for many years!

Dark Adaption
When making any Deep Sky Observation it is VERY important to let your eyes get used to the dark!
When you go outside from the lit environment indoors your eyes have pupils about 2-3mm in diameter. This doesn't let in much light and the view through the telescope is very much dimmed.
As you become 'accustomed to the dark', your pupils open up over time and eventually they reach about 6-7mm. Also, during this time, your eyes produce a chemical called 'visual purple' (the protein Rhodopsin), that helps you to see in the dark. This process takes about 20-30 minutes, and lets in more than four times as much light, which you also detect better because of the Rhodopsin.
When you make observations after this time you will see much more detail in faint objects. See Illustration (Click to enlarge).
You can make use of this time to look about the sky and pick out constellations and planets. You don't have to get bored waiting for your eyes to adapt to the dimness. IF you do want to jump straight into observations, (and why not?) I would suggest observing a planet or using your binoculars for a few minutes. This won't be so bright that you don't adapt, but at the same time, it is not trying to see something really faint!
NOTE: It's the same when you go from observing the Moon to DSOs. You will have to let your eyes open up after observing the bright Moon to be able to see the much fainter Deep Sky Objects.
Resolution.
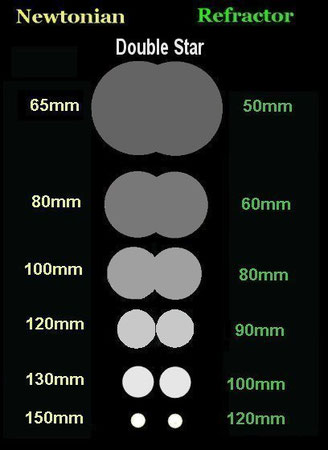
The reason bigger telescopes have better definition and resolution of detail is that the bigger the telescope primary, the smaller the point image it can produce. So, small telescopes produce big 'points' of light (Low Res. Images) but big telescopes produce smaller 'points' of light (High Res. Images).
So it follows that if the two stars are closer than the minimum 'point' that your telescope can produce, you will only see an elongated blob where the two circles overlap, instead of two distinct points. As you use larger and larger telescopes the star 'points' become smaller until you can see the two distinct stars clearly.
See diagram, Left.
The double-star shown is just a connected blob, at any magnification, for any telescope under 120mm (Parabolic Newt.) or 90mm (Refractor) - Where they are just about separate
points.
Also: Note that as the telescope gets bigger it collects more light and the stars appear brighter in the eyepiece. More light
concentrated into a smaller point. This allows you to see fainter stars with a larger telescope.
The reason that refractors show more detail than the equivalent parabolic reflector is that there are no obstructions in their closed system of optics. The Newtonian has lots of
obstructions and compromises: A spider that holds the secondary mirror, the secondary mirror itself in its cell and tube currents that degrade the image. The mirrors transmit only about 90% of
the light that falls on them and there are at least two in all telescope designs except the refractor (which transmits about 98%.) Although a Newtonian's optics may be 'diffraction limited' (See
later section) the open tube with the obstructions in the lightpath degrades this capability! Because Maksutov and SCT telescopes have a closed optical system, this makes them better optically
than open tubed Newtonians of the same diameter. A refractor, on the other hand, can be pretty much perfect for its aperture, making it better at resolving detail than any Newt or Cat
scope.
For simple reckoning of equivalent sizes, between refractor and Newtonian types, just multiply the refractor
object glass diameter by 1.3 and you will get a good approximation of the equivalent Newtonian primary mirror diameter. Or divide the Newtonian by 1.3 to get the equivalent refractor
size. Be aware it is only an approximation - Different manufacturers and different observing conditions can alter the perameters somewhat - But as a general rule it's accurate
enough.
Proof of the pudding: I have owned a 130mm f5 parabolic Newtonian and a
100mm f9 ED refractor and a 127mm f11.8 Maksutov-Cassegrain, all at the same time. I can tell you that in extensive test comparisons, despite their different diameters, all three are very
equal in resolution and light gathering performance. This is a debate that has raged since the late seventeenth century.

In Practice: The swings and roundabouts of astronomical instrumentation come out to play:
The Newtonian 130mm f5 is better at Deep Sky than the 100mm f9 Refractor or the 127mm f11.8 Mak.
But, the closed system of the refractor and Maksutov perform to their best on more nights than the open tube Newtonian!
The 100mm ED refractor gives a generally better image quality than the 127Mak, because the Mak has a secondary mirror obstruction and the meniscus lens adds a bit of chromatic abberation.
But the Mak has slightly better detail than either of the others when the atmosphere is perfect due to overall diameter.
All three have the same light gathering, because, although the 130 and 127 have a larger overall light gathering area (about 1.8x the 100mm refractor's) the reflections (2x 10% light loss) and obstruction of light from the secondary (8% light loss) leaves aproximately the same amount of light (59% of 1.8) as the 100mm refractor with its 98% transmission.
I could not choose a favourite between the three! In many aspects of astronomical instrumentation it's 'swings and
roundabouts'. The decision of "Newtonian or Refractor?" is something that you will spend hours, maybe years, thinking about. There's no easy winner! In fact, there probably
isn't a winner at all - It comes down to what you want to observe with it.
In an ideal world, I keep all three so I have the choice, depending on the subject, which to use! In the real world I sold all three. I currently only have my 10x50 binoculars!
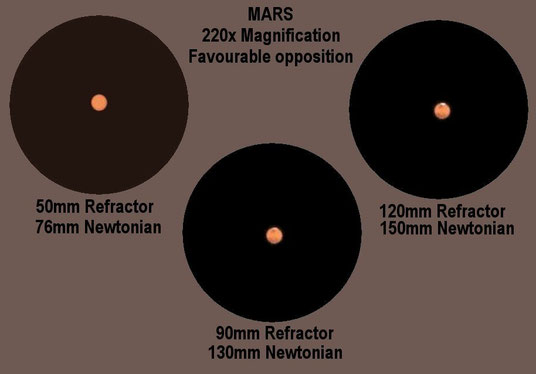
Planetary Images.
You get to choose which view you would prefer by picking a telescope of the size I advocate in this
guide! If you can't afford a big enough telescope, please, save up - Don't buy a small one to 'make do'.
Authentic
View:
Mars at a
favourable opposition (Closest to Earth). You'll need to look closely - But observe the differences in detail between the three telescopes. Once again you can choose which view you would like by
buying the size that gives the view you want!
Note: It would be easy to magnify these images to show the planet disk clearly for you, but that is not an authentic view. This diagram shows the realistic view in the telescope.
A telescope which uses mirrors in its optical system transmits only about 85% of the light that enters the system, a refractor something like 98%.
Observe the detail and the brightness differences in the pictures above - These views are representative of the real difference between the different telescope sizes as they appear to the eye when observing on a still night.
Chromatic Aberration 'False Colour'
When light passes through a lens the light is split into its component colours somewhat.
Depending on the type of telescope you choose or the lens it has, you will get more or less chromatic abberation. This 'false colour' shows itself around bright white objects as red and blue fringes like a rainbow effect seen in very cheap, kid's toy binoculars.
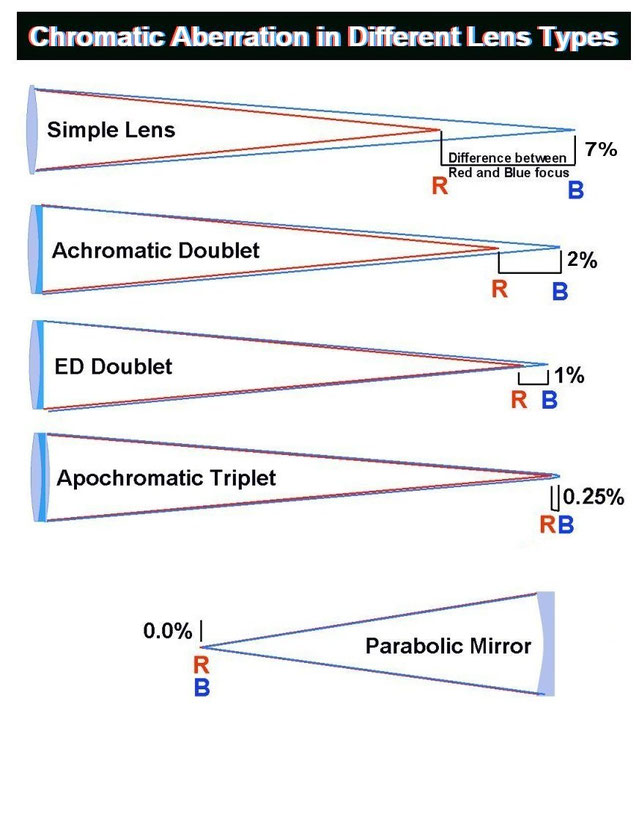
Generally speaking, the better the telescope the less chromatic aberration will affect your view.
Newtonian reflecting telescopes do not suffer from chromatic aberration (CA), except in the eyepiece, as the light does not pass through the glass of the mirror but is reflected off. All light is reflected the same.
Illustration: You will see that the different lens types have different levels of success at combating chromatic aberration. These lenses have a medium f8 focal ratio... When selecting a refractor it is important to know what type of object glass you are going to get and therefore you can be prepared for the level of chromatic aberration to expect. Newtonian buyers, you can ignore the worry of chromatic aberration (You have enough on your plates!) In this diagram the percentage figures are not strictly accurately represented, but it does give a good idea of the relative differences between the different lens types in medium focal ratios.
Note: These lenses have a medium f8 focal ratio... The focal ratio has a significant effect on chromatic
aberation. An f6 refractor will have significantly more chromatic abberration than an f15 refractor with the same lens type. A refractor with an ED or Apochromatic triplet OG of f16 would
display virtually no chromatic aberration.
IMPORTANT NOTE: I was speaking with my optician during an eye test and he pointed out that you can never totally elliminate chromatic aberration as the eye itself has some! There will always be a small amount detectible and is part of being human. He didn't recommend getting rid of the eye at the telescope eyepiece! So, we're stuck with at least some when using any telescope for visual observations, however, by choosing a telescope with well-corrected optics we can reduce chromatic aberration (CA) to a minimum.
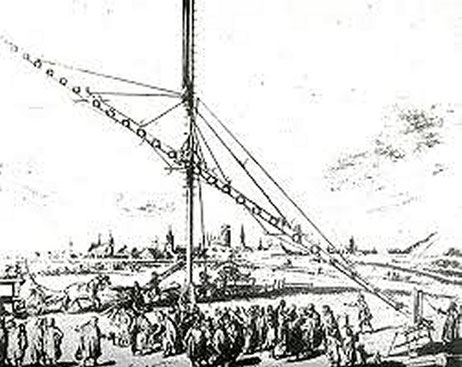
Remember I suggested longer focal ratio telescopes had less CA? The longer the focal length of the lens, the less the effects of chromatic abberation are seen. The reason for this is that if the light is refracted less, then the difference between the red and blue focus is also less. The shorter the focal ratio, the bigger the difference. Refractors in the early days of telescopic observation grew to huge lengths to try to get rid of the 'false colour'. These cumbersome instruments were known as aerial telescopes and some were as much as 150 feet or 46m in length!
Luckily, a British inventor called Chester Moore Hall created the achromatic lens in the 1730s, using a combination of a positive focus Crown Glass lens and a
negative focus Flint Glass lens, which have different dispersion properties, to bring the red and blue light to a much closer focus. Bending the light one way separates the blue and red
focus, but bending it back the other way brings them closer together again.
Pic: Pedro Ré, and his "150 foot" Aerial Telescope. Johannes Hevelius had a similar instrument in Danzig.
In modern times, manufacturers have used exotic types of glass to lessen these effects yet further (But at a price! These exotic glasses aren't cheap.) I was lucky enough to own an ED telescope and I must say that the colour correction was very good. Another advantage is that the lessening of chromatic aberration also increases image detail quality as more of the light is focussed into a single point, giving a technically brighter image, and allowing an increased magnitude limit for any given size of telescope - In practice, you won't notice!
This effect of reducing chromatic aberration by use of longer focal ratios is also evident in modern achromatic telescopes.
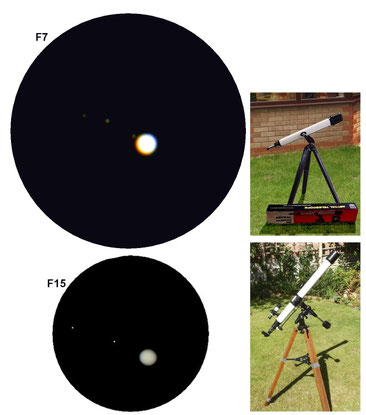
Example1: Chromatic Aberration is very apparent in this poor quality medium focus achromatic f7 60mm Astral refractor. (Observe the red and blue fringes at either side of Jupiter's disc).
Example2: Chromatic Aberration almost nonexistent in this excellent long focus achromatic f15 60mm Prinz 550 refractor. (Twice the focal length, twice the focal ratio)
< You can click this illustration to enlarge if it helps see the chromatic aberration effect.

f Number and Field of View:
The brightness of the image in a telescope and the field of view (The size of the circle when you look into the eyepiece) is determined by the diameter of the telescope objective (The main lens or mirror) divided by the focal length. It is also determined by magnification (Higher magnifications narrow the field of view and spread the light over a larger area making it dimmer). If the f number is low (4 - 6) the field will be wide and if high (8 - 15) the field of view will be narrower for any given magnification.
Here's another analogy!
Think of looking through a toilet roll tube. They're fairly short in comparison to their width (about f5). Now look through a kitchen foil tube (about f11). The field of
view is much smaller in the long tube. This is exactly how a long focal length gives a restricted view and can be used to demonstrate well the f number effect on field of
view.
Eg: 900mm focal length divided by 90mm objective lens gives f10
(900/90=10) (Which is fine for a refractor but a bit unwieldy for a Newtonian.)
It is usual for Newtonians to be shorter focal length than the equivalent
refractor - So f4 - f8 is usual in Newtonians, whereas, f6 - f15 is more usual in refractors. A refractor with a shorter focal ratio (f
number) than f5 starts to show some focusing problems and the false colour around bright objects becomes much more pronounced (Red and Blue fringes) so try to avoid refractors shorter than f5. (A
focal ratio of around f10 is a very common size for good astronomical refractors but as a guide f5 should be the minimum you look for. Parabolic Newtonians of f4
– f8 are common and give good images.) There are many excellent f5 achromatic refractors out there, just avoid the bargain basement models!
Visually, the stars are not affected by f number but extended objects, like galaxies and nebulae, seem brighter in low f number systems. If you're interested in 'deep sky objects' then a
parabolic Newtonian reflector with a focal ratio of between f4 and f6, or a refractor with a ratio of f5 - f7 would be your best choice.
A VERY IMPORTANT CONSIDERATION: NEWTONIAN MIRROR PARABOLISATION:

This applies ONLY to Newtonian Telescopes. It does not apply to Refractors, Maksutov-Cassegrain, or Schmidt-Cassegrain telescopes.
Small Newtonian reflectors often have spherical figured mirrors. The mirror's shape is incredibly accurate and MUST be parabolic to bring all the rays of light to the same focus.
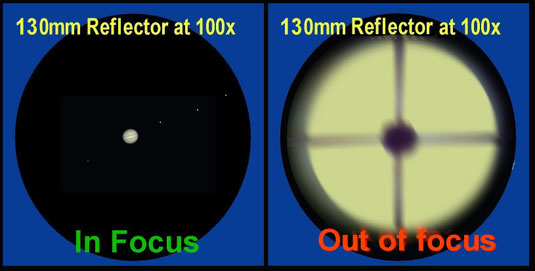
Pic: See the sharp stars on the Parabolic image. See the fuzzy stars on the spherical image.
Manufacturers of small telescopes don't bother with this final 'figuring' of the mirror. It's time consuming and needs special testing of the optics. To keep prices
low they miss out the important step of porabilisation.
You might think, "Ah, but I can still see the stars!" Yes, you can, but you will lose maximum magnitude because
the faintest will be blurred and spread their light so you won't see them. Also, if stars are fuzzy, what about detail on the planets or the Moon? Smudging of a
tiny point is not as noticeable as smudging on a surface. So your parabolic Newtonian might reveal thirteenth magnitude stars but the spherical one of the same size, only eleventh magnitude.
Another good reason to buy parabolic Newtonians.

Another annalogy Regarding Resolution! If you had a piece of paper with a smudged point, like a full stop, on it, you'd know where it was and it would be obvious but slightly smudged. It would be obvious and the smudging wouldn't matter too much. But, what if it was a page of very small writing? What if that were smudged? This is like looking for detail on a planet. Smudging could leave you seeing a mess!
So: Why aren't all Newtonians parabolised?
The manufacturers leave out the parabolising process because it's an expense they can avoid - Their telescopes, however, are sub-standard as a result and give awful image quality. They try to get around this fault by supplying long focal lengths (f8 - f12) because the difference between the spherical and parabolic mirror is smaller.
FACT: If you want to get the best out of your Newtonian telescope and use the optimum magnification and have the best image quality, you need to have a Newtonian telescope with a parabolic mirror. That usually means at least a 130mm Parabolic Newtonian.
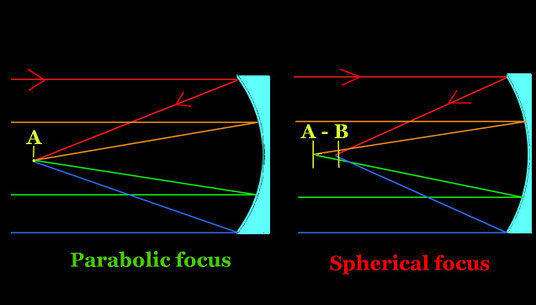
Simple Ray Diagram: The parabolic mirror gives much sharper point images and the detail on the planets will also be smudged by a spherically figured mirror.
The spherical mirror produces out of focus blurry stars and smudged planetary images.
The parabolic mirror brings all the rays of light to a focus at A. Whereas, the spherical mirror brings light from the centre of the mirror to a focus at A, whilst it brings the light from
the edge to a focus at B. Providing some focussed light and some slightly out of focus light at all points between A and B. There is no clear focus with a spherical
mirror.
NOTE: These are not different colours being
reflected to different points like chromatic aberration - It is all the same object's light - The colours in the diagram are to show different light rays only. Mirrors reflect all colours
the same (unlike lenses which refract different colours different amounts).
"Diffraction Limited Optics" – A good thing or a Bad?
You may wonder why your telescope has 'Diffraction Limited Optics'. (You should hope it does!)
It sounds as though that's a bad thing, doesn't it?
Why should you accept 'limits'?
Well, the truth is that all optical systems have a theoretical limit to the detail thay can show. A small telescope can only possibly show so much detail - A larger one will show more detail. But a badly made lens or mirror, of any size, won't show all the detail a lens or mirror of its size should.
So, the limit for seeing fine detail in an image is dependent on the accuracy of the telescope mirror or lens. A lens or mirror that is perfect, optically, is said to be 'Diffraction Limited'. Because the only thing that is limiting its abiltiy to show detail is optical physics. That is, it's as good as it can be, given the size of the optics.
So: Diffraction limited optics are the best.
Always look for "diffraction limited optics" when buying your telescope. If it doesn't say in the blurb or specification page - ASK!
In a Newtonian Reflector, for example, the mirror MUST be parabolic to achieve diffraction limited images (Below about f12, but who would want an f12 Newtonian? Crazy!) A spherically figured mirror below f12 is always out of focus at some point!
The Dawes Limit
This is the formula for finding the resolution limit of your telescope (If it has diffraction limited optics).
It is also known as The Rayleigh Limit.
R = 4.56/D D in inches, R in arc-seconds
R = 11.6/D D in centimeters, R in arc-seconds
where :
D is the diameter of the main lens (aperture)
R = Resolution: The resolving power of the instrument
You can use this information to work out if you can see the moons of Jupiter as discs, or whether you should be able to split the double double in Lyra or not, for example - A very useful formula.
Modern manufacturing techniques mean that it is easier than ever for manufacturers to produce very good optics. A company like SkyWatcher, for example, produce excellent value, diffraction limited refractors, Maksutov-Cassegrain and Parabolic Newtonian telescopes. They include this information on all their specifications. If you're looking at a telescope and it doesn't say 'Diffraction Limited', you can bet that it isn't and you'll have inferior views.
The biggest obstacle to your viewing clarity, however, is the atmosphere. Whilst your telescope may be diffraction limited, it will also, always be 'atmospheric seeing limited' too. There are bad nights, good nights and very good nights. It's all part of the game!
"WILL A SMALLER TELESCOPE THAN YOU RECOMMEND, SATISFY MY NOVICE NEEDS ?"
Something I must tell you: I was asked the above question by someone who had read this guide!
My answer is simple: There are no such things as "novice needs!”
There are objects that are visible in 'small' telescopes and these same things are beyond a 'tiny' telescope - I'm here, writing this guide after fifty uyears of
observational astronomy, telling you that those things that aren't visible in a 'tiny telescope' make up 95%+ of what you will read about and want to see.
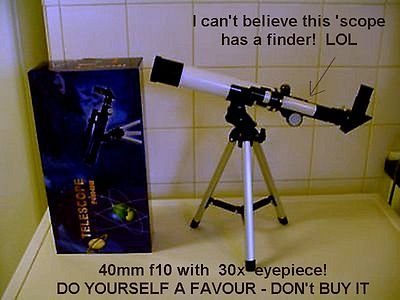
Pic: The 40mm telescope shown will NOT show: Markings on Jupiter, Saturn's rings, more than 50% of Messier's objects, or The trapezium. It will not split Mizar or show the phase of Mercury - And the views of things it will show will be small and devoid of detail.
We buy ourselves some optical equipment because we have read that we can see Saturn's rings, but once we've seen that things like that can
be seen we want to see more detail, the 'Cassini Division', or the polar caps on Mars, or the belts and bands and the 'Great Red Spot' of Jupiter's atmosphere, or the Ring Nebula, M57, in Lyra
- To view these wonderful things requires at least a 70mm refractor or a 130mm Parabolic Newtonian
reflector! Buy anything smaller and you will not be able to see these wonderful
details.
You may think, "I'll just be happy to see Saturn's rings, Jupiter's moons, and the disc of Mars". But I'm telling you, once you've seen them you'll
immediately want more detail! You'll be tempted to try a higher magnification but that just magnifies the awful image and makes things worse if anything! So, why start off on a minimum? Why
not give yourself a good start and at least have a detail level that allows you to see even more with experience?
Do yourself a favour, read and digest this guide and buy at least a 70mm refractor or a 130mm Newtonian and set off on your stargazing journey on the right foot.
If you want a really good start then a 90mm refractor or 150mm parabolic Newtonian would be better!

See for Yourself:
Left Pic. a 76mm Newtonian at 200x Magnification does not reveal detail.
Right Pic. a 150mm Newtonian at 100x Magnification but with a larger aperture does,
You can see more detail at lower magnifications with larger, better telescopes!
EQUATORIAL MOUNTS:
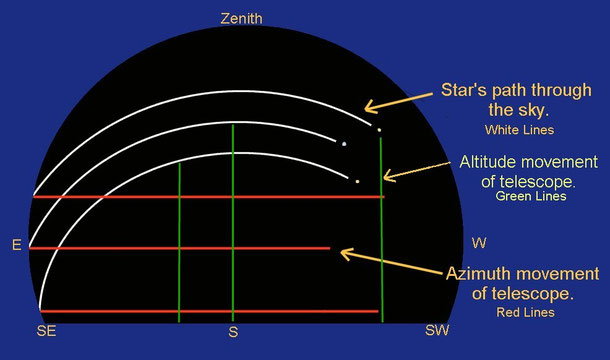
The benefit of an equatorial mounting is that you only need to move the telescope about the polar axis to follow a star as it moves across the night sky. The polar axis points to the pole star, approximately, and therefore the polar axis needs to be set to the observer's latitude.
Pic: This diagram looks a bit confusing I know.
This demonstrates the difference between the movement of the stars and an Alt-Az telescope. The two move in different ways. Necessitating constant adjustment of the mounting in two directions (up
and right).
An equatorial mounting automatically follows the white lines.It's easy to find your latitude using Google! For the English Midlands, for instance, that is about 52.5 degrees. Once an object has been centred in the view, lock off the declination axis (The one with the counterweight) and as the telescope is moved (With motor or slow-motion knobs) about the polar axis the planet or star will stay in the field of view without further adjustment. An Alt-Az stand, such as is found on the Dobsonian Telescope needs constant adjustment of both axes at the same time and can be frustrating to the beginner.
LATER:
To see just how easy it is to set up an EQ equatorial mounting and to get more information,
please see my "Mountings: Complete Essentials"
guide.
EQs can be a bit of a mystery for the uninitiated, but basically you point the polar axis at Polaris then move the other two axes to find and follow your object. (The Mountings: Complete Essentials page explains in greater detail.)
Should You consider a Go-To mounting?
As with many aspects of amateur astronomy, there are swings and roundabouts in the choice of mounting. You need to take some time to consider which type of mounting will help you achieve your goal.
If you want to learn your way around the sky and be able to use any telescope or binoculars to locate objects at any time, you might opt to learn 'the manual way', with an equatorial mounting that you have to operate yourself and point in the right direction. Use your skill to find convenient guide stars and 'star hop' your way to the object you want to observe. There is a lot of fun in this and it is very rewarding.
Alternately, you may want to be sure that you're looking at the right object and forego the learning of the stellar signposts, in favour of a robot telescope that will point to the object you want to see off a list. For you, the 'GoTo' mount is a good option. Beware, though, you will take much longer to learn where astronomical things are!
Go-To Mountings have motors and computers that find objects for you from a list. Some of them have a hand-set attached to the mounting to select your objects, while others use an app on a smartphone to control the telescope.
Granted, they take some of the fun and all the
skill out of amateur astronomy and will not allow you to advance much beyond 'telescope user'. However, you will have seen lots of things within the range of your telescope
without the palava of tracking them down (sometimes frustration builds beyond belief trying to locate supposedly easy objects - In my case Messier objects M1, M97 and M78... I've still not
seen any of those after all these years, and it's not for the want of looking, believe me!) Astreoids are another set of objects within the range of small telescopes which are feindishly
difficult to observe with certainty without a GoTo...
There is a Go-To version of the Equatorial, which is useful once you have learnt your way about the sky.
The Alt-Az Go-To is also not suitable for long exposure astro-photography as the field rotates as you track an object smudging the detail.
However, short exposures of ten seconds or so can be stacked to produce excellent pictures with
experience.
As you have seen. There are a lot of "howevers" and "alternativelys" in this section. You have to decide which way is best for you.
I have a specific page for all mounting types Mountings: Complete Essentials
MAGNIFICATION:
This is a basic overview: For full information, including: Barlow lenses, Exit Pupils, and
other considerations, please access my Complete Magnification Guide
HERE.
Magnification is not the be-all-and-end-all of telescopes! You can see a surprising amount with relatively modest magnifications - If you were to pin me down and say I could only have ONE eyepiece (therefore one magnification) as a planetary observer I would choose one which gave about 150x magnification. Not 200x or 300x or even the fantastic 525x magnification - Just 150x*.
*If I was only interested in galaxies, nebulae and comets, I would reduce this to 80x because then I would need a wider field of view for Deep Sky Objects :o)
Useful magnifications vary with the size of the telescope.
The larger the telescope, the higher the maximum
magnification, but remember this is always dependent on the quality of
the 'seeing' or atmospheric turbulence.
Examples: You would be
forgiven for thinking that really big telescopes use magnifications of 500x and maybe 1000x, but the honest truth is...
l have used the 9" (225mm) f16 Refractor at the Godlee Observatory, Manchester University. We had excellent views of Jupiter at 175x magnification.
The best view I ever had of the globular cluster M13 was in a 22" (550mm) amateur owned Newtonian, at just 200x magnification.
I used the 30" (750mm) Newtonian at the Amateur Astronomy Centre Nr. Bacup. And, once again, we had some lovely views of Jupiter, at 200x magnification. (See Pic of the 30" below.)

< Have a look at this telescope
Even 'huge' telescopes utilise 'reasonable and usable' magnifications.
Pic: The 30" telescope at the AAC was used to view Jupiter at 200x.
(That's me when I wasn't grey! Approx 1988)
Why do we need different magnifications?
The objects we look at are of
different sizes and sometimes we want to see the whole, and sometimes the detail. Sometimes, you just think that a smaller or larger view would help see the detail of what you want to view.
Also there are other considerations such as the exit pupil size to think about - See magnification guide.
This means that we need to be able to 'close in' on something. For instance, if we want to look at the whole of the star cluster "The Pleiades" (Seven Sisters) a 6"/150mm f6 reflector would need a magnification of only 28x to fit them all in to the view - However, if you wanted to show the double star Alcor in Ursa Major (The Great Bear) then you would need a magnification of around 100x - 120x to show the double to best advantage.
Likewise, if you're interested in planetary detail, you'll want magnifications from 80x to the maximum your telescope and the atmosphere will allow. If you want to observe the moons of Jupiter and Saturn, you will only need to use 60x - 100x.
The main consideration is the atmospheric
turbulence. If the atmosphere is unsettled, then you will need a lower magnification to get the best view. The higher magnifications can only be used effectively when the atmosphere is calm and
'quiet'. It's not all about big magnifications, it's about getting the best view on that particular night.

When I started out I had a telescope that only magnified 60x - That's not really enough. When I got my first 'proper' telescope, I believed that using high magnifications would show more detail.
I saved up for a 3xBarlow so that my telescope would magnify 600x (800mm focal length with 4mm eyepiece and 3xBarlow = 600x magnification). I was hardly able to locate the planet Jupiter,
the image was so dim! When I did, all I could see was a fuzzy disc which was very difficult to keep in the view and which had no detail on it whatsoever and also a very soft edge.
The 150x magnification that came with the telescope was much better suited to the optics of the scope. Showing a sharp disc of Jupiter with three bands crossing the disc. I learned the hard
way that 150x is plenty for Jupiter in a small telescope. Even in a large telescope I have rerely used more than 220x.
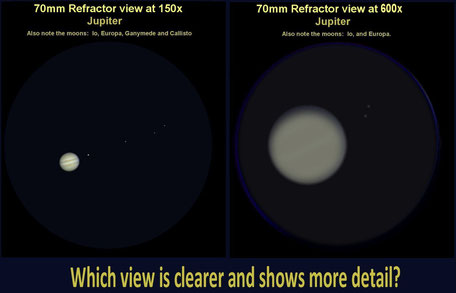
The very last thing I want to do is have you thinking that very high magnifications would give you a better view.
This illustration aproximates the difference between 150x and 600x views in a 70mm x 800mm f11 refracting telescope on a normal seeing night... Observe the detail on the two planets.
Which would you prefer?
I hope you'll agree that using a lower, more sensible magnification gives a better view of the planet. The Great Red Spot is visible on the 150x view!
Read on to see why this difference occurs and what magnifications you should be using to optimise your view.
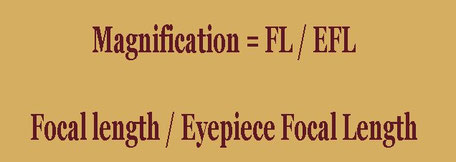
How do we work out magnification?
Each eyepiece (The small lens you look through) has it's own focal length (Usually printed on the side or top) If you know the focal length of the telescope object glass or mirror, then all you need to do to find the magnification is divide the focal length of the telescope by the focal length of the eyepiece.
Eg1. 900mm / eyepiece 15mm = 60x magnification.
Eg2. Focal length 1250mm / Eyepiece 8mm = 156x magnification.
It can be seen then that the same eyepiece in different telescopes will give different magnifications!
Eg3: a Refractor, focal length 1200mm with eyepiece 10mm = 120x magnification. The same eyepiece in a 150mm Newtonian with a focal length of 750mm = 75x magnification.
Magnification is a big selling point for telescope sellers so you have to accept that they will throw in an eyepiece that is virtually
useless just to give that 525x magnification claim. As long as they give other eyepieces that cover the 50 - 100 range and the 100 - 150 range you'll be OK.
But do you know what? I have noticed that once you get away from the ridiculously small telescopes manufacturers tend to give more reasonable magnifications! Quite often 76mm Newtonians come with
525x (useless), but a 150mm Newtonian will more likely have 150x as it's 'best' magnification (One that could actually be used on most
viewing nights).

If you don't know your primary focal length you can measure the outside of your telescope to approximate (to about 1cm) the focal
length.
Remove the eyepiece, wind the focuser right in, measure as shown in the diagram.
Once you know this length in millimetres, you can find magnifications easily.
Don't forget you can always buy more eyepieces to get the usable magnifications you require.
This doesn't work for Bird-Jones telescopes or Catadioptric scopes.
So... Following my advice further it stands to reason that to utilise the higher magnifications to the full larger telescopes are essential! A six inch 150mm Newtonian will stand 300x magnification on a really good night, but an eight inch 200mm would be able to deploy 400x on very still nights.
Logically, then: If you buy smaller than my recommended size you won't see the detail that's available. You can really only expect to use magnifications up to 50x per inch of aperture for Newtonians, and 100x per inch for refractors.
THE MAXIMUM USEABLE MAGNIFICATION on
a very good seeing night is:
About 2.5x per millimetre diameter for any telescope type maximum on the best viewing nights.
(It's not a hard and fast rule, just a guideline. If the image quality starts to drop off, reduce magnification!)
I would recommend you read the complete Magnification Guide.

What About Light Pollution?
If you live in a large town or city, please don't think that you have 'no chance'. There are many astronomy projects that are well within the capabilities of your instrument even in a city center.
The Moon and the planets are bright enough to be viewed from a very light poluted area. These days street lighting is nowhere near as bad as it was last century. When you hear about the woes of light pollution, it generally relates to 'deep sky observation' and is stressed by purists banging on about 'the ideal'.
Observing in the city, or large town, is rewarding and interesting with the right subject. There may be a need to observe from a park or piece of common land, rather than your local built up area, depending on your horizons. But this is well worth it to get you into this brilliant hobby. If you have a local astronomical society, they will help you in your choice of observing site and may even have an observatory!
I grew up in the world famous seaside town of Blackpool, with its closely positioned rows of terraced houses and back alleyways, much like the picture above. The view of the sky from my Egerton Road, back yard was: North above 25 degrees, East above 50 degrees, South above 12 degrees and West above 15 degrees (approximately). This situation was, obviously, far from ideal. However, this is where I learned my way about the sky and made many many observations. With my first telescope and subsequent instruments in this well illuminated town I observed the Moon, the planets, double stars, comets and many Messier objects. Although it was far from ideal it was a fantastic time of my life learning what I could see.
I never once took my scope out into the countryside! ( I did once take a pair of binoculars out into a farmer's field at three in the morning and fell over a sleeping cow! But that's a different story.) Country dwelling observers have their own problems, believe me! For a while I lived in a house with huge trees growing all around and this limited my view to 45 degrees up all round and the altitude of the trees was worse still in the south (where we like to observe the planets) limiting me to objects over 70 degrees altitude! Luckily, out front, there was The Green, and I could take the scope out there, well away from the trees, to get a 20 degree southern horizon.
If your circumstances aren't brilliant, I urge you to give it a go anyway - You'll be surprised at what you can see. Don't give up before you've started!
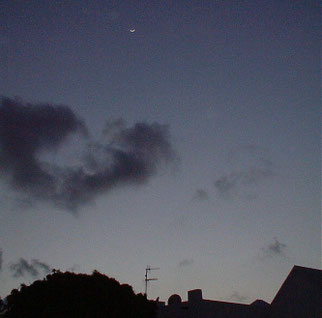
ATMOSPHERIC CONSIDERATIONS:
The atmosphere is a major player in the 'What's the highest magnification I can use?' debate. The rule is to use the highest magnification that still shows a steady clear image.
Sometimes the atmosphere is really steady and you can use the highest magnification your telescope will allow. But, more often, there will be warm and cold
currents churning up the view. In that case you have to moderate your magnification so you can see the best view you can get. This usually means that you have to use a maximum
magnification of about 150x on a 150mm Newtonian telescope, one that boasts a theoretical maximum of 300x.
The reason for this is that the atmosphere is made up of small cells of air. These are roughly cushion shaped cubes ranging from about 4"
(100mm) up to really calm air pockets of 12" (300mm). The larger the air pockets the calmer is the atmospheric seeing. The clarity of the image is affected by your telescope observing
light passing through the boundaries between these small pockets of air.
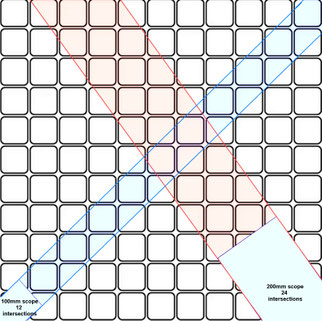
All light coming from space is pretty much parallel, and so you will be looking through many pockets of air in the lower atmosphere to see your object roughly equal to your telescope diameter. If your telescope is a 90mm diameter, you will usually be looking through the whole of each 100mm pocket of air and the image will be steadier for you than for someone who is using a 150mm telescope. The 150mm telescope will have 1.5 air pockets per apperture to look through - The 'turbulance' is caused by looking through the edges of the pockets of air. On a calmer night, the air pockets might be 200mm in size, and the 150mm telescope has great views because it is a smaller diameter than the air pockets. I know this sounds crazy, but this is why we get some nights that are brilliant, and others where you should just pack up and go in! The brilliant nights, it can be reasoned, will be more frequent in a smaller telescope than a large one! So, don't moan if you can only afford a 100mm telescope, you'll have good seeing on more nights than your mate who has a 200mm Newtonian! Of course, on the nights when the air pockets are over 200mm he will have much better detail views than the 100mm scope.
Pic: Compare the number of intersections seen by the 100mm telescope (left blue) compared to the 200mm (Right pink).

When I went to live in Lanzarote, a sub-tropical island, I was looking forward to 300+ clear nights a year, but what I didn't realise was that the atmosphere would boil from sunset until two a.m. The views before midnight were nearly always rubbish! The best viewing was between two am and dawn, once the ground had cooled down a bit. Being a small sub-tropical island, the cool air off the surrounding Atlantic Ocean was disrupted by the heat of the land, giving awful results in the eyepiece. (see pic of the Moon at top: Taken from 29 degrees North, 13 west. Looks like the Cheshire cat's grin!)
In temperate latitudes we have it a bit better. The atmosphere is usually good after the Sun's been down an hour, getting very much better about midnight any time of year. Once the
atmosphere is calm you can regularly use half your telescope's maximum magnification. On really clear and still nights, which are a rarity, you can observe at the
max.
A slight mist can sometimes be a good thing - It can act like a filter when looking at the bright planets or the Moon and won't detract from the image! Clouds can be observed round by looking
through the gaps. But fog, rain or snow is a definite no-no.
---------------------------------------------------------------------------------------------------------------------------------------------------------------
Should You "Go out into the country?"
Generally speaking, light pollution is not about having a streetlight close to your house. It is concerned with the whole area you observe from. I get letters from people all the time telling me they're going to take their scope out into the country, or up a hill*, to get better views. The fact is that unless you live in a major city, you won't get much better views at all. If you observe from a town of less than about 60,000 inhabitants, going to the 'country' won't make any difference - You're already in the country! Cities and large towns have a bit of a light problem as far as DSOs go, but there is no problem with the Moon or planets from city centres at all.
*Going up a hill will not improve your view. Your altitude makes hardly any difference below about 14,000 feet (4,300m). Also, you need to aclimatise to that altitude and you'd feel ill for a few hours at least! In the UK there are no mountains anywhere near this altitude. Sorry to say that going up any hill or mountain below 3800m won't make your view any better.
My advice about your observing location is this: Make sure you're in a dark environment. If you're in the garden, make sure there are no house lights on. Make sure you have a reasonably clear view south. If these requirements are not possible at your home then maybe a local park will get you into a better location. But there is certainly no need to go out of town into 'the countryside' seeking better viewing. It is mostly psychological!
Never underestimate the proximity of a toilet and a kettle when you are enjoying looking at the stars!
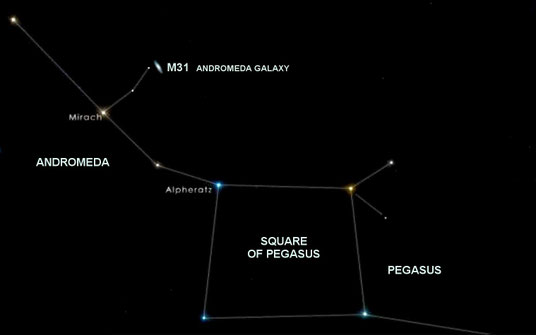
Star Hopping:
The technique used to find faint objects in a telescope.
This is basically a method of finding successively fainter objects until you have the target in the telescope.
You start by finding something you can find easily, then gradually work toward the target object using a planned trail of other objects.
Star hopping is useful for unaided eye location of objects as well as when tracking down an object in the eyepiece. Smooth control of the telescope is essential when star hopping as it is
very easy to lose where you are! Slow motion controls on an EQ mounting is your best solution to success using this technique.
Example: To find the Andromeda Galaxy, M31 (Unaided eye)
1: Find the square of Pegasus (An asterism in the constellation of Pegasus).
2: Locate the top left hand star of the square, the star Alpheratz.
3: Count two fainter stars to the left, to the star Mirach.
4: Count two fainter stars above that one.
5: M31 is just above that star! (See pic).
To find faint objects, such as, asteroids, variable or double-stars, or the outer planets, for example, you do the same thing, but using the view in your telescope to hop from star to star. Telescopic star hopping is usually in a much smaller area than the example above as you have objects in a much smaller field of view to work with. I tracked down the asteroid Pallas, the first time I saw it, using this technique described in the Asteroids section of My Solar System.
Note: An asterism is a small group of stars contained within a larger constellation. Some well-known examples are: Orion's belt (Orion), The Plough / Big Dipper (Ursa Major, the Great Bear), The Hyades and the Pleiades (Taurus), The Teapot (Saggitarius), The Kids (Auriga) and the Square of Pegasus (Pegasus) as mentioned.
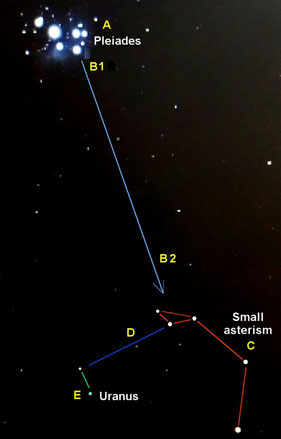
Binocular Star Hopping Example:
On March 13th 2025, on the 244th anniversary of the discovery of Uranus. I used my 10x50 binoculars to locate and observe the planet.
The pic shows the star hopping plan to locate this dim world among the stars.
Method:
1: Locate the easy asterism, the Pleiades M45, in Taurus (A).
2: From there, sweep downwards a few degrees (B1 to B2)
3: Locate the asterism of five fainter stars (C)
4: From the top triangle of the asterism, move left (D) to find a pair of starlike objects.
5: The lower one is the planet Uranus. (E)

THE MAGIC SIZES:
The maximum magnification, dependent on atmospheric conditions, is:
2.5x per mm for refractors and 1.25x for your parabolic Newtonian.
Following this statement above it can be seen that the maximum magnification
you should use on a 60mm refractor on a normal seeing night would be 120x
We have already seen that the planets are best observed at magnifications between 150x and 200x , on a still night.
This means we NEED a bigger telescope to handle these magnifications successfully.
ie: A Refractor of 70mm to 90mm or Newtonian of 130mm to 150mm - The magic sizes I recommend!
70mm x 2.5 = 175x
90mm x 2.5 = 225x
130mm x 1.25 = 162x
150mm x 1.25 = 188x
(You can therefore see: I haven't just plucked these sizes out of thin air :o)
"You cannot change the laws of physics, Captain!"
Obviously: Working at the instrument's limit isn't going to produce excellent images. So, I would recommend the larger 90mm refractor or the 150mm Newtonian. That way, you are well within its capabilities with your 150x to 200x magnification planetary views.
So, that's about it for the nitty gritty of what makes a telescope suitable or not.
You can stop here if you wish, now you are armed with the information.
The following extra titbits can be considered 'further reading'.
Please see the other guides in this website by using the links at top. These expand on the basics contained in this page and give fuller information on all subjects.

I thought I knew better than all the books I had read about suitable telescopes and asked for an Astral Telescope for Christmas in 1976. The 60mm f7 Alt-Az (AZ) scope wasn't really an astronomical telescope at all. It was at least an achromatic telescope but only had four fixed magnifications of 15x, 30x, 45x and 60x which were selected by pulling out the eyepiece. Click, click, Click. This meant that the eyepiece was some sort of zoom device, which is never a good solution as it will contain several more lenses than the ideal. It had no finder of any sort, and no slow motions on the awful stirrup mounting head (Not even a steady bar!) It was more suited to looking out to sea. But, undaunted by its shortcomings, I observed many objects in the beginner's repertoire.
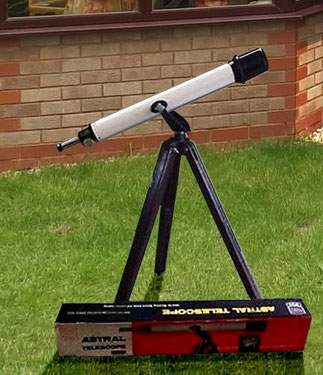
Since that enlightening Christmas, and through the last forty five plus years of observational astronomy with some brilliant telescopes, I have been of the opinion
that it is a good idea to start off in astronomy with a telescope that will show you more than the very basics. (Does it show?)
Pic: The Astral Telescope was £55. About a week's wages for an adult, in 1976.
Yes, a tiny telescope will show you A FEW things, but why bother with this first step?
The Astral Telescope's optics must have been shockingly bad (these things happen at the
bargain basement end of the market), or maybe it was just the f7 optics and the 60x magnification and the inexperience of a young teen amateur astronomer combining to
disappoint?
Note: Years later, in 2003, I oversaw the construction of an achromatic f12 60mm with some students for a project, which I directed as Tutor of a 'Project Research and Development' course in Mablethorpe business centre. The students and I used it with a 12mm eyepiece and the bands and belts of the Jovian disc were clearly visible in that, also at just 60x magnification!
Nowadays, there are a wealth of different kinds of telescope, and the prices have come down massively. So - why would you suffer the tiny
telescopes when good quality, decent sized telescopes are available for you at very reasonable prices?
YOU CAN NOW GET YOURSELF A VERY GOOD TELESCOPE FOR LESS THAN A WEEK'S WAGES! (A week's wages is now around £450 IN THE
UK) You're looking for a Refractor 70mm and larger... Or a parabolic Newtonian 130mm or
150mm...
Having been trading telescopes for a number of years I can, hand on heart, say that you can get a VERY good telescops for under £100 on the second hand market in 2025!

Please DO...
Look out for fantastic bargains on the second-hand market.
Second hand is "as good as new", with most astronomical instruments, as they very rarely sustain damage.
Grab a bargain...
Pic: This 100mm SkyWatcher 100ED-PRO Refractor was found in a 'Cashconverters' store and they sold it to me for £89.99 - WOW! (This telescope OTA is £720
new!)
The scope has ED optics (Almost no chromatic abberation), it has a 50mm finder (Brilliant) and comes with a very good quality 2" diagonal and focusser. It also came with two excellent quality eyepieces. All-in-all, this is a superb telescope and I am very pleased - You could be the happy owner of such a scope for peanuts - If making savings like this interests you, please read my Second-Hand buying guide.
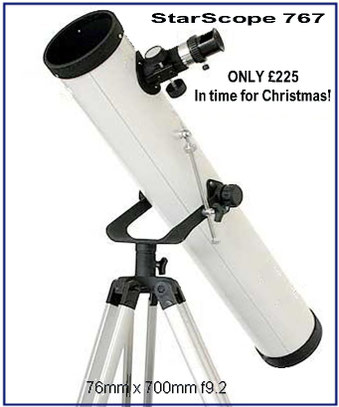
BUT, Please DO NOT...
Be tempted to buy any telescope SMALLER than the sizes I recommend in this guide or you will not see the detail that you deserve to see for the money. If you have patience you can get the scope of your dreams for the same price as one of these binnable objects! See my second hand telescopes guide!
Pic: This tiny spherically figured stirrup mounted telescope will not begin to satisfy even your most basic astronomical needs. I feel sorry for anyone who has started out with something like this binnable tat!
PS: You wouldn't buy this one anyway, would you? The focal ratio is over f8... In a Newtonian that will usually signify a spherically figured mirror with a consequently awful image, and it is mounted on a classic design boo-boo... the 'styrrup type' AZ mounting!
WHAT ELSE MIGHT YOU NEED?
I get quite a few messages asking what else you should buy to get started in astronomy when you get your new telescope.
A Good Star Atlas.
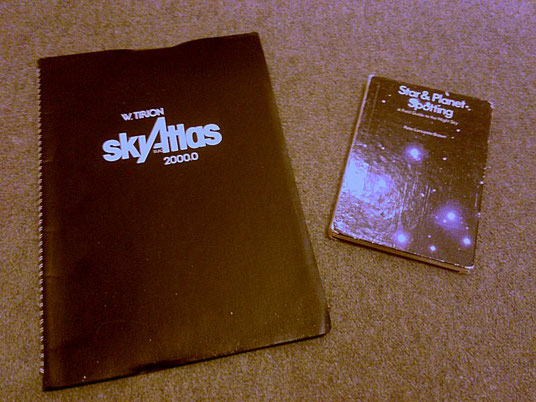
The most useful thing you can get is a good star atlas. I recommend two publications. Peter Lancaster Brown's excellent introduction to visual observing 'Star and
Planet Spotting' (Available second hand on eBay from 60p) and for those observers who have some experience Wil Tirion's 'Sky-Atlas 2000.0' which shows stars down to magnitude 8 (A real must for
those with telescopes above 130mm) Which you can pick up for rather a lot more (Mine was £30 when I got it in 1981).
Pic: My two superb reference works.

Pic: My SkyAtlas 2000.0 is an invaluable tool for finding anything you need
to see.
A superbly detailed star atlas it shows stars down to magnitude 8.
It has 26 maps of the night sky with colour-coding.
The Orion area of the winter sky shown left. (Note: Orion Nebula Enlarged at left showing magnitude 10 stars).

Pic: My copy of Star & Planet Spotting
is
invaluable as an observer's reference. It gives lots of useful information on the Constellations, Observing the Planets, Variables, Comets and Meteors. There are also basic and very usable star
chart pages in the middle. They show stars down to magnitude 6.
The winter sky, including Orion, shown left.
I would recommend that every amateur astronomer should have a copy!
Note: The oblique line on the left of the left page is the track of Comet IRAS-Araki_Alcock from 1983.
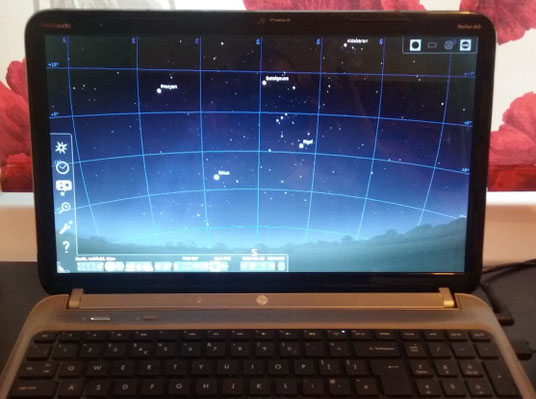
PC Based Astronomy Programs.
It is also very useful
to use a computer based program such as 'Stellarium' (invaluable Free download). There are many different ones but for now why not try a free one?
This will, after a bit of playing about with the options, equate you with the way the sky moves. You can set specific times or view the sky as it presently is. Move forward or backwards, in time,
at varying speeds. You can zoom in, use a telescope or have a whole sky view! You can get information on any object. You can look at how the planets move and work out where and when to see
specific things. You can turn various useful things on and off: ecliptic, planet orbits, EQ grid, Alt-Az grid, labels, ground, atmosphere, daylight, clock, constellation lines and art!
< Pic: Screen-shot of a laptop displaying 'Stellarium'. Orion area again with Betelgeuse selected, view South with atmosphere, daylight and ground selected. Equatorial grid is on. Constellation lines are off.
It's easy to set your location so you can see the exact sky where you are, and easy to change it so you can see the sky for where you will be going on holiday for instance! Lets you see the Southern sky or work out which stars are visible from various latitudes. It's a lovely program visually, and is worth a look. It will never replace the star atlas for usefulness 'at the telescope' - But it is absolutely invaluable for seeing how things work and planning your observing sessions.

Stellarium for your mobile phone.
This is an app for your phone that is pretty much the same as the free PC version in what its capabilities are.
The free version is a 'lite' version which has most of the detail you need for basic astronomy planning at the telescope. There is a paid for version which adds more detail and
capability.
Personally, I only use the PC version, although I do have the app installed on my phone too!
Pic: On the screen shown you can zoom in to M42 in Orion until all you can see are the Trapezium stars! I like the lite version, it's pretty good!

What Might I Need Equipment wise?
It is always handy to have a pair of binoculars. They really are almost a must to accompany your telescope. Almost any size will do, except the tiny sports types. Binoculars
are 'sized' by their magnification and their diameter. For example, a pair of 10 x 50 binoculars give a good view. They magnify 10x and have lenses 50mm across and are referred to as
"Ten by Fifty" (not 'Ten times Fifty' I had a letter from one chap who thought the magnification is 10x50 = 500x... No, sorry.).
Personally, I have a pair of 10x50s. That's the recommended size for hand held astronomy binoculars the world over, and in these web pages.
Binoculars will help you find the exact position of the bright galaxies, check quickly on the position of Jupiter's moons (Oh, yes, don't let the claim that a telescope will show Jupiter's moons be a selling point – If it wasn't for the proximity of the very bright Jupiter you could see them without a telescope!)
Pic: Bino-Bargains: My excellent Swift Ranger II, 10x50s are superb and were bought from eaby, second-hand for £19
With your binoculars you can see and the planets out as far as Neptune, and they give many wide views of the milky way. They are useful tracking down the Messier objects too. I would recommend you get a good pair of 8 x 40, 7 x 50, or particularly 10 x 50 binoculars.
NOTE: I have a page on the website which explores this subject in much greater detail: Binoculars in Astronomy
Try
to keep things simple - No huge magnifications, No Zoom Binoculars and make sure you check the size - Lots of misleading sizes advertised on the interweb! 200x150 being one
set of 10x50's... I don't know what the seller thinks the figures mean! Overall size in millimetres? Anyone's guess!
Whilst the 60mm and
70mm and even 80mm binoculars are very nice for astronomy, you do need a tripod and mounting to hold them steady. The main object of using them in conjunction with your telescope is for
conveniently looking at something before observing. It's not very convenient if you have to use a tripod! By all means get a large pair for use with a tripod if you like the views - But this
would be an instrument in its own right and not really used for a quick check prior to observation with the telescope.
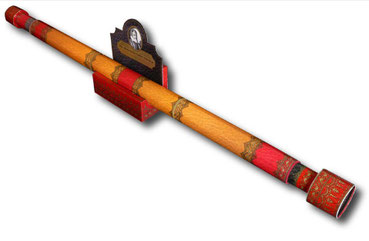
For your telescope:
Buy nothing extra for your telescope until you are familiar with using the telescope you bought. It's very easy to spend lots of money needlessly on things that you don't or won't need. Take your time to get used to your instrument and your view through it. After a while you will realise what you need.
The next thing you'll probably want is another eyepiece to extend the range, sometimes higher magnification and sometimes lower.
It can be beneficial to get a 2x Barlow lens. This device effectively (optically) doubles the focal length of your telescope and therefore all your eyepieces can be
used as they are or in unison with the Barlow to give twice the magnification. Sometimes useful but not always - Remember the magnification limit of your telescope and try not to exceed it.
Another consideration, if you are looking for Deep Sky objects, the Barlow will also double the focal ratio - f5 (fine for Deep Sky) becomes f10 - Not too good for Deep
Sky!
There are many cheap plastic Barlow lenses available (£12-£19), but I would recommend spending about twice as much and getting a metal, achromatic Barlow (£22-£35) - The quality
of the image is well worth the extra outlay!
Try not to duplicate magnifications (don't waste your money) if you buy a 10mm it will give you a magnification. Adding your Barlow will give you another magnification twice that of the first. If you then bought a 20mm eyepiece adding the Barlow would duplicate the magnification you get without it using the 10mm eyepiece. Always take care you won't duplicate too much (Some duplication is almost inevitable).
Using a Barlow also means that if you have a refractor of f10 you will be using it as though it is an f20 with the resultant shrinking of the apparent field of view and 'photographic slowing of the system'... Care is needed and I wouldn't spend a lot on a Barlow unless you can try it first!
Another important part of the telescope is the 'Finder Scope'. This is the smaller telescope attached to the side of the main scope that allows you to
locate things in the eyepiece. You can adjust the finder's cross-hairs to precisely line up with the centre of the field of view of the main scope, even at high magnifications. It can be tricky,
but you can't really do any harm. Lining up the finder should be done with a distant earthbound object in the daytime so time can be taken to get it spot on. The more accurate the finder is set
up the easier observations will be in the dark.
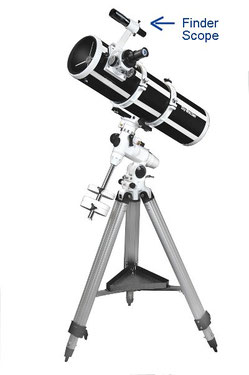
FINDERS:
PLEASE SEE THE FINDER TYPES GUIDE FOR FULL INFORMATION ON THIS SUBJECT.
Some finders that are supplied with telescopes are woefully small for the telescope they serve. A finder of at least 25mm is essential and 30mm is much more desirable for 150mm reflectors. 200mm and above really need a 50mm optical finder.
Eg: If you're hoping to line your telescope up on Neptune, you have to bear in mind that the planet is around magnitude eight, and to find it easily in the finder, the finder has to gather a good deal of light too! (The 70mm Refractor I review later in this guide had a finder of just 15mm diameter - Couldn't see much of anything fainter than Jupiter!)
If you can replace this
small finder with a big, 'straight through' finder (The right-angle finders are difficult to use for the beginner) your observations will become much easier.
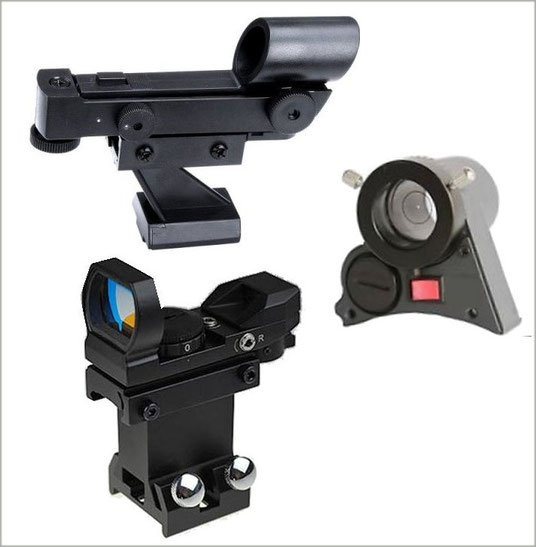
The finder needs to gather light and show stars that cannot be seen by the unaided eye. Some scopes come with something called a red-dot finder. This should be replaced with a light gathering magnifying finder to enable you to see things that your eye can't. What use would a red-dot finder be in locating Neptune when it is Magnitude 8 and your eye can only possibly see to magnitude 6? You need a proper finder...
Pic:
Red Dot finder types in common
supply.
These won't show you anything you can't see with your eye!
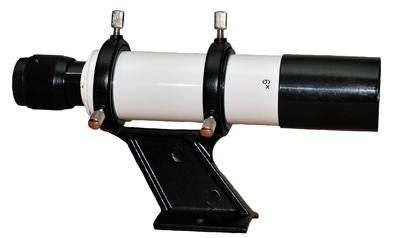
Pic: A Proper Finder scope - 6 x 30mm
This will show objects down to magnitude 9. You can line up better because of the magnification and cross-hairs.
If you would like more information on this subject, I have a separate guide that deals with this subject in greater detail.
Here> FINDER-SCOPE TYPES

Moon Filters
LUNACY!
Do not pay any extra money out for a 'Moon
Filter' - No self respecting amateur astronomer would use such a gimmick (You cannot harm your eye with the Moon's light!). These items just
line the pockets of the manufacturers!
REASON 1: It can be bright, but if you're looking at the Moon then there's no need for dark adaptation, and it can't damage your eye.
REASON 2: Astronomers spend most of their time trying to maximise the amount of light available to the eye - Why would you darken the image?
REASON 3: Each time light passes through a lens or filter there is some degradation of the image quality.
How many reasons do you need? Please don't use a Moon filter... Leave it out and see more of what's there!

Travel Scopes:
Generally, these are usually supplied on a more flimsy tripod, but nevertheless, they usually give reasonable images of stars and the Moon. The image scale is small due to the short 400mm focal
length so they should NOT be expected to show detail on the planets.
You may find that your
telescope is a bit big for just grabbing quickly to have a look at something, or it won't fit in your car with all the family when you're off to the seaside but you'd like a telescope in case you
need to observe something. You could do worse than get yourself a 'Travel Scope'. This is an easily portable telescope designed for use on the go.
A
travel scope should not be considered for your Main telescope, but will complement your Main telescope. There are plenty of short focus refractors in decent sizes that will still show
you plenty when you're out an about. For instance I have an astronomy acquaintance who takes his in a back-pack when walking his dogs and sets up while they have a run about on the
beach.
You can get a very good 70mm Travel Scope for around £50 new (Including the carry-bag).
The 70mm objective lens
gives enough detail for casual observing and the f6 ratio gives a wide field and bright deep sky images too. A good all rounder of a decent size.
My own Travel Scope is
a Helios 80mm f5 refractor on travel alt-az with slo-motion control, that I picked up for £22.00
You may have to buy a short focal length eyepiece (4mm) or 2x Barlow or even a 3x Barlow to get decent planetary image size (100x Magnification and above) as some come only with 20x and 40x magnifications which, while refreshingly conservative, are nowhere near enough to show detail on the planets.
70mm
Celestron Travel Scope on extending tripod with carry-bag. Ideal for 'Astronomy On-The-Go' but should not be your main instrument, unless as a 'stepping stone'.
These can be had for around £50
new!
The travel scope should
not be considered as a starter scope if you are interested only in the planets as the image is too small. These scopes are excellent for having a good look round the wonders of the universe and
getting a feel for what can be seen with a 'proper' instrument (But will let you down on planetary views).
Resist buying the Newtonian layout reflecting types of travel scope at all costs! They are far too delicate for true travel scoping! Refractors and Maksutov optical layout
scopes are much sturdier.
If you have limited funds and want to get into astronomy with a useful instrument, this is a great way. By getting started with a 65mm to 75mm Travel Scope you are able to
spend very little and have a scope that will be of use, even if you do 'take the plunge' and buy a larger telescope in the future - It's always a good idea to have a small, easily used telescope
handy!
This
telescope is great for most aspects of astronomy 'on the go' and having a quick look around the night sky, but, once again, I wouldn't recommend it for your main
telescope!
Please, AVOID any telescope with a focal length shorter than 400mm.
NOTE: Travel scopes are designed to be 'no bother' when carried about the countryside, so they are designed with lightness as a high priority. Consequently, the mounting can wobble in use, somewhat more than a small refractor on a more sturdy mounting/tripod.
TRAVEL SCOPES, The Verdict:
Travel scopes represent a basic start into using a manual telescope but even an 80mm won't reveal the detail you'd like to see. Although Travel Scopes typically employ magnifications from about 20x up to 100x, they will not show the detail you require as your main telescope, due to the small image scale, being only 400mm focal length.
The Most Important Thing You'll Need... PATIENCE!
Being able to
'see' with your telescope is something that is helped by the size of your telescope, but also needs a lot of experience. Start off with the magnifications I have suggested and keep observing. As
you get used to seeing objects in a telescope you'll learn to really 'see' the detail that's there. Start on a list of 'easy' objects and learn to see the detail in them (See this Astro-projects page)
I'm not trying to put you off, I'm hoping that you'll realise that what I'm saying is, if
you're initially a little disappointed with your telescopic view of the heavens, stick with it and you will gradually be able to see more and more.
Someone like me, who has spent years looking through telescopic equipment, can see a whole lot more than a raw beginner and somewhat more than someone with a year's experience. But this is a
fantastic hobby and there wouldn't be much fun if everything was there on a plate for you straight off!
Most of the fun of this hobby is gradually learning more and more about the universe and learning to see it for yourself.
Have a look at some of the projects you could undetake with a telescope like I recommend: (See this Astro-projects page)
The Dobsonian Telescope: Facts!
I think a quick word about Dobsonian telescopes is in order. Having had John Dobson as a house guest when I lived in Horncastle, when he gave a lecture at the Horncastle Astronomy Weekend, I think I am able to provide you with informed information on this 'differently mounted' Newtonian telescope. The original design was for a large aperture telescope, using the Newtonian layout. The mounting is a simple altitude and azimuth non-equatorial design for cheapness and simplicity (ie. up and down left and right).
The beauty of these telescopes was that the mirror could be made from much thinner, cheaper glass than the standard Newtonian because it was on an Alt-Az mounting and not an equatorial. The mirror was supported on bubble-wrap, cardboard float points and a 'sling' type support strap! The complicated mirror cell and thick glass mirror of the equatorially mounted Newtonian was avoided and much bigger telescopes became affordable to amateurs.
For the purists:
The term 'Dobsonian' has come to mean any telescope on the 'Dobson Style Mount'. This has become so prevalent that it is even in several astronomical dictionaries as the definition!
However, the true definition of a 'Dobsonian Telescope' is slightly different and is worth knowing.
Many manufacturers, and even experienced astronomers mistakently think that the term 'Dobsonian' refers to the type of mounting it is on. An Alt-Az of particular construction.
This is not the case. Having spoken to John Dobson personally on this subject, these are the facts.
When John was creating the telescope design that became known as 'The Dobsonian' there were a number of considerations that influenced the design (ALL of which have to be present for a telescope to be a TRUE Dobsonian).
John was not bothered about patenting his ideas, he just wanted to get as many people looking through big telescopes as possible - Consequntly, there is no rule about what you can call 'a Dobsonian'.
To that end:
1: He ground large mirrors (12" and larger) out of thin glass blanks, usually 25 - 35mm thick. These were extremely thin by contemporary standards - A 12" 'ordinary Newtonian' would typically have a 65-75mm thick mirror and a 16" would have maybe 85-95mm thick glass. John Dobson made telescopes of 20" and 24" aperture with 60mm thick glass.
2: He avoided the complicated and expensive mirror cell by laying the mirror on a backboard with a simple plywood cell of three triangles and rubber points with a
'bib' over the top, sometimes with a layer of bubblewrap to support the thin mirror. The weight of the mirror was taken by a strap underneath the circumference. Because of this the
telescope could ONLY be used on an Alt-Az mounting to keep the sling supporting the mirror. This was OK in this design, because keeping costs low precluded
the equatorial mounting. An Alt-Az it was.
3: John made the mounting from plywood and a large bolt for the verticle axis and teflon pads to minimise friction. The altitude bearings were made of tubing and rested on teflon pads in the mounting cut-outs.
John was pleased to be able to make a workable 20" parabolic Newtonian reflector for the same cost as a 6" commercially bought telescope.
There's a video by John himself: Here> https://www.youtube.com/watch?v=snz7JJlSZvw&t=3608s
Watch video from about 55mins, for the mirror support part.
However:
The above facts are largely unknown and figured only in interviews with Mr. Dobson in the astronomy magazines of the seventies and early eighties. The majority of people, following the manufacturer's lead, believe that the type of mounting is all that denotes a Dobsonian Telescope. It is a matter of fact, that this misconception will continue to prevail, and we will have to accept that these Newtonian telescopes of classic design, supplied on a 'Dobson Style Alt-Az mounting', will be referred to as Dobsonian Telescopes! (It's convenient and much less of a mouthful! :o)
Recommended for the beginner if your interest is soley in Deep Sky. The easy use mounting and easy-peasy set-up is intuitive and natural. At low to medium magnifications these telescopes give great images and can be recommended for beginners.
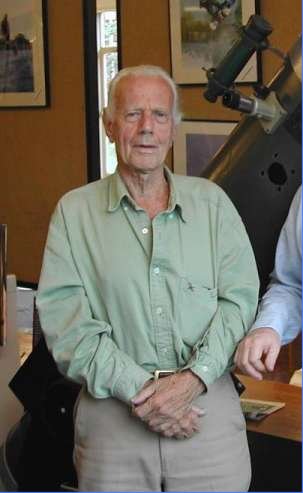
Pic: A shot I took of
John Dobson at the HAW: A 14" Newtonian on the
'Dobsonian Mounting' that I made can be seen behind them.
Although these telescopes are fantastic to use, in
the hands of someone with little experience tracking the object is tricky and high magnifications are impractical. Consequently, planetary observation is difficult for the beginner. I would
respectfully suggest that the Dobson / Dobsonian telescope should be avoided until you get some experience with the easier to use 'equatorial mounting'.
If you see a 'Dobsonian' telescope advertised make sure it's not just a Newtonian on a Dobson mounting, or worse, they're calling it a Dobsonian because it's on an Alt-Az
mounting of simple design! ... To be a true Dobsonian telescope it has to have the thin main mirror supported on the sling type support and it should be BIG!
Call me pedantic, but they're selling you an Alt-Az Newtonian and telling you it's something special... NO.
The whole point John was trying to get across wasn't 'ease of use', if that was the point they would be mounted on equatorials! They were designed to be telescopes of huge diameter built at home
on a shoestring! Mass producing Dobsonians seems to be missing the point entirely.
Anything that isn't huge*, and relatively cheap to boot, isn't really a Dobsonian at all, but a Newtonian 'dressing down' to snare the
unwary!
Don't pay megabux for a Dob! (*By huge I mean 12" 300mm and over.)
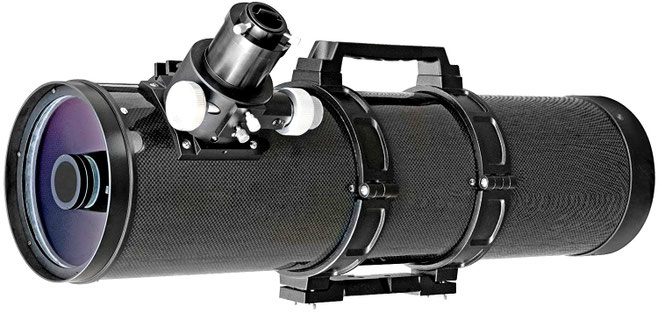
What about Cat/Newt and Mak/Newt Reflectors?
There are a number of companies now selling so called 'Catadioptric Newtonians'. I would suggest that these are to be avoided. The cheaper ones use a
spherical mirror and a negative lens to add focal langth.
They have optically extended focal lengths - So you'll find a short tube but with a focal length of typically 1400mm. (The telescope will look on the outside like a
typical Newtonian f5 telescope, but may state f10). The view in these 'Bird - Jones' telescopes is narrow and unless the mirror is very good the image quality will
suffer.
PIC: Maksutov/Newtonian (Mak/Newt) telescopes, on the other hand, are very nice instruments, though costly. I have yet to come across one on the
second hand market place! (They must be very good!)
There are two types of hybrid: Mak/Newt and Cat/Newt ... The better designed ones (Mak/Newt), which cost £1,000 plus for the smallest and produce
very good image quality, use an optical 'corrector plate' which is a thin optically precise piece of glass at the tube aperture and are consequently 'sealed systems' (See picture) - The Cat/Newt
versions use a Barlow lens in the focuser to extend the primary focal length in a short tube and are not closed optical systems.
The Cat/Newt design is not particularly good, however. This design is also called a "Bird/Jones" optical system and l can't honestly see why anyone
would have designed it that way! Look it up on an astronomical forum when you have a minute (and prepare for abusive talk!)
What the design sets out to do is utilise cheap spherical mirrors and rectify their faults by adding in a corrective lens. The corrective lens, however,
doesn't actually correct anything, rather it compounds the problem and actually makes it worse if anything.
It's like you've got a pair of glasses that aren't right for your sight, but instead of getting some that are, what your optician does is adds another pair of
glasses to counteract the first pair. The light is working twice as hard and has twice as many lenses to navigate. Now, obviously, this might be ok if the lenses were very good, but we're dealing
with a means of avoiding expense... so, you can imagine how good the lenses are.
This is a perfect analogy. They have a cheap and incorrectly figured mirror and add a small and equally inaccurately figured lens to try to make it
better!
Far and away the best solution is to simply use a proper parabolic mirror in the first place. Why manufacturers insist on creating these complications when
the solution is so simple is beyond me!
These telescopes are difficult to collimate, even with a laser collimator, as the extra lens ruins the return light path. The best you can get is an aproximation of
collimation with a catadioptric-Newtonian (Not good enough for optics!).
The best image quality you'll be able to get is by using low magnifications. I used one recently which boasted 1006x magnification as supplied by Bresser
(usually a very good company), but, to be honest, it was all out of useful magnification by 50x. I'm sorry to say that it's a very poor design and it will be useful for only the very basics
of astronomy.
To be fair to the closed tube catadioptric Maksutov/Newtonian telescopes: There are three advantages over the simple Newtonian:
Firstly: The tube is closed by the corrector plate and this eliminates tube currents.
Secondly: A closed system also lessens the tarnishing of the mirror surfaces.
Finally: The secondary cell doesn't need a spider to hold it in place, so there is not as much diffraction of the image (But it's still there
because of the secondary).
Note: Both these systems are catadioptric telescopes. They make the distinction between the two by using the word Mak to show the different layout
only. Any telescope system using mirrors and lenses is by definition 'catadioptric'.
Buyers make sure: The main mirror and the corrector plate must be very good quality as the
optical lengthening of the focal length means that any errors in the mirror or plate are magnified!
A well made quality Maksutov-Newtonian of 150mm could be an excellent instrument for observing the planets. If you're buying new, they will cost over £1,000 for the OTA. If the price is in the
very low hundreds, walk away! If your interest lies in this direction you could consider a Mak/Newt as an option but the accuracy of the main mirror and the corrector plate is
paramount!
The idea is that you get a nice long focus instrument in a much shorter tube. (It certainly isn't to make it simpler to manufacture, or to give better image quality, or to be simpler to use and maintain!)
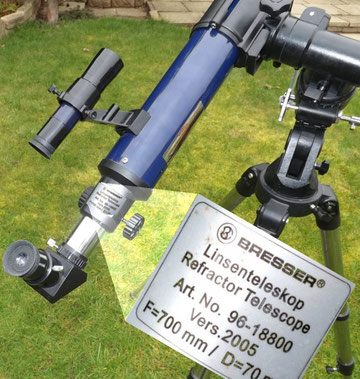
A Word About Telescope Merchandising Codes or Naming Systems:
The codes used by manufacturers to describe telescopes usually relate to the various sizes and focal lengths mentioned above: There is a sort of de-facto system that a bit of logic will unravel.
A telescope called 'StarPlod 70070' will be 700mm focal length and
70mm Diameter.
Pic: This Bresser has a code that doesn't relate to the optical perameters at all and might leave you wondering, but at least the optical perameters are detailed on the label.
One coded 1200/150 is likely to be 1200mm focal length and 150mm Diameter.
60/900, you guessed it, 900mm focal length and 60mm D.
What about a '3003' ? This company is selling a 30" focal length with diameter 3" lens (f10).
Trying to catch us out! Make sure you check any code against the description. Sometimes it doesn't relate to anything! EG: The Meade LX200 is a 254mm
SCT.
Some telescope sellers / companies are:
ONE: Obsessed as their marketing departments are
with magnification - They will advertise a magnification as an AREA compared to normal view. This means where we astronomers would say a telescope magnifies 50x they may claim 2500x Which is 50 x
50 = the difference in the area. This doesn't happen often nowadays, but watch out. You won't be fooled by
this because you know that magnification from 25x to around 150x is all you need for most objects.
TWO: Sometimes they are selling just the telescope without a mounting. You WILL need a mounting, and an equatorial mounting at that! Make sure
it's the whole telescope and the mounting and not just the optical tube assembly ('OTA')... watch out.
So... the telescope that I found called a PlanetViewer F90076 is a Newtonian reflector, with focal length 900mm, and diameter 76mm (2.99") which, as you can now work out is f11.8 (Newtonian f11.8... Eek! Wobble wobble, very dim image, very narrow field of view like looking up a straw!)
Which is a little less than half the recommended MINIMUM size - Which will perform, I'm sorry to say, approximately a QUARTER as well, and 'NEW' would cost you three times as much as the brilliant SkyWatcher 150P EQ3 that's on sale on Facebook Marketplace for £90.
Don't forget that a76mm diameter Newtonian reflector operates, detail wise, as well as a refractor of 3/4 the size - Would you really buy a 57mm refractor to do amateur astronomy? Of course not!
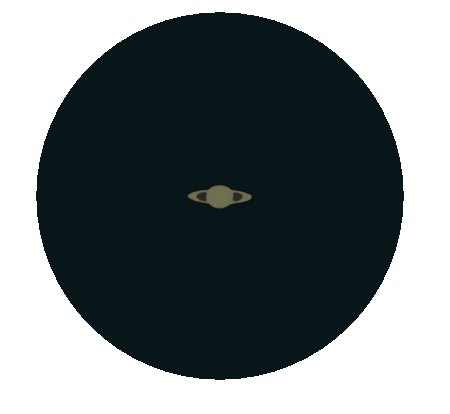
< Smudge Saturn: Close up!
This image is representative of a 76mm (3") Newtonian reflector or a 40mm (1.5") refractor image at 100x.
I JEST NOT dear reader... Please be guided by the voice of experience
:O)
PS:
IF some well-meaning soul has bought you a 'tiny telescope' for a present, and having read this guide you know they have bought you something that will fall short of the ideal. DO NOT WORRY.
Message me and I'll give you some advice.
Owning a tiny telescope is not the end of astronomy, but you have to accept the limitations, for now.
It's not ideal to own a tiny telescope, but there are some projects you can embark upon that will help you appreciate your next telescope and help you to 'see'.
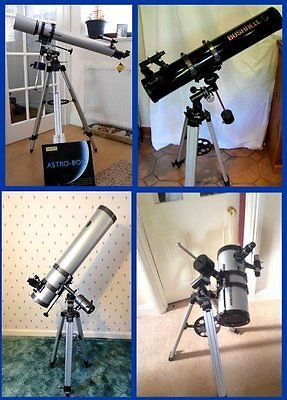
"The Watch-It Gallery" - Who would buy these?
Get to know what a telescope looks like when it is set up. If you come across a telescope that is being advertised somewhere and the 'scope is obviously upside down, or assembled in a totally whacky manner - Please leave it alone!
< See these? You may laugh, and if you don't, you need to learn a bit more about how to set up a telescope before you go buying or trying to use
one!
I hope this guide has given you the essential s of what you need to look for in a telescope. The rest of the website is dedicated to getting the best out of your new instrument.

Check and double check - Before buying:
No answer? Move on, buddy!
I came across this telescope on eBay whilst looking for a SkyWatcher 150mm Newtonian telescope for someone... This telescope was
advertised as a 150P Telescope.
This is NOT a 150mm and it's not parabolic either!
It's a 130mm BK1309
SkyWatcher: To the expert the difference is obvious. To the beginner, you could end up paying rather a lot of money and ending up with something smaller than you require with sub standard optical
quality!
I tried contacting the seller, but no joy. The answer there is to walk away quickly and look elsewhere.
There is a very good reason that so many people are selling their tiny telescopes.
It's because tiny telescopes are no good for astronomy!

IF I CAN BE OF ANY HELP WITH YOUR SELECTION I AM MOST WILLING
TO ANSWER QUESTIONS ON TELESCOPES BY E-MAIL
I will answer as soon as I can and it's no bother – Honestly!
If you buy smaller than the sizes I recommend you will sell yourself short of the experience you
deserve!
SuperCooper
Clear skies and good seeing... I hope this guide has been useful.